Light Painting Photography

For the promotion and progression of Light Painting Art and Artist.

  • Home
  • Blog
  • History
  • Artists
    • Dean Chamberlain
    • Eric Staller
    • Susan Sims-Hillbrand
    • Vicki DaSilva
    • David Lebe
    • Troy Paiva
    • Bruno Mesrine
    • Chanette Manso
    • Patrick Rochon
    • Aurora Crowley
    • LAPP-PRO
    • JanLeonardo
    • Lightmark
    • Arturo Aguiar
    • Pete Eckert
    • Trevor Williams
    • Michael Bosanko
    • Jason D. Page
    • Nocturne
    • Brian Hart
    • Jeremy Jackson
    • Janne Parviainen
    • Jadikan-LP
    • Dana Maltby
    • Lichtfaktor
    • Dennis Calvert
    • TigTab
    • Hannu Huhtamo
  • Tools
    • Light Painting Brushes Starter Kits Introduction
    • Fiber Optics Light Painting Tools for Photography
  • Tutorials
    • Beginner Light Painting Tutorials
    • Light Painting Tutorials by Artists
    • Light Painting Tool Tutorials
    • Kinetic Light Painting Tutorials
    • Light Painting with Fire Tutorials
    • How To Light Paint A Flower
    • Light Painting Photography Tutorial: The Spiked Orb
    • How To Light Paint a Faberge Orb!
    • No More Orb Feet – Light Erases Darkness
    • The Tinfoil Light Painting Technique
    • How To Light Paint A Ghost
    • Electric Orb Light Painting Tutorial
    • Spirographs and Physiograms Tutorial
    • On Camera Light Source
    • Off Camera Light Source
    • Orb Techniques
    • Steel Wool Tutorial
    • Custom White Balance
    • Omnidirectional Light Cap
    • Gel Holder
    • Simple Orb Tool
    • 4 Ways to Add Color to your Plexiglass Light Painting Brushes
    • Driving Shots at Night
    • Wire Wool Spinning
    • El Wire Tutorial
    • Light Stencils
    • Orbs
    • Dome Tutorial
    • Battery Operated Cathode
    • Light Wheel
    • Double Wheel
    • Fire Wall Tutorial
    • Fire Rain Tutorial
    • Smoke
    • How To Light Paint with the Polaroid One Step +
    • How To Focus In The Dark
    • Light Painting Tutorial The Peacock Technique
    • How To Shoot Defocused Fireworks Tutorial
    • Drone Light Painting Tutorial
    • Light Stencil By Trevor Williams
    • Andrew Whyte Dome Tutorial
    • Light Painting Workshop by Patrick Rochon
    • Rob Turney Refractographs
    • SpiroJib by Johnny Griffin
    • Lens Swap Light Painting Tutorial
    • Camera Rotation Light Painting Tutorial
  • Videos
    • Light Painting Documentaries
      • Jason D. Page Documentary
      • Ball of Light
      • Night Photography: Finding Your Way In The Dark
      • Lightpainted Reality
      • SeeMe | In Focus : Pete Eckert
      • Pete Eckert – Dancing on The Edge of Perception
    • Dean Chamberlain
    • Vicki DaSilva
    • Patrick Rochon
    • Lichtfaktor Light Painting Videos
  • Terms
  • Links
  • Connect With Us!
  • About
You are here: Home / Search for "Digital"

Search Results for: Digital

Light Painter Timo Rehpenning wins Gold at the Trierenberg Super Circuit

October 22, 2015 by Jason D. Page

Emergency Exit kl

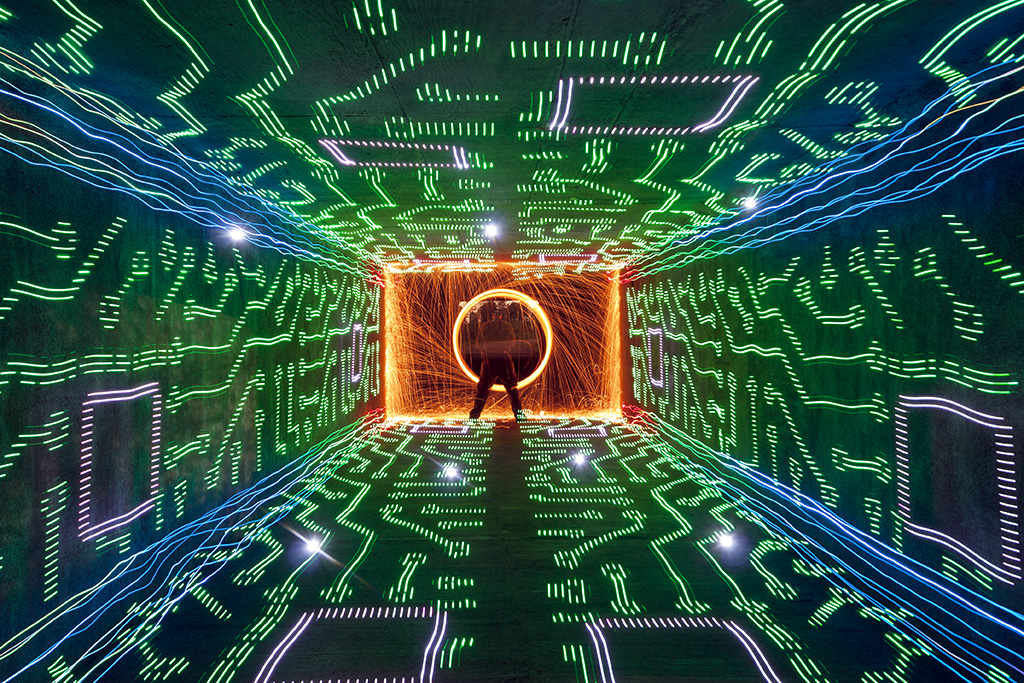
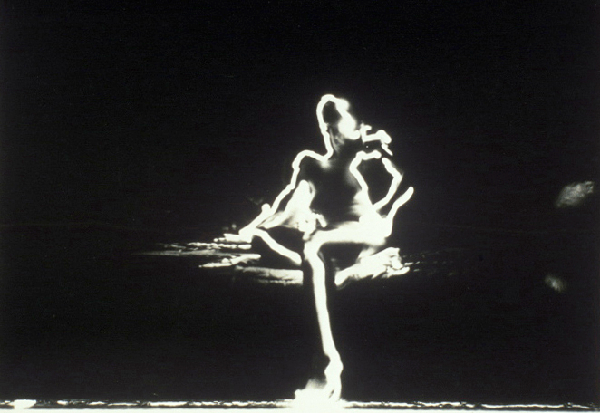
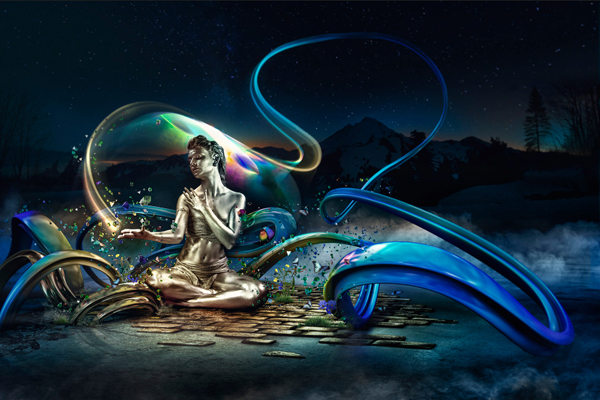
I wanted to catch up with Light Painting Photographer Timo Rehpenning who recently won the Gold Metal for the above image in the category of “Night Images and Artificial Light” at the Trierenberg Super Circuit. Tim says “This is a win for all light painters” bringing more recognition of our art form at the largest photography contest in the world. Read on for all the details…

LPP ∇ Hey Tim Congratulations on your big win at the Trierenberg Super Circuit! It so great to see a Light Painter getting recognized at such a large event. Can you tell me a little more about yourself and how you got into Light Painting.

TR ∇ I have owned a dslr since 2008, until I got hooked up upon Light Painting I shot the usual, regular stuff most likely every beginner in photography shoots – plants, family (kids), all sorts of animals and insects, and so on ;-). After I paused from worklife because of a burn out and depression I tried to do photography a little more seriously and that was the time I stumpled over the works of Jan Leonardo Wöllert and other light painters. I just wondered “how the hell do they do that! A little later I had my first attempts with whoolspins after some tries and some fails, voila I had my first whoolie orbs done, that actually had a proper shape. Lots of experiments with different led lights followed. But it was not enough – I generally wanted to get deeper into photography. The best thing to do seemed to me to join in a local photo club. As it turned out later, I picked one of the most successful clubs in germany.

None of my clubmates had any expierence with Light Painting before and they were a bit skeptical about the images I showed them. In Dec. 2013 I got lucky and one of my images were picked for the LPWA Exhibition in Paris – I guess it was from that moment, people at the club took Light Painting a bit more serious.

LPP ∇ How did you become involved in the contest, did you find out about it through the club?

TR ∇ On regular club meetings there is much discussion about pictures and wether they would might work in contests, on that occassion I first heard about huge contests like “Al Thani”, “Hipa” and of course “Trierenberg Super Circuit”. Some of my clubmates seem to believe in the stuff I did and in early 2014 they convinced me to join a contest called German International Photo Cup, compared to Trierenberg it is a rather small one. I didn’t expect any of my Pictures to be good enough to actually compete but one of them got me my first gold medal and I was hooked. I submitted pictures to other contest and got at least several images accepted and at “Hipa” one of my images even made it to the last judging round.

You got to know, we’re talking about contests that are mostly about classic photography themes like Portrait, Landscape, Architecture, Nature.

Trierenberg however is a bit different, the people behind it are looking for images a bit more artistic than in other contests. That (besides beeing curious) was the main reason I sent in 14 images. The Contest is split into several, so called salons with categories like night photography, nature, nudes, portrait, digital art and so on… That got me a total of 30 acceptances, which alone is a huge honor in such a big contest. There was a total of 110,000 pictures from 110 countries that were submitted, which makes trierenberg truly the world biggest contest – one reason it is often refered to be the oscar of photography!

TR0_7949 kl

LPP ∇ Did you make the image specifically for this contest?

TR ∇ Actually no! After the exhibition in paris I got a call from a local TV station – they asked me about an interview and I created this image for that occasion.

LPP ∇ How did you find out you won?

TR ∇ At the end of the judging phase every particpant gets a notification via e-mail, which tells which picture got accepted. I however got an e-mail wich said I was one of the winners – awarded with the gold medal in the category “Nightlight and artificial light”! I was invited to the gala of photography in Linz. Don’t ask how many times I had to read that email until I finally realized I wasn’t dreaming!

TR0_7969 kl

LPP ∇ What did you win?

TR ∇ Loads of money? “laughing” Well no, I got a nice metal, that looks great in my display cabinet.
TR0_7999 kl
Only the winners of the “Grand prize” get some cash, but for that you have to have your pictures ranked at the top in all salons and different categories as well. I didn’t drive all the way to linz (from the place I live its about 650 km by car) only to get this medal, it was an awesome event and I had the chance to see really great pictures in each category, meet some fantastic people (and all of them crazy about photography, and many traveled half around the globe to join the gala – some of them came all the way from China and Australia) I made some new contacts.

The way I see it – The gold medal I just got is not only a medal for me, its for all Light Painters, the ones that got me into this kind of Art, the ones that pushed me and it is also for Dennis Calvert (thanks once more, mate!!) who developed the technique I used to create my winning picture.

LPP ∇ Congratulations again its a awesome image and a win for all of us, and thank you for taking the time to answer some questions!

TR ∇ Thank you.

LPP ∇ Check out more of Tim’s work on his website and Facebook!

Filed Under: Light Painting Photography

Light Painting Break Down: Johnny Dickerson for Onboard Memory

July 27, 2015 by Jason D. Page

Light Painting Onboard Memory

From time to time we come across a light painting and just stare it wondering how the F@#! did they do that?!?! Break Down is a series if which I only ask the artist one question “How the F@#! did you make this” its up to the artist to tell as little or as much as they want. For this Light Painting Breakdown Johnny Dickerson talks us through how he created the above image titled “Onboard Memory”

So Johnny how the F@#! did you make this?

Originally, I had the idea that I wanted to create a shot where it looked like I was completely immersed inside a computer. The only way I thought that I could it, is to make a “tunnel” of light using the Digital Light Wand (Editor Note: The Digital Light Wand was created by Michael Ross and was the predecessor to The Pixelstick) and have me at the end. I first tried to create it in my backyard with unsatisfactory results.
Light Painting IMG_3210

The walls did not line up like I would have liked, and there was no way to make the ceiling line up right with the walls. I even tried nailing down some string in the ground to give me a straight line to work with. It still was not acceptable with what I had in mind, so I put the idea to the side for awhile.

Flash-forward several months, while out scouting for potential areas to light paint, I came across a bike tunnel that was about 12 feet wide by 8 feet high and about 200 feet in length.
Light Painting IMG_9202

There was not (and still to this day) any lights in there; which makes it perfect to light paint in. It’s completely dark for the most part, except for a warehouse floodlight that spills in a little, but you can shoot further down and avoid it’s light pollution. This is what it looks like when you shoot straight down the middle.
Light Painting IMG_9207

I thought I just hit the jackpot for light painting! Even to this day, I refer to it to my light painting buddies around town as just “the tunnel”, they know. I was ready to try my idea of being immersed inside a computer.

I had a pattern of a computer that I used for the Digital Light Wand and decided to walk down the tunnel against the wall.
Light Painting IMG_9234

By using the walls of the tunnel to walk down, the pattern lined up exactly how I wanted it! I later came to realize how dark it was in there and needed a reference point from where I needed to start light painting. I found a fairly large rock outside and placed it halfway through the tunnel in the corner. So, when I start the exposure, I slowly walk to the rock and start light painting at the same spot every time. For the shot “Onboard Memory”, I walked the Digital Light Wand against each wall, twice on the floor, and twice on the ceiling making 6 passes. Realizing there was nothing in the corners to “connect” the DLW passes, I decided to make a pass with the LEDs on a bike tire (made well known by TCB).
Light Painting IMG_9236

Once I seemed up the corners, I went back to where the rock was and spun some steel wool. To top it off, I created some flares by just shining a flashlight at the camera for a couple of seconds, hoping the flares would line up with some of the computer pattern.
Light Painting Onboard Memory

So obviously this is amazing work but Johnny also sent in a few others that are absolute JAW DROPPERS that were created very much in the same way, check these out!


If you are not following Johnny’s work you are missing out. Be sure to check out his website, his Facebook page for more incredibleness!

Filed Under: Break Down, Light Painting Photography

Ulrich Tausend a.k.a. 1000Lights Record Breaking Light Painting!

May 9, 2015 by Jason D. Page

City of Angels - Ulrich Tausend (1000lights)

At the age of 36 Light Painting Photographer Ulrich Tausend already has some great life accomplishments under his belt. He has owned and sold a successful gaming company, he has helped to organize numerous large scale events, and is currently working at the JFF – Institute for Media Research and Media Education in Munich Germany. Over the last few years Ulrich has set his sites on setting a World Record for the Most People Creating a Light Painting! Recently I had the opportunity to talk to Uli about his record breaking work and his passion for sharing the Light Painting Art Form in his unique way. Check out the interview below…

Roughly 2500 visitors of the re:publica 2015 set the light painting world record. www.1000lights.de/rp15 (C) Ulrich Tausend (1000lights)

LPP ∇ Uli, Congratulations on your wonderful work sharing light painting and your dedication to setting a light painting world record. Seeing all those people light painting together is really something special! Can you tell me a little more about yourself?

UT ∇  Lighting has always been an important topic in my photography. I started with Light Painting some years ago and I really like to explore what I can do with this Art Form.
While it is fun to do orbs and ufos and so on, I prefer to work with people. Most of my light paintings involve people in one way or the other. I like interaction, especially with newbies who don’t know about light painting yet and therefore often have really fresh ideas. It is always exciting to see people experience the magic of light painting for the first time. I am also very involved with education, I love the sparkle in the eyes of students. For the last two years I have been working at the JFF – Institute for Media Research and Media Education in Munich/Germany. I have a history of game design and owned a computer games company before selling it in 2008. Since then I have focused on media education but I am still involved with serious game design. I am a Sociologist.

LPP ∇ Does the name of your website 1000Lights relate to your passion for sharing light painting and education or something else?
UT ∇ My surname “Tausend” means “Thousand” in english. I use 1000lights as my light painting pseudonym.

LPP ∇ Is this the first time you have created a Light Painting on a large scale with many participants, or have you done something like this before?
UT ∇ Two years ago (2013) I organized the Kids Photo Award in Munich. There we first tried out creating an “audience light painting”.

Paket Zuschaueraktion - Kinderfotopreis 2013 Lightpainting Carl Orff Saal  (C) Ulrich Tausend (JFF)

UT ∇ The kids really loved it. *See more about the Audience Light Painting 2013.

In 2014 we repeated the event on a larger scale trying to set an official world record. Making an official record involving many people actually posed to be a bit tricky. Guinness World Records only wrote us about what we actually had to do to get it accepted after the event and their guidelines are pretty tough if you don’t pay to get some one from Guinness involved.

Paket Zuschaueraktion - Kinderfotopreis 2014 Lightpainting Carl Orff Saal 1200px (C) Ulrich Tausend (JFF)

UT ∇ Since then I did several other “audience lightpaintings”. I especially liked the ones at the Ohrenblick Mal 2013 and and Mobile Clip Festival 2014. There we did something a bit more tricky. The people who won the award would freeze and put light on themselves with their smartphones. The others would add drawings.

Paket Zuschaueraktion - Ohrenblick Preisverleihung - Perspektive (C) Ulrich Tausend (JFF)

UT ∇ In 2014 we also had a Pixelstick to “print” the logo of the event.

Packet Zuschaueraktion - mobile clip festival 2014 - Lightpainting (C) Ulrich Tausend / Axel Öland (JFF)

LPP ∇ What a great way to share Light Painting! Tell me about this most recent record attempt. Where was the event held, was it just to break the record or was this also part of some other event?
UT ∇ The world record took place at the re:publica conference about digital society. For the conference I handed in a proposal about new computer aided light painting techniques and I also proposed to set the record during the closing ceremony. Both proposals were declined. I also had another proposal for using Minecraft in Schools which was accepted so I went to the conference. The Minecraft session was pretty cool. We built our presentation in Minecraft itself which was a topic on the conference. I talked with one of the organizers of the conference (Jonny Hauesler) about it when the topic of light painting came up. He found it really interesting and asked me if we could still realize it. That was on the afternoon on 6.5.2015.  At 22:00 he confirmed that they talked to the team and agreed to have the event during the massive closing ceremony on the next day!  Incredible how flexible and open they are but that meant I had only couple of hours to prepare. During the night I planned everything. Back home in Munich I have a lot of equipment, but I was in Berlin with only a little light painting “travel” bag. In the morning I bought myself an extreme wide angle lens (Panasonic 7-14mm =14-28mm, f4) for my Olympus OMD EM-10. As I wanted the best possible setup I also borrowed a Nikon N800 with another 14mm extreme wide angle. That was actually not that easy as the company wanted a lot of money as security and there was only a little time to get it.

LPP ∇ Woah were you panicking or were you pretty calm because you had done audience light paintings before?
UT ∇ It was a pretty intense situation, but I was not panicking. I had done similar photos before, only on a smaller scale. I was pretty well prepared (considering the short time frame). My colleague Maximilian Vilser (who controled the pixelstick) also helped a lot. Also Lilian Kura and her friends were really nice. She is a professional writer and checked over my tweets to announce the event and she and her friends really spread the word. To give you an insight into what we thought about, only an hour before the actual photo took place we stopped a plan to get the camera to a even more elevated position. We would have either used a high ladder or even a lifting ramp, but both possibilities seemed to be too unstable to get a steady shot. Also it would have lengthened the event and I was a bit worried to tumble from the ladder with 2500 people watching me.

LPP ∇ Yes that would not have been good, lol. What about the lights for the participants, did you supply the lights or did they just use what they had available?
UT ∇  As I was traveling and not expecting to do a world record attempt I only had 10 lights with me, several helping angels distributed these. But 98% of the lights present were smartphone-flashlights from the audience. With more time to prepare many more people would have taken their own colored lights with them or I could have provided more colored lights to add more texture. You can see my pixelstick on the back left side of the picture writing the tag of the event #rp15lights. We did not know how many people would be at the event, so we wanted to close a gap in the back. But directly before the event more and more people came in and it was really packed. So the Pixelstick is partially blocked by people.

#rp15lights - light painting world record at the re-publica in Berlin - (C) Ulrich Tausend (1000lights)

LPP ∇ How many people were actually involved in this image?
UT ∇ From what I heard 2500 people fit into that stage as you can see the stage was full when the event took place.

Copyright: re:publica/Jan Zappner

LPP ∇ WOW! How long was the set up, how did you explain the light painting process to all 2500 people, sometimes it is difficult to get 1 or 2 people to understand the Light Painting process.
UT ∇ During the closing ceremony I briefly explained what everybody had to do (take lights and move them or try to draw something). There were two short pauses before the closing ceremony which I used to try out the camera set up and we were also able to dim the lights for a moment for one test photo. I also had someone help me and press the shutter on the second camera.

LPP ∇ How long was the actual exposure for the image? Did you only have one take or several?
UT ∇ We did two takes, both from two perspectives. The exposure for both times were just 10 seconds and that was it, no retakes possible. I then ran back to the tech guys, cropped the photo in lightroom and they put it into their presentation. 12:00 minutes after the the shot it was presented on stage:

LPP ∇ Obviously you were not able to have a Guinness Representative because of the very short notice so are you going to submit this to try and get the Official record?
UT ∇ I am waiting for the video and some more photos from the front to try to hand in with them.

LPP ∇ I am sure I speak for all of the light painting community when I say WE HOPE YOU GET IT! One last question, what is it that drives you to share Light Painting in this way?
UT ∇ It is a combination of many things: Getting to know light painting astonishes people, it often sets a creative spark in them and is a lot of fun. Spreading the word of Light Paiting is my little humble way to make the world a slightly better place. Just seeing how the people react, they love it. It is pretty cool to stand in front of a huge crowd all waving lights.
But probably most important is that it fits in my own way of doing art. I like to bring people into situations where they have a feeling they never experienced before or do things they never thought of beforehand. In a way you could say that I like to manipulate people through art to discover and grow. Some will criticise events like this and question its artistic value. Instead of few doing professional light painting in a very planned and high quality way, it is many fresh minds trying it out without previous preconception of it. It is something unique which I think you can’t judge with usual quality standards which you apply to other light paintings. For me it is art nevertheless – or you could say it is art especially because of that difference.

LPP ∇ Is there anything else you would like to add?
UT ∇ The event itself was filmed but the video is not yet online. Several people filmed from within the audience. You can find some videos and other coverage on my page 1000lights.de/rp15. The tag of the event (#rp15lights) went trending (most tweeted) in Germany straight away. You can find more of my light painting pictures on 1000lights.de and my Facebook page.

In addition to the “audience light paintings” I have some other light painting specialities: – Again I like to interact through light painting with people who don’t have experience with it yet. That especially works well, if the people can see how the photo is coming along, while they are shooting it. – I experiment with my pixel stick and other programmable lights. The QVED Conference and the Mobile Clip Festival 2014 are nice examples for that.  I am also working on live light shows with a VJ. but we still a way to go there.

LPP ∇ Thank you very much please keep up the incredible work!
UT ∇ Thank you very much.

Here is a little teaser video from the event until we can bring you the full version.

Filed Under: Light Painting Photography, Light Painting Video

Pixelstick Review by Ian Hobson

September 24, 2014 by Jason D. Page

Pixelstick-Review
Unless you have been living under a rock or in a comma for the last year you have probably heard of the light painting tool called The PixelStick. The Pixelstick is that light painting tool that looks a lot like Michael Ross’s Digital Light Wand created around 2010, huh hummmm… The Pixelstick received mass exposure and raised nearly 6 times its Kickstarter funding goal, a total of $628,417.00 to go into production! That was in December of 2013, well just about a month ago veteran Light Painter Ian Hobson got a hold of one of the first production models. Ian was kind enough to put The Pixelstick through its paces and write an in depth, honest and impartial review to let us all know if its worth the $325.00, check it out below.

Images and words by (Ian Hobson)
I have no axe to grind, nor am I an evangelist for fancy tools, but I am passionate about light painting. I want to share my thoughts with others who take the artform seriously, and are not simply looking for a ‘magic bullet’ style device to turn them into spectacularly competent light painters overnight. So by writing this, I’m doing nothing more than calling it how I see it. I’m not sure how well kickstarter projects usually do, but Bitbanger Labs must have been pretty pleased with how their second one turned out. It seemed that almost as soon as they’d set up the kickstarter for the Pixelstick, it had exceeded it’s required target and was set to become a real product. Now it is a real product, and is one of very few commercially available dedicated light painting tools.

Is It Worth The Money, Light Painting

Is It Worth The Money

For those of you who are unfamiliar with it, the Pixelstick is an array of 200 addressable RGB LEDs. This means each LED can produce almost any colour, and each one can be instructed to flash on and off at a particular speed and colour sequence. With the right set of instructions, the LEDs can be used to mimic the pixels of a bitmapped image, so as the Pixelstick is moved through space, the LEDs effectively ‘draw’ the bitmap in midair and can be captured during a long exposure photograph.

As a concept, this is not new. The first such light painting tool appeared a few years ago and in January 2010, pioneering work by Mike Ross (TxPilot on Flickr) used the open source Arduino platform to send the instructions to the LEDs. ( Mike’s first example of this is here: https://www.flickr.com/photos/txross/4268235686)
At the time, this required some tricky manipulation to generate the code to ‘paint’ a bitmap, and the hardware had to be self-assembled. The amount of technical effort made doing this quite a headache, and despite Mike’s excellent online tutorial describing how to build what he dubbed the ‘Digital Light Wand’ many people who were keen to try it, were put off by the headache inducing complications of self-build.
Subsequently, other versions of the concept were tried, such as the LightScythe by ‘Mechatronics Guy’ in Australia, and more recently electronics component suppliers Adafruit have published online tutorials on using the latest versions of addressable LED strips with Arduino and Raspberry Pi platforms. But this still requires the user to self-build, and this puts a lot of people off.

Bitbanger Labs filled the gap in the market in October 2013 when they launched their kickstarter project to produce an ‘off the shelf’ version of this concept. Happily for them, they reached their target with 5 weeks to spare, and the Pixelstick went into production in early 2014, and started shipping in the late summer. Bitbanger are marketing it as a game changer, claiming it will ‘Change the way you take photographs forever’.
So does it live up to the hype?

The Parts Unboxed

The Parts Unboxed

The main thing that stands out is the Pixelstick is pretty much plug-and-play. There’s no mucking about with soldering irons, no banging your head at a screen trying to program arduino code. There’s minimal assembly, slap a bitmap onto an SD card and away you go. For those who aren’t sure how to manipulate a bitmap, Bitbanger provide a few pre-loaded test patterns that don’t even require an SD card, and they also have a few pre-prepared bitmaps for download from their site.

Another major consideration that formed a large part of the pre-release update emails for the Kickstarter is the build quality. Bitbanger seemed quite determined that they would produce a robust piece of kit. They have used extruded aluminum for the backbone and decent quality plastic to form the control box housing the circuitry. The cables are well sheathed and have durable connections to the LED strips and the control box. Nothing rattles about, the LCD screen displaying the user interface is just about the right size to combine ease of use without being so big it gets in the way. The LED strips are good and bright, being able to shine through ambient light well enough to allow it to be used under moderate streetlighting. The LED strip is in two sections, and they fit together snugly, with an adjustable bracket holding the two sections of supporting aluminium securely together. The control box and the battery holder are both attached to the back of the aluminium backbone by adjustable screw fittings, so they can be positioned anywhere along the length of the device. The central bracket also has a fitting to insert a small length of metal rod which serves as a handle, and a surrounding section of tube allows the stick to be spun around the handle should the user so desire.

So far so good, when assembled, the pixelstick feels solid, but is not so heavy as to be unwieldy. At 1.8m length, it’s not something you’d wave about easily like a lightsaber, but there is the option of using only half the LEDs to create a more manageable tool, and it works perfectly well in this configuration if you need to fit it into small spaces where the full length would be a hindrance.

It stands up well to being spun about in a circle

It stands up well to being spun about in a circle

The big winner for me though, is the interface. I’ve used a few variations of self-build Arduino Digital Light Wands, and whilst the current state of the art versions using the adafruit SW2012 Neopixel LEDs have the edge over the pixelstick in terms of image quality, they suffer from less accessible interface. In short, it’s awkward to change from one bitmap to another, or to alter the speed at which the bitmap is displayed by the LEDs. This is where Bitbanger have come up trumps.

The Pixelstick interface is intuitive, being simple to use yet also comprehensive. It allows to user to easily select from the bitmaps loaded onto the SD card, and has a number of other features that indicate the designers did some serious thinking about what light painters would want to do with the device. It allows you to alter the speed, brightness of the bitmap with ease, there’s an option to repeat the bitmap up to 99 times, or even reverse the left-right direction by which the bitmap is displayed. There’s an option for a timer delay, so the LEDs will wait for the prescribed number of seconds before lighting up, all of which increase the creative potential of the device. Another aspect of the interface that shows the designers were thinking of functionality is that the buttons are extruded from the control box enough to allow operation in the dark, i.e. with a bit of practise, they are big enough, and well spaced enough that you can feel where they are without needing to see them. The ‘fire’ button which sends the selected bitmap to the LEDs is set apart, and is bright yellow, which is a small thing, but it helps a lot when you’re jumping about in the dark, as does the separate power switch, which is placed on the top edge of the box, where it’s easily accessible, but out of the way so you don’t hit it by accident when operating the device.

A well designed interface

A well designed interface

Another function I have not yet had time to explore fully is the ‘Increment’ feature of the interface. This allows sequentially numbered bitmaps to be executed one after another by hitting the ‘fire’ button. Making it very useful for those who seek to create light painted animations of the bitmaps stored on their SD card. Add to this the nice carry bag (handily sporting a bright yellow interior to make it more visible in dark situations, so you don’t find yourself scrambling about looking for it when shooting), the option for inserting different grades of diffuser in front of the LEDs and the ability to trigger the LEDs via a standard wireless remote control, then there are a good number of positive points to be made about this device.

But it can’t be all perfect can it? No. There are a few issues I have with the pixelstick, because I’m a picky so-and-so.

First off, the handle is wrong. It’s a short pole sticking out at right angles from the main section, and it is fixed centrally, so there’s no option to place it where you as an individual feel comfortable with it. A handle more like a pistol grip would have been a better option, as though this wouldn’t allow spinning, it would make it a lot easier to pull the stick through the air, and the way the device is designed, the two types of handle could easily be interchanged.

In terms of the quality of the images it produces, I have no complaints. The firmware interprets 24 bit .bmp files very well indeed. The colours are accurate, and if they seem a bit washed out, then just drop the brightness, or increase your F Stop, and all will be well. The resolution is very good, with 100 LEDs per metre being substantially less than the 144 LED/m available from Adafruits Neopixels, the diffuser compensates to a large extent, and the images do look sufficiently photorealistic. It’s worth putting some dither on tight edged lines in bitmaps though, as I found that the smooth lines from rasterized vector graphics do look a little jaggedy around the edges without a bit of dithering.

Smooth lines need dithering to avoid jagged edges

Smooth lines need dithering to avoid jagged edges

I’m also critical of the SD card slot, it’s tight and holds the card well, but the card sticks out slightly. There’s nothing to stop grit/moisture from getting in around the edges to infiltrate the control box, which could become a problem eventually. A flexible cover like those found on cameras covering the usb slots would have been much preferable. But it shouldn’t be too much trouble to make one from Sugru or even just a bit of tape will be better than nothing. A raised plastic ridge around the slot would have been a good thing too, as I’ve noticed a tendency for the card to release when the device is laid down on that side. As the card hits the ground first, it springs out as if you were pushing it with your finger to get it out. A ridge would prevent this.

Out and about at the beach, sand or water could get into the control box

Out and about at the beach, sand or water could get into the control box

One last niggle. The firmware seems to ignore trailing or leading black pixels in a bitmap. So if you have a 200px wide black bitmap with a small white dot in the middle, when you hit ‘fire’ the white dot will appear at the edge of the image displayed by the LEDs. I assume there’s a workaround out there, presumably by using a line of pixels that are 99.9% black, but not entirely, so that the firmware doesn’t ignore them, but they’re not bright enough to show up on camera.

In conclusion, the Pixelstick is a decent bit of kit. It’s not a game changer in the way that had been suggested before it’s release, as it’s not offering anything substantially different from the functionality already on offer from it’s precursors, to whom it undeniably owes an unacknowledged debt, and which can be created for a fraction of the price. But if you’re not keen on making your own tools and you’re prepared to shell out the cash, it will offer hours of fun and increase the creative opportunities for light painters.
Other reviewers, perhaps less immersed in the world of light painting have declared it to take long exposure photography to the next level and that it’s the best light painting tool they’ve seen well, that’s a matter of opinion.
For light painting snobs such as myself, the lack of skill required to employ it in it’s most basic form means that the novelty could wear off pretty quickly. But it also means that the creative challenge to use it in ways that go beyond simply dragging a bitmap through the air is worth taking into consideration.
One thing I can confidently state is that it lives up to my expectations, I didn’t expect it to revolutionise my light painting, but I did expect it to be worth the financial outlay in terms of it’s quality of construction and operation, and it is. Above all, I hope it’s success as a business project will inspire other manufacturers to realise that there is a vast untapped market for quality light painting tools out there.

Bottom Line: It’s a good piece of kit and does the job well, but you could make one yourself for less cash.

Fruity Oaty Pixels

Fruity Oaty Pixels

(LPP Admin NOTE)
One other subject that should be noted are the incredible opportunities Pixelstick offers in the field of stop motion animation using its ‘Increment’ feature as seen in the video below, create by Bitbanger Labs. Check it out and to get your own head on over HERE.

Filed Under: Light Painting Photography, Light Painting Video

The Light Lasso by Joerg Miedza

September 20, 2014 by Jason D. Page

Joerg Miedza Light Lasso 9


Sometimes is go to go back to the basics. Going out and shooting with just a single light and a camera can be the most refreshing form of light painting. Think of it as getting back to your roots before all the Digital Light Wands and Pixel Sticks. In this new film by Light Painting Photographer Joerg Miedza the goal was just that to get back to the basics. Entitled “The Light Lasso” Joerg describes the work as “Back To Basic – one light, one man, one location” although there are a few different lights used and a couple of locations you get the point. Its a beautifully simple light painting film that is comprised of 2987 still images and was not so simple to make.

Joerg says “It´s hard to do a 100% perfect round circle in a real performance, so you can see the sequences are hopping a little bit. You have to move exactly to end on 360° where you started at 1°, is very tricky. That´s light painting as I know it, it need´s a well prepared and correctly accomplished movement in the dark – if the light painter has moved all fine, the result is awesome. I can tell you, I work hard on perfect movements and the results are getting better and better!”

The film making process was not without a few fails. Joerg says “sometimes my steps were not good enough, sometimes the lamp crashed to a tree or a wall so I would have to redo the production”. In one of the more notable re-takes one of Joerg’s horses walked over in the field to see what all the lights were about… Check out the animated gif of the horse incident and the full Light Lasso film below!
M02-2316_000121

Filed Under: Light Painting Photography, Light Painting Video

Solid Light by Jadikan

August 30, 2014 by Jason D. Page

solid-one-split
A few years ago I met Jadikan at an art show, we were talking about light painting when he pulled me into a back room to show me a secret project he was working on. Jadikan showed me this ancient looking contraption that was like a wooden version of a Viewmaster toy I had when I was a kid. This old contraption turned out to be a stereoscopic viewer! When I looked inside I saw my first ever analog 3D light painting! Of corse I immediately started running away to try and steal it but he caught me so I had to give it back. A Stereoscopic viewer holds an image known as a stereogram. Basically how it all works is you shoot two images of the exact same scene that are at a slightly different angle from one another, when you put them side by side in the viewer your brain turns the two images into one image with extreme depth.

A 3D light painting was a very exciting thing to see for the first time and I wanted to learn more so I asked a bunch of questions, Jadikan was rightfully quiet about the project and just showed me enough to make my mind race. Now thanks to the SOLID-LIGHT Project I have the answers to all those questions that raced in my mind some 3 years ago. Check out the images, interview, and video below.

LPP ∇ I’m sooooo excited to see this project ready for release, tell me what is behind the Solid-Light Project and who is involved?
JLP ∇ The Solid Light Project’s purpose is: To promote 3D pictures/content with an original stereoviewer.
Behind the “Solid One”‘s step, The Light Painting Photography was created by myself and photographer JF Delamarre, the website was made by another friend and the viewer is from me (using laser cutting machine in a Fab Lab)
Jadikan-Stereoscopic-Viewer-1

LPP ∇ Where the idea come from ?
JLP ∇ I have been interested in stereo photography since I discover it. My first attempt was in 2008, when I had a second digital camera available for the first time. A few months later, I met a guy who was practicing stereo photography with an old film camera on medium format.

LPP ∇ Shooting stereoscopic film has to be pretty difficult? How does that work?
JLP ∇ You have to cut the film and display it correctly between 2 pieces of thin glass to be insert in an old steroviewer.
Not an easy job but when you see inside the viewer, it is just amazing how the depth and the detail jump out at your eyes on the 120 inversible film with magnifying glasses.

LPP ∇ What kind of camera are you shooting with?
JLP ∇ So we started to shoot together with his “Stereflektoskop” from the 30’s. From 2009 to 2014, we have learned a lot about 3D pictures and shot rolls and rolls of film (always invertible) at the same time, I found a few other medium format cameras in specialised shops on the internet.
Jadikan-Stereoscopic-Cameras

LPP ∇ How did the project progress into what we see now in the Solid-Light Project?
JLP ∇ As I was started to understand the full process of stereophotography, I wanted to find a way to share thoses 3D works at exhibitions.
Using prints or screens instead of the original film will allow to show easily in different places without the original.
I experimented with different viewers on the market, built a few others by hand and I finally discovered a way to reach my goal of a personal reproducible stereo viewer when I found The Fab Lab network!
Fab Labs are a fair sharing place for computer controlled machines. (laser cutting, 3D printing …)
I went to the closest Fab LAB to start designing a Stereoviewer. It took a few months with different versions to finally present Solid One in a kit – for prints or for using with a smartphone (compatible size).

LPP ∇ How does it work if someone wants to make their own viewer?
JLP ∇ I made the plans available for people want to make their own.
People have 2 choices: Download the .dxf file and use a laser cutting machine to do the job (I use a 3mm thick medium wood for the viewer) or download the pdf, print it and cut it from a 3mm foam board for example. The trickiest part is to find the lenses, I did not find reseller for one piece, so send me an email if you need a sample.
Jadikan-Stereoscopic-Viewer-Cutout

LPP ∇ Whats next for this project?
JLP ∇ The next step of Solid Light is not fully determined, but I have in mind to collaborate with a painter artist to make with “his” 3D boxes. (inside/outside/shape) I also want this tool can be used by other photographers/artists who want to show stereo artworks.

LPP ∇ This is one incredible project and I speak for all of us when I say THANK YOU for all of your hard work and especially for making the stereoscopic viewer freely available for all of us! Anything else you would like to ad?
JLP ∇ I think that this was the right time to make the final touches and launch this project because of the “google cardboard” announcement this summer… (check this out if you don’t know about it)
…Solid One is fully compatible with the Virtual Reality content displayed by google ! 😉

For more info on the Solid Light Project check out the video below and website http://www.solid-light.com/en/ stay up to date with all of Jadikans latest projects on his Facebook page HERE!

Filed Under: Light Painting Photography, Light Painting Video

Susan Sims-Hillbrand

Light Painting by Susan Sims-Hillbrand Westwood - self portrait 1977Susan Sims-Hillbrand began light painting in 1977. She was in a photo class at California State University, Northridge (where she graduated with a BFA in 2-D Art) when her instructor Jerry McMillian assigned the task of creating an unusual self portrait. Susan was throwing around some ideas when her husband suggested “you should try outlining your body with light” that statement sparked the idea of Susan’s first “Penlight” and what would become a lifelong passion. Using a pen with a small light on the end Susan sat in the dark, opened the shutter of her camera and traced her body with the light. Susan says “The outcome was so dynamic I was encouraged to continue on the path and have been doing them ever since.” Throughout Susan’s career she has stayed on the analog path never making the jump to digital. Although her cameras and printing processes have changed over the years, she continues to shoot on film and to this day does her own darkroom developing and printing. In the 70’s Susan focused on her penlights and made photo silkscreens and glass etchings of her images. In the 80’s, while living in NYC, she did a few more penlight photos but started a family and was spending less time with her art. In the 90’s while living in Ohio Susan was commissioned to do some penlights and the spark was reignited. In 2006, in San Francisco Susan learned to color print, from this point on she started doing exclusively color penlights. Susan views her work as a performance and she refers to the end result as Spiritual Landscapes. “They are like a choreographed dance, movie or play on a single frame of film. They tell a story. Still today it fascinates me to know I am in the piece yet you never see me.” Check out some of Susan’s incredible images and read her full light painting photography interview below!  For even more images and information check out Susan’s website http://susansimshillbrand.com


Light Painting by Susan Sims-Hillbrand

Light Painting by Susan Sims-Hillbrand

Light Painting by Susan Sims-Hillbrand

Light Painting by Susan Sims-Hillbrand

Interview conducted by Jason D. Page in 2014

Who is your favorite Light Painting Artist?
Until recently I was not aware there are others who refer to themselves as Light Painters. As of yet I do not have a favorite.

What is your favorite food?
I love the smell, taste and appearance of seasonal farm fresh produce.

Do you create in any other mediums other than light painting? If so what are they?
Yes – mixed media, sculpture and writings.

What is your favorite Light Painting Photography image that you have created?
Although I like all of my images, each one is unique with it’s own story and always a pleasant surprise, I was most pleased with “Transmutation”. It was the first time I mixed day with night and the concept I had worked.

What is your favorite Light Painting Photography image of another artist?
“Picasso Draws a “Centaur”, which I came across shortly after I did my first piece.

What is the most difficult part of Light Painting Photography?
I have an on/ off relationship with the work. There is much to learn about myself through the images. How I do them, the interactions with the subjects and what my expectations are all play a part in the ease or difficulty. I push myself to explore more possibilities within the constraints I have imposed and that can be demanding.

How do you get your Light Painting Photography work seen?
Entering shows – having shows – word of mouth and my website.

Do you sell your Light Painting Photography work?
Yes

Are you represented by a gallery?
No, but recently I had two pieces posted on an online gallery site- YourDailyPhotograph.com

Where can we see more of your work?
On my website – SusanSimsHillbrand.com

What is your favorite quote?
I have two favorite quotes –
“Our deepest fear is not that we are inadequate. Our deepest fear is that we are powerful beyond measure. It is our light, not our darkness that most frightens us.”
Marianne Williamson
“No matter how slow the film, spirit always stands still long enough for the photographer It has chosen.” Minor White

Who is your favorite artist?
There are so many from various time periods and art styles. To name a few – Georgia O’Keeffe, Eva Hesse, Picasso, Gabriel Orozco, John Baldessari, Anselm Kiefer, Chantal Akerman, Darren Almond, Van Gogh….

What is you favorite activity other than light painting?
Being with family and friends having stimulating conversations.

Tell me a good light painting story.
I had a strong urge to use a burning sage stick for my next light painting and to do a totem pole concept. Not soon after this thought I was asked to be apart of 10 photographers photographing the same adolescent boy. “Will 10 photographers provide an understanding of this boy or will we dismantle his identity through so many interpretations?”, that was the question the curator asked.
I did not know anything about the adolescent boy until the day of the shoot. Could not have been a better subject. Turned out he is half Native American and lit sage sticks often with his friends while sitting in a circle during conversations. I usually only do one image but I decided to do more that night. Three images were strong and any one of them could easily represent the request but not once I saw all three together. The curator only wanted one. Realizing if I stacked them I would have the totem pole, a story, concept and three would become one so that is what I did. The bottom image, represented what he did – “Boxer, Wrestler, Referee”, who he was becoming, “Green Aura” and what he can become, “Sempiternal Rose”. The final piece was 10 feet high, 30” across and thick rope framing the sides. The rope ties the piece together and represents the climb we make in life – physically and spiritually.

Tell me a nightmare light painting story.
No nightmares but I have been asked if anything happens to the people I outline.

Have you ever been arrested or ticketed for light painting?
No

What do you say to people when they see you light painting and they ask “what the hell are you doing”?
I explain what I am doing.

Where do you find inspiration for your Light Painting Photography?
I find it everywhere. All of life inspires the creative process.

Who would you like to punch?
There is no one I would want to punch. Might be better to ask what would I punch. Having the desire to punch is an internal frustration of understanding and communication so a pillow or punching bag would be a good outlet.

Who would you like to kiss?
Everyone

Why do you Light Paint?
There is an element of mystery and magic capturing the essence of existence when painting with light. I like the performance aspect. There I am on the other side of the camera entering the scene, interacting with the space and people, using lights to define what is there, and being in the photo yet never showing up, unless it is a self- portrait.

What is your favorite time to shoot?
When I am inspired and that comes in spurts. My favorite time of day is at dusk when colors are intensified.

What is your favorite subject to shoot?
People, nature and urban decay.

Where is your favorite place to shoot?
Outside

If you could travel anywhere to Light Paint where would you go?
To the Northern Lights

Have you ever invented a Light Painting Photography tool? If so what was it and how did it work?
No

Do you ever get sick of explaining your work to people?
I like explaining what I do people are intrigued.

How many times have you heard the word photoshop when someone was describing or asking about your work?
Since I have been doing them before photoshop existed the assumption has always been that I must be manipulating the photo whether in the darkroom or in photoshop. People are always surprised to hear I have not.

What makes you happy?
Simplicity of life’s beauty makes me happy.

What makes you mad?
Being hard on myself can upset me.

What part of Light Painting Photography do you enjoy the most?
The whole process of light painting fascinates me. I get most excited in the darkroom when the image appears and I see the final results.

What part of Light Painting Photography do you hate the most?
There is nothing to hate.

Do you have a website? If yes what is the address?
SusanSimsHillbrand.com

What is Light Painting Photography?
Light Painting Photography is a performance using lights to place emphasis on a particular subject.

Give me some advice for anyone that might like to try Light Painting Photography.
Experiment and see what happens.

Are you scared of the dark?
Not any longer but when I started doing light paintings I was and wrote this about the experience.
“My creative self has brought me through the fear and innocence of darkness.”
It took me a long time for that to come true.

CONGRESO INTERNACIONAL LIGHTART OVIEDO

June 23, 2014 by Jason D. Page

Light-Painting-International-Congress

All I can say is WOW. This is going to be the greatest event ever organized for light painting in the history of the world. The Light Painting International Congress is going to be held July 4th-6th with workshops, exhibitions, talks, and a variety of other events from International Light Painting Artist! The Light Painting World Exhibition will be held July 4th-13th! Every single person in attendance should give a hug, a high five, a hand shake, or something to light painting artist Alfredo Álvarez, a.k.a. Frodo of Children of Darklight, Herramientas Light Painting OnLine shop and Sergey of LPWA for organizing this INCREDIBLE EVENT! Below is the calendar of events so far, check it out but what you really need to do is head over to http://congresolightartoviedo.com to get all of the details.

CALENDAR / SCHEDULE

FRIDAY, JULY 4TH
18:00 – Inauguration I LightART International Congress City of Oviedo – LPWA Special Event (Multipurpose Room, 1st floor). Credentials control.
18:30 – Opening Act
19:30 – 3rd World Light Painting Exhibition. Welcome cocktail (Exposition Hall. Main Floor)
20.30 – Hugo Baptista Workshop ” Crowd-sourcing a bullet-time light painting stop-motion video “(inscriptions mandatory)
23.30 – Collective Artistic photo show. The Gesta Square

SATURDAY, JULY 5TH
10:30 to 19:30 – Light Painting Call (Call First Floor Tent.). FREE ENTRANCE

SPEECHES (Multipurpose room)
10:00 – Door opening and credentials Control
10:30 – RIDERS OF LIGHT: ” Posibilities and alternatives of light painting photography ”
11:30 – DARIUS TWIN: ” Illustrating with light and evolution of style / technique ”
12:30 – Break
13:00 – JANNEPAINT: ” Visual tricks ”
14:00 – Lunch Break
16.00 – FLASHES IN THE NIGHT: ” Flashes of the Night’s night photography ”
17:00 – SERGEY Churkin (Chukos) “What is lightpainting” + “Historical lecture” (presented by Luis Alberto Fdez)
18:00 – Break
18.30 – DANA MALTBY (TCB): ” Digital double exposure. Covering the Lens ”

20:00 – PERFORMANCE ” Kaleido Light Show “(by Cisco Lightpainting and Will Wildnot)

WORKSHOPS (3rd Floor. Rooms 1 & 2)
12:45 – ” LIGHT PAINTING, CREATIVITY AND COMMITMENT “. The Child of Light.
16.00 – ” LIGHT PAINTING BUILDING AND REPAIRING TOOLS “Ivan Barco Tools Lightpainting
19:00 – ” NIGHT PHOTOGRAPHY “. Flashes at Night

21.30 – Dinner and party at La Casona de la Montaña. Video projection, music, exhibition, kaleido light show

23:30 – Workshop: ” LIGHT PAINTING PORTRAIT “. Sergey Churkin
23:30 – Night park walkaround with Special Guests

SUNDAY, JULY 6TH
10:30 – Door opening and credential Control
11:00 – ROUND TABLE DISCUSSION: ” Present, past and future of light painting “(. Multipurpose room Moderator The Child of Light)

13:15 – slide show of Audiovisual Works and photo contest weekend
14:00 – Special mention to the photo contest “YOUR TOWN AS A Lightpainter”

The program schedule ** May change without notice.

Filed Under: Light Painting Photography, Light Painting Video

Chris Thompson’s Awesome Camera Rotation Tool the CRT

May 16, 2014 by Jason D. Page

Peace-Gardens-Rotated


The things that I love most about the light painting community is the constant innovation and the willingness to share new tools, ideas, and techniques. Its so damn inspiring to see people bring ideas out of their minds and into reality and then want to share them with everyone! Chris Thompson, along with his brother Alan, have created an incredible new tool for light painting called the CRT or Camera Rotation Tool. With the CRT and his genius creativity Chris is making some absolutely stunning light painting images! The best part about all this (for you and me) is that Chris is happy to share how he is making these masterpieces and maybe even better is that you can get a custom made CRT yourself delivered to your doorstep! Check out these incredible images and read the short interview with Chris below to find out how to get a CRT.

LPP ∇ Chris you have been creating some amazing images with your custom Camera Rotation Tool or CRT. Tell me a little about this incredible piece of gear, what does it do exactly and what inspired you to make the CRT?

CT ∇ The CRT is a device which allows the camera lens axis to be rotated during a single exposure. The inspiration for making a CRT came from some of the great light painters on Flickr such as Juls Boo, Mart Barras, and LED Eddie; I wanted to experiment with my own style of light painting and camera rotation seemed like a logical next step.

LPP ∇ Who was involved in the creation process and how long did it take to have a final product you were happy with?

CT ∇ My brother, Alan and I worked together on the CRT. I’ve been making my own light painting tools over the years, and having access to my brother’s skills and his workshop full of drills, welders and lathes, it was a no brainer to create our own CRT! Over several months, my very patient brother and I developed many different versions of the device until we came up with the CRT we are using today. The challenge was to create a device lightweight enough to place on an existing “hobby” tripod, easy to use, accurate and most of all, inexpensive!
CRT-!

LPP ∇ What is the CRT made of?

CT ∇ We use a cantilevered 3mm mild steel bracket arrangement allowing the weight to be perfectly balanced atop a tripod. The earlier prototypes were quite heavy so with each incarnation during development we found new ways to take a few more ounces off the weight without compromising strength and stability. I think the last time we weighed the CRT, we were down to a kilo!

CRT-2

LPP ∇ From the images it looks like it mounts to a tripod, does it have a universal adapter that fits most any tripod?

CT ∇ One of the challenges during development was to find a way to fix the CRT to a tripod in the same way as you would a DSLR or digital compact; we soon realized that no two tripod makes were the same. We devised a way to fix the CRT to the tripod adaptor plate regardless of make or model; we supply the CRT with a nut, bolt and washers to enable a quick session with a spanner. We find it easiest if the user purchases a spare, inexpensive tripod adaptor plate to save having to keep removing the CRT from the adaptor plate.

LPP ∇ The images you have been releasing look so symmetrical how do you stop on specific angles or degrees to get the images lined up so perfect?

CT ∇ In the workshop, my brother and I had a Eureka! moment when trying to work out how to gauge an angle. We realized that most modern iPhone / Android / Windows phones have some sort of gyroscopic device built in; all we did was to buy a hot shoe adaptor with a quarter inch thread and fix a phone bracket on top of the camera. It’s easy to create an image with a rotation to less than 1 degree accuracy simply by downloading a free app to the phone. We don’t include these alignment gadgets within the CRT package due to their being so many different phone models out there but these are the parts we would recommend for alignment:

The hotshoe adaptor:
http://www.ebay.co.uk/itm/141047800452?ssPageName=STRK:MEWAX:IT&_trksid=p3984.m1423.l2649

And the phone bracket:
http://www.ebay.co.uk/itm/291027410257?ssPageName=STRK:MEWNX:IT&_trksid=p3984.m1497.l2649

LPP ∇ Can you walk us through how to create an image like “Spider’s Bridge Rotational Vortex” or “Peace Gardens, Rotated”?
Spider's-Bridge-Rotational-Vortex

CT ∇ The CRT is simple to use and speeds up the workflow with camera rotation photography. For the actual photography element I open the shutter on a bulb setting and expose the first part of the rotation for whatever length of time necessary, then I replace the lens cap without ending the exposure, wind the CRT around to the desired angle and then remove the lens cap. Then it’s a case of repeat this until you have your rotation shot. The angle alignment tools I mentioned above definitely help with the accuracy! The one thing you have to get right is the alignment on the subject; it’s best to do a test shot or two before rotating away! One other thing I’ve found is that it’s best to underexpose each part of the rotation by a little so the end result doesn’t look too washed out or overcooked!

LPP ∇ Do you have plans to take the invention further with any modifications or new light painting capabilities?

CT ∇ My brother is often in his workshop busy experimenting with new ways to make the CRT lighter without compromising strength and stability; he’s come up with some great ideas so far and the CRT is constantly evolving! Recently I’ve been experimenting with motion blur and camera rotation to create a more abstract result; the lessons I learn from this may be reflected in the final product! The only limit with the CRT is your imagination!

LPP ∇ Here is the big question… Where can we get one and how much does it cost?

CT ∇ The CRT is available for £150 (about $250.00) plus delivery charges to wherever you are in the world (we are based in the UK). We have a Facebook page, Camera Rotation Tool, where you can find details and the latest photos shot with the CRT. Under development is a new web site, www.camerarotate.com, watch this space! Alternatively, for details and how to pay for the CRT, you can email chris@camerarotate.com

Also there is Camera Rotation Photography on FB to check out.

LPP ∇ Thanks for taking the time to answer a few questions, I really can’t wait to get one myself.

Filed Under: Light Painting Photography

SOOC vs SOOC

March 17, 2014 by Jason D. Page

SOOC-Eric-Pare-1
There has been another spark ignited on the SOOC debate recently, if you don’t know what the SOOC debate is good for you, you may want to stop reading now before you get dragged in…. The SOOC debate is all about should a light painting be “Straight Out Of Camera”, or is some editing of the image OK and if so what does “some” mean… when is it not a light painting anymore? My personal opinion is any photograph is always best to get it right when you shoot it, that is what I personally strive for in my light paintings, but really you can do whatever the hell you want! I just don’t think you should say you created an image entirely in the camera if you added a bunch of layers to it in photoshop or some other digital editing program. I know some LP’s label their shots No Photoshop but tweak them to death in Lightroom, so does that deserve a no PS label?

On the other end of the spectrum, Light Painting Photographer Eric Paré Teamed up with digital artist Mike Campau to create a f@#*ing awesome new light painting project (image above) that is SOOC, (straight out of computer), see what I did there… There is no way an image like the edited version of this one could have ever been achieved SOOC, unless maybe your TCB and even with his skill set it would still be pretty difficult. Because this image is out of the computer does that make the light painting part of it any less awesome?

The debate about if a light painting should or should not be edited will rage for at least a little while longer, but as light painting grows and new projects like this one come out opinions will change, or not. Check out the before and after, the BTS video below that shows how much work went into creating the final image, and feel free to post your thoughts in the comments section so we can all look back and laugh 5 years from now…


Filed Under: Light Painting Photography

« Previous Page
Next Page »

Copyright © 2026 · News Pro Theme on Genesis Framework · WordPress · Log in