Light Painting Photography

For the promotion and progression of Light Painting Art and Artist.

  • Home
  • Blog
  • History
  • Artists
    • Dean Chamberlain
    • Eric Staller
    • Susan Sims-Hillbrand
    • Vicki DaSilva
    • David Lebe
    • Troy Paiva
    • Bruno Mesrine
    • Chanette Manso
    • Patrick Rochon
    • Aurora Crowley
    • LAPP-PRO
    • JanLeonardo
    • Lightmark
    • Arturo Aguiar
    • Pete Eckert
    • Trevor Williams
    • Michael Bosanko
    • Jason D. Page
    • Nocturne
    • Brian Hart
    • Jeremy Jackson
    • Janne Parviainen
    • Jadikan-LP
    • Dana Maltby
    • Lichtfaktor
    • Dennis Calvert
    • TigTab
    • Hannu Huhtamo
  • Tools
    • Light Painting Brushes Starter Kits Introduction
    • Fiber Optics Light Painting Tools for Photography
  • Tutorials
    • Beginner Light Painting Tutorials
    • Light Painting Tutorials by Artists
    • Light Painting Tool Tutorials
    • Kinetic Light Painting Tutorials
    • Light Painting with Fire Tutorials
    • How To Light Paint A Flower
    • Light Painting Photography Tutorial: The Spiked Orb
    • How To Light Paint a Faberge Orb!
    • No More Orb Feet – Light Erases Darkness
    • The Tinfoil Light Painting Technique
    • How To Light Paint A Ghost
    • Electric Orb Light Painting Tutorial
    • Spirographs and Physiograms Tutorial
    • On Camera Light Source
    • Off Camera Light Source
    • Orb Techniques
    • Steel Wool Tutorial
    • Custom White Balance
    • Omnidirectional Light Cap
    • Gel Holder
    • Simple Orb Tool
    • 4 Ways to Add Color to your Plexiglass Light Painting Brushes
    • Driving Shots at Night
    • Wire Wool Spinning
    • El Wire Tutorial
    • Light Stencils
    • Orbs
    • Dome Tutorial
    • Battery Operated Cathode
    • Light Wheel
    • Double Wheel
    • Fire Wall Tutorial
    • Fire Rain Tutorial
    • Smoke
    • How To Light Paint with the Polaroid One Step +
    • How To Focus In The Dark
    • Light Painting Tutorial The Peacock Technique
    • How To Shoot Defocused Fireworks Tutorial
    • Drone Light Painting Tutorial
    • Light Stencil By Trevor Williams
    • Andrew Whyte Dome Tutorial
    • Light Painting Workshop by Patrick Rochon
    • Rob Turney Refractographs
    • SpiroJib by Johnny Griffin
    • Lens Swap Light Painting Tutorial
    • Camera Rotation Light Painting Tutorial
  • Videos
    • Light Painting Documentaries
      • Jason D. Page Documentary
      • Ball of Light
      • Night Photography: Finding Your Way In The Dark
      • Lightpainted Reality
      • SeeMe | In Focus : Pete Eckert
      • Pete Eckert – Dancing on The Edge of Perception
    • Dean Chamberlain
    • Vicki DaSilva
    • Patrick Rochon
    • Lichtfaktor Light Painting Videos
  • Terms
  • Links
  • Connect With Us!
  • About
You are here: Home / Search for "Digital"

Search Results for: Digital

Light Painting Facebook Learning Groups

April 19, 2017 by Jason D. Page

Recently there have been some great new groups created on Facebook specific to particular styles of Light Painting and I thought it would be good to share some of them here. These groups are great places to find inspiration, tips, and most importantly a community of like minded individuals that are happy to help you create your light painting visions. Enjoy.


Ericparelearn.com
The first is one founded by Eric Pare this group is all about light painting with the fluorescent tube guards that Eric has made famous.

Light Painting Brushes Tricks and Tips
This group is run by the Light Painting Brushes Brand Ambassadors and is a awesome group all about creating using the Light Painting Brushes tools.

LightBlading
Founded by light panting pioneer Patrick Rochon this light painting group is specific to the art of using plexiglass light painting tools also known as blades.

Fiber Optic Light Painting
Founded by fiber optic light painting pioneer Maria Saggese this group is all about the incredible effects that can be achieved with fiber optic light painting tools.

Light Paint Lab
Founded by creative madman Dan Chick this group is great for awesome ideas and being inspired by Dan’s cutting edge techniques!

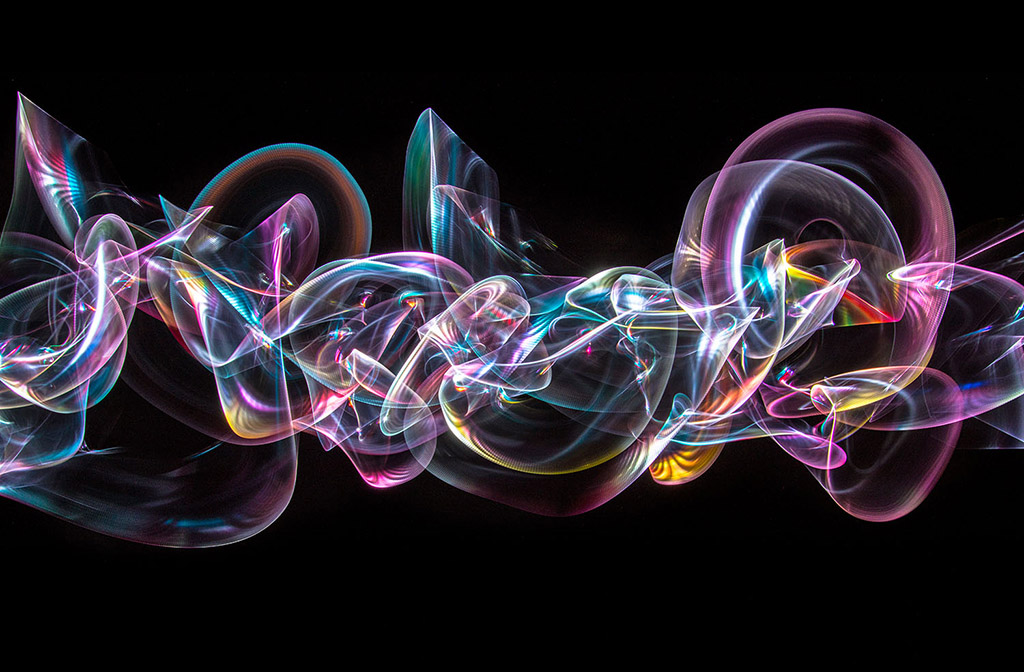
Camera Rotation and Kinetic Photography 
This group is all about creating light paintings by moving your camera! Image above by CRT pioneer Chris Thompson.


Jan Leonardo/Learn
Founded by LAPP co-creator Jan Leonardo this group is for learning and sharing Light Art Performance Photography.

The Official Pixelstick Group
All about using the Pixel stick to create your digital light painting magic.

If you have a Facebook account I highly recommend checking out these groups.


Filed Under: Light Painting Photography

Light Painting Camera Rotation Rig Ideas!

February 18, 2017 by Jason D. Page


Camera Rotation is a form of Kinetic Light Painting Photography where the lights in the scene generally stay stationary and the camera itself is moved to create the design in the final image. Using Camera Rotation you can take a common scene, ↑like the corner liquor store above ↑, and turn it into something extraordinary. If you are not familiar with Camera Rotation Photography there is a detailed tutorial HERE that will tell you everything you ever wanted to know about the subject!

Camera Rotations are generally created using either a custom made CRT (Camera Rotation Tool) or a bulky Tripod Gimbal. Recently over in the Camera Rotation & Kinetic Photography Facebook group Light Painting Artist Juls Boo shared an idea for an interesting off the shelf solution, the full description of how to build it is pinned to the top of the FB group. His solution basically consist of a couple of L-Brackets and an indexing Rotator that is “normally” used for shooting Panoramics. The best part about using the Indexing Rotator is that the angles are already marked for you eliminating the need for a digital level. Below are a few shots of the set up and examples of images created with the rig, as you can see it breaks down really compact to fit in your bag.

This is what it looks like mounted to a tripod.

Here are some examples of images Juls has created using this rig.


The post Juls made sparked others to share their ideas too. There are a bunch of great ideas and solutions that you should check out but one in particular that seemed super simple was what Dan Chick came up with. Dan’s version is basically one Gemtune DH-55 Panoramic Ball Head with Indexing Rotator, With Quick Release Plate & Clamp and two Fotga Universal Quick Release Plate L Brackets. Why two brackets you might ask, well the answer to that is to help center the weight of the camera over the tripod.  Here are some images of the rig and below is a video that Dan made to show how it all works together!


Here are a few examples of images Dan has created with his rig:


Now go get this stuff and build yourself a rotation rig!

Filed Under: Light Painting Photography

Light Painting Photography at PHOTOKINA! Part 1

November 7, 2016 by Jason D. Page

photokina2016

Photokina is the world’s leading trade fair for photography and video imaging. With 983 exhibitors from 42 countries, including every major photography brand, and 191,000 visitors its safe to say its as big as it gets in the world of Photography. The multi day event was held in Cologne, Germany and here is the best part, thanks to the hard work and dedication of Light Painting Legend and LAPP founder Jan Leonardo Wöllert, this year Photokina showcased the Light Painting art form in a big way! There was an exhibition of over 100 Light Painting Artist from 40 different countries, Light Painting Lectures, Light Painting Workshops, and even a Live Light Painting Photo Booth in the Olympus Playground right in the front of the show! Jan Leonardo is a very busy man but I was finally able to talk with him a little bit about the event! Since this was such a grand event I also wanted to get another perspective from a few of the Light Painters that attended the event so I asked Pala Teth and Mart Barras to select one single image from the event and tell me why it was their favorite, that will be PART 2. First up is the Interview with Jan Leonardo Wöllert read on below.

Interview with Jan Leonardo Wöllert:
LPP ∇ Jan first off on behalf of the entire Light Painting community I want to say Thank You! What an extraordinary event for light painting art and artist you created this year at Photokina. Can you tell me more about some of the different light painting events you organized for for the show?
JL ∇ Thank you Jason, 
Together I worked with the organizers of Photokina and many other light painters and friends to created the event “Photokina Event- World LightArt” this included a few different areas:

The Photokina – LightArt Congress (PhoLAC) was held on September 23rd and 24th. 
The Congress was a great event that included live music, laser shows, Ironman & Avengers live, workshops, light painting lectures and presentations, and much more in the Center of Photokina!

We had the Digital Light Painting Exhibition powered by ZEISS On 22 Panasonic screens. One these screens we presented over 100 Light Paintings by artists from 40 different countries! The 100 nominated photographs from the International Light Painting Awards 2016, as well as the winners of the International Light Painting Awards 2015 and 2013. The exhibition area covered 150 square meters and was in the lighting area of Photokina. There was also a chill lounge for drawing a deep breath and enjoying the Photokina experience. The Winners of International the Light Painting Award 2016 were shown along with the winners of the 3rd International Light Painting Award on back lighted pictures. These beautiful illuminated images were produced from the print specialist Daniel Ries!


3rd: As special attraction we had the Light Painting photoBOX direct on the middle boulevard. The Live Light Painting photoBOX was on the middle boulevard in the entrance area of Photokina as a main attraction. It was a part of the Photokina Eventworld too. During the whole photokina produced lots LP artist more than 1000 live light paintings with interested photokina visitors.
01-photobooth

4th: Finally we had a Printed Exhibition of the Light Painting Award – Photokina Special prize winner 2015 Darren Pearson from USA. Whitewall/Hahnemühle print exhibition
darren-pearson-gallery

LPP ∇ WOW that is a lot going on! How many artist participated in the digital exhibition?
There were around 126 artist that were shown in the Light Painting Gallery powered by ZEISS together with the winners of the International Light Painting Award 2016.

LPP ∇ Can you tell me more about the live light painting photo booth, who was creating the portraits for this portion of the event?
JL ∇ Bernhard Rauscher organized the Light Painting photoBOX and hosted them together with Sven Gerard, Gus Mercerat Manuel Köstler. We also had a rich program and international guests, including Darren Pearson (USA), Eric Pare (Canada), Denis Smith (Australia), Mart Barras (UK) and many more. On the photokina opening day Ironman was there in person for photographs.
iron-man-1

LPP ∇ How did you select the artist you brought to the event?
JL ∇ The idea was to bring light artist from around the world together! Eric Pare is one of the fastest growing international Light Painting artist. He and Kim are a amazing artist couple. Denis Smith is the best Australian Light Painter and was the 2nd Light Painting Award winner in 2013, he is also a very successful and professionel light painting artist. Mart Barras is a very creative light painter and well known too. The basis of my sellection was that the selected artists were role models and/or had a very special message, like the great German Artist Sven Nieder and his Stella Polaris story.

LPP ∇ What was your favorite moment from the Photokina?
JL ∇ The “After phoLAC FUN” there was for the whole community a great moment. Organized by Karin Brodowsky and Marcel Panne from Lichtfaktor was a night a full success with a unbelievable Brazilian Barbecue named Rodizio and a lot of beer. This event was planned to be a big Light Painting together but it was much much more. I saw so many faces and people that we spoke to for the first time after a long time friendship online.


The light and fire artist Rene Albrecht did a fantastic fire show. This “After photLAC FUN” was for a great moment for all of us.

LPP ∇ How many people visited the light painting exhibitions?
JL ∇ In all areas we had more than 16.000 visitors. Alone the Light Painting Gallery powered by ZEISS had more than 11.000 visitors at the six photokina exhibtion days. The Light Painting Gallery powered by ZEISS was the biggest international light painting exhibition world wide and a great success.

LPP ∇ What was the most challenging part of the event?
JL ∇ This is funniest part Jason! The most challenging part was my own speech on the Photokina – LightArt Congress. I spoked often about Light Painting at different events but I was never so unendless, dead, and empty. After a few minutes into my speech I lost my concept and was close to crying. The audience was great, they gave me big ovation and helped me in these painful moments. The Photokina “Event World LightArt” and the PhoLAC were planned so big, there was almost too much to be done! I noticed it during the Photokina, It was overwhelming and I slept only 3 hours each night.
01-speech

Another very emotional moment was during the construction of the Light Painting Gallery together with Jörg and Garry from EMD also Anna and me. Garry hurt himself very bad. His middle finger was broken in eight places and between him and I we couldn’t prevent it. He had to go to the hospital and after only 3 hours he was back and continue working with us. Thank you very much dear Garry … you old hard bone.

LPP ∇ Who were the sponsors that helped put all this together.
JL ∇ At first is to be mentioned the Photokina. The Photokina and I were the promoter of the “Photokina Event World LightArt” and from the phoLAC. Without the support, power and believe in the success of the event there would have been no phoLAC. Thank you so much Mrs. Pudlat and Mr. Schmale.

Carl Zeiss and Manfrotto supported and sponsored all areas and helped with organization questions and with money. Thank Daniel Ries from the HQ Print Service delivered the best backlight prints I ever have seen. The fotoforum Magazine produzed together with me the fantastic fotoforum special print with all data’s of the different stages, events and areas. They printed 4000 magazines and they were after 5 days out of print.

Thank you very much dear Martin Breutmann for your help and ideas.
But the biggest sponsors and helpers were the humans: My friends! 
First to mention the good soul and my girlfriend: Anna Leonardo!!! She helped me in moments I was more than down. She talked with people when I hadn’t time for conversation. Anna is my artistic muse and my life. Thank you so much Anna Leonardo to be with me in this difficult times.

Garry Krätz from EMD was the Technical Manager and gave all his power, his event equipment and experience for the PhoLAC and the Light Painting Gallery powered by ZEISS. Thank you very much for your unendless power dear Garry.

Joerg Wurzbacher was the organisator of the Light Painting Gallery and one of the brains behind the phoLAC. Thanks you so much for your help, ideas and for your man-power dear Joerg.

Bernhard Rauscher organized the Light Painting photoBOX and hosted them together with Sven Gerard, Gus Mercerat Manuel Köstler. Not to forget the many Light Painting Artist they showed her talents in the BOX. Thank you so much for your great job guys.

Last but not least the amazing making of and event photographer Chritaian Arne DeGroot for the this wonderful documentations of all these events.

There are so many helpers, sorry I can’t tell every story. So I say thank you so much to: Karin Brodowsky, Marcel Panne, Anton Julmy, Jörg Schmidt, Barney Flashlight, Mafu, Ironman & the Avengers Live, Sven Gerard and all the others great humans they I have forget.

LPP ∇ Again it was a truly amazing event that really benefited the community and the Light Painting Art Form so thank you very much to you and everyone that contributed to making this event happen!

JL ∇ Thank you Jason.


IMAGES Used From Photokina Group Album HERE

Filed Under: Light Painting Photography

Light Painting Photography Contest Winner, May 2016

June 3, 2016 by Jason D. Page

Light Painting Contest 03 May 2016

And the winner for the March 2016 Light Painting Photography Contest is… Christina Salinas! Christina created the super cool winning image ⇧ above ⇧ using light stencils and a multitude of different light painting tools all in a single 196 second exposure. Christina is a Digital Photography teacher in northern California who loves to share light painting with her student, she will be donating all the new gear she receives in her prize package to her school and students! Here are all the steps Christina took to create the winning image:

Step #1: I created a (2) 8.5 x 11 black and white stencils with the Logo design (in yellow) & the Array in Red/orange
Step #2: I then made a light tight, exposure box to hold the stencil.
Step #3: I printed two copies of each stencil, placing them into a sheet protector and placing them on the exposure box, using straight pens to hold in place.
Step #4: Camera settings were set to ISO 100, F 14, Bulb Mode
Step #5: I used a cannon Speedlite flash and covered it with a yellow gel setting it to Manual, full power.
Step #6: I then locked my shutter with a cable release and exposed the Logo stencil using the flash &, and then switched the stencil to the array stencil. For this stencil, I used the Light Painting Brushes red & orange hooded gels exposing the edge of the array with red and orange in the middle.
Step #7: I then used the Godspeed lite blade along the edges of the stencil, moving every few inches around the stencil design.
Step #8: To finish the exposure, I raw processed the image and cropped to an 8×10.
This exposure lasted for 196 seconds.

To see more of Christina’s light painting work you can check out her LPWA profile HERE. For this fabulous creation Christina will receive a LPP prize pack filled with treasures from our sponsors below. Click here to see the current contest theme and find out how to enter to win your LPP prize pack!

Light-Painting-Brushes-Banner

Click here to see the current contest theme and find out how to enter to win your LPP prize pack!

Filed Under: Light Painting Contest, Light Painting Contest Winner, Light Painting Photography

Why is Light Painting so Alive? by Chanette Manso

April 26, 2016 by Jason D. Page

Light Painting by Chanette Manso
In this excellent article written by Chanette Manso, originally published in german by LICHT MAGAZINE-Munich, GERMANY June 2015, she explores the debate of fine art vs. documentary photography in Light Painting. Chanette talks about how her Light Painting work has evolved over the past 20 years and explains why she feels Light Painting should fall into the category of Fine Art.

Why is Light Painting so Alive?

With the popularization of Light Painting Photography over the last decade, it would be timely to reopen the debate started between fine art photography and documentary photography. The root meaning of photography being “drawing with light”; photo comes from photon or light and graph from drawing. The term Light Painting may seem redundant with the meaning of photography, yet it isn’t really because it differs in the way light is used to make an image.

In the early 20th century a handful of photographers such as Alfred Stieglitz or Edward Weston advocated photography as fine art, while another group along with Ansel Adams thought photography should stay sharp and accurate. The first group created a movement called “Pictorialism”, where they chose soft focus for a dreamy atmosphere; while the second group reacted to this with “Strait Photography”, not wanting to imitate.

Yet renaissance painters used the camera obscura to best reproduce on a flat surface what they could see with the naked eye; just as photorealism and hyperrealism painters in the 21st century made paintings to best resemble a photograph. Considering how many paintings resemble photographs and how many photographs resemble paintings, the idea of imitation has a new appeal, especially in our day and age of computer imaging. However, between light painters the debate between a sharp and a soft focus continues.

The technologies developed around photography have most often been to attain a sharp image, by reducing the time of exposure to light. In the beginning all photography was long exposure just like light painting. Reproductive and documentary photography aims to capture what the naked eye sees, disregarding that all is in movement. Weather close or far, weather still or in motion we can see everything at once in focus. The object of light painting is to capture light and or matter through movement over time. Light paintings often adds or shows what the naked eye cannot see, thus it is a very different way of conveying image and light.

A regular photographer chooses a subject, frames it and then uses natural or electrical light to capture a landscape, a portrait, or an object. Light has a more selective role for light painters. There are three basic techniques in light painting that each use movement. One is where the artist reflects moving light onto matter choosing what to show or not in a landscape, portrait or object. The irregular movements of light on a subject create a painted look. If the subject moves it becomes blurry, if not the subject will appear sharp but soft. Another technique is to move the light source directly towards the camera, making light drawings or light streaks. What light shapes to make remains the artist’s choice from improvisation to light choreography. The third movement possible is that of the camera itself on a fixed light source, creating a light form, which is more difficult to control. There are more light painting techniques evolving all the time with each light painter testing, experimenting and inventing to portray their vision of life.

As a light painter of twenty years I have watched light and matter dispute their place in my images. I remember being captivated by a photograph called, “Mafia Spaghetti”, a black and white portrait of a mafia guy covered with threads of light looking like spaghetti. I kept wondering how I could see the man perfectly still at the same time as the movement of light traces from Christmas lights above. “Open Flash” was the term explained to me for setting off a strobe light to fix the matter or man while keeping the camera shutter open to record the movement of the hand-held camera. Inspired by this, I experimented dancing with tiny light bulbs on my fingers, thus discovering how human movements can make light circle, figure eights, and spirals. The streets of Paris became my open studio, including the Moulin Rouge, train stations and along the banks of the river, La Seine. I liked postcard views of the city and had fun adding light graffiti, words or one-line drawings to the scenes. These early light painting included urban settings, a visible model and light streaks. Today these may be categorized as street art; I prefer to call it streak art in reference to the light.
1991_chanette__paris-pomme

I used more light and less matter by moving into the studio, where I hung a black backdrop, a blank slate, a door to imagination. Working in the dark allows for a multiple exposure effect in one shot similar to using computer software. The main difference being live is you can’t back up, part of the light painting challenge. Even more so when working with film than with digital where you see the results immediately, take more pictures and evolve more rapidly. My light painted editorial shots for fashion, sports and portraits in San Francisco were based on strobe lighting with a recognizable subject matter. Soon after, I became fascinated with light as matter, light as content and less highlighting product.

Covering themes that mirror life reflections, I explored my Cha silhouette technique, where I would photograph only light while using the human body as empty space to structure the light shapes. I felt that pure light painting with no matter was closer to my imagination, to my feelings and thus I could express so much more than with regular photography or than with my first light paintings. During this period I focused on such series as, «Balancing Act», «Spreading the Wings», «Releasing the Ties», «Transformation», «Eternal Renaissance of the Adult Woman» and «Inkblots».
2007_chanette_manso_inkblot7

Recently, I have been developing a light painting that tends towards a more organic feel than some previous work. My Body Light involves light reflective body painting combined with light painting. The human body is no longer a structuring empty space, but becomes the moving light source or «light brush» itself creating softer more impressionistic subjects against the sharpness of light filled backgrounds. I particularly like the contrast between the soft and the hard in many of these works. Fuzziness evokes fuzzy feelings in mysterious ways, whereas sharpness tends to trigger intellectual reflection.
2015_chanette__neyteri_grooming

I find conventional photography uses light to catch only an instant of life, while light painting uses light to encompasses time through space thus closer to real life. Light painting with unlimited imaginative expression is more apt to produce an emotion and fall within the realm of fine art.

About the author
Chanette Manso is a French-American artist, now living in the South of France. Her light painting choreography stems from two life long passions, dance and photography.  “The energy behind my direction comes from my interest in how movement creates image and how image can play a role in culture.” See more at ChanetteManso.com

WHAT ARE YOUR THOUGHTS ON ALL OF THIS? WRITE IT IN THE COMMENT SECTION BELOW. 🙂

Filed Under: Light Painting Photography

Camera Rotation Light Painting Tutorial

Camera Rotation is a Light Painting technique that falls into the category of Kinetic Light Painting. Kinetic Light Painting means that the lights in the scene generally stay stationary (although they don’t have to) and the camera itself is moved to create a design within the frame during a long exposure photograph. Camera Rotation is exactly what it sounds like. The camera, while attached to some sort of device, is moved in a 360º motion during a long exposure, This process can create absolutely mind boggling geometric madness from the most mundane of subjects. The history of this technique can be traced back to 1953 and image below from Photographer David Potts.
David Potts Hennessy Neon Signs Piccadilly Circus London

David was widely recognized for his black and white documentary style photography when he began creating his colorful works. David said “Very simple. I wanted to explore what the available colour films would do.” These works slightly predate the elegant colourist compositions of legendary fellow LIFE photographers such as Ernst Haas. In his 1953 image Potts transforms the familiar London landmark into a swirling mandala of colour. “I had a Linhof 5×4 view camera I had bought from Max Dupain with a [film] back that rotated 360 degrees. I simply wanted to see what using the camera’s movements – turning the film around – would do [to Piccadilly Circus] during a long exposure.” (source)

Jump forward 63 years to now and this technique is still pretty rarely used. For this article I interviewed, Juls Boo, Jelle Schuurmans, Chris Thompson, and Johnny Dickerson a few of the Light Painters currently pioneering this lesser known technique to see exactly how they are creating their incredible Camera Rotations. Each of these Light Painting artists shared advice, the gear they use, and even walk us through how they created their favorite images so if you are inspired or gain some knowledge please let them know with a high five, a follow, and/or a thank you.

(NOTE: As with the Lens Swap article the information in the first portion is an abbreviated and combined version of the answers given by the Light Painting Artist listed above. At the bottom of the page you can read the full interview answers from each Light Painter)

INSPIRATION:
First let me give a little background of how each of these Light Painters started creating these types of images. Juls and Jelle both started rotating their images in 2012. Chris began creating his camera rotation light paintings in 2013 and Johnny in 2014. The inspiration to start doing camera rotations for both Jelle and Jules came from necessity. Juls lives in Paris, which is a pretty bright city, the lack of dark areas was forcing him to look at spaces differently to create his light paintings. While walking around the city one night he was struck with inspiration of creating rotated images.
Camera Rotation Light Painting Tutorial Juls Boo IMG_8665

Jelle’s inspiration was also born from necessity in that he had visualized an image that he wanted to create, but didn’t know how to do it. He was experimenting with double exposures when he got the idea for “Tunnel Frenzy”. To create the shot below he had to find a way to rotate the image around the lens axis to get this effect he wanted, so he began experimenting eventually coming up with a rig that allowed him to realize his vision.
Camera Rotation Light Painting Tutorial Jelle Schuurmans Tunnel Frenzy

Chris and Johnny both drew their inspiration from the work of Juls and Jelle. Chris says “I saw a rotated image on Flickr by Juls Boo which I found absolutely fascinating and quite literally ground breaking for me.  It resonated with me and my light painting ‘style’ I was using at the time.” Johnny was first inspired by Jelle’s Tunnel Frenzy shot he says “I was first inspired by Jelle Schuurman’s “Tunnel Frenzy” and having no clue how he lined the train tracks up so perfectly. Johnny was also inspired by Chris Thompson’s early work “with the CRT of just random things around town had me wondering how he did it.”

GEAR:
The tools for creating camera rotations for these 4 artist vary greatly. Juls and Jelle are using custom built CRT’s (Camera Rotation Tools) while Chris and Johnny are shooting with more off the shelf solutions. In true Light Painting innovation Juls took a bike from the trash and turned it into a device to rotate his camera.
Camera Rotation Light Painting Tutorial Juls CRT IMG_0297

Jelle created his CRT (Camera Rotation Tool) from an industrial ball bearing and some strips of aluminum.

Camera Rotation Tool Light Painting Tutorial

If you don’t have the tools, space, time, or knowhow to build yourself one of these rigs thankfully there is a off the shelf solution! Chris and Johnny both use the Beike BK45 Tripod Gimbal that is intended for sports and wildlife photographers using long lenses. By simply turning your camera the tripod gimbal can be used for Camera Rotation.

Camera Rotation Tool Light Painting Tutorial Johnny Dickerson IMG_3093

GETTING STARTED (What to Shoot):
So lets say you have built yourself a rig or bought yourself a tripod gimbal now what? Well you need to find yourself something to shoot. Some of the favorites subjects of these artist are tunnels, bridges, and other everyday objects such as a corner of a building or angular architecture. One of the main things that all of these artist recommend looking for is something that is illuminated and surrounded by dark space. For instance a bridge, pier, or corner of a building. All of these make for incredible subjects for camera rotation, and believe me once you start rotating your camera you will look at the world through different eyes!

Camera Rotation Light Painting Tutorial

LEVEL IT OUT:
Lets say you have found the perfect subject to shoot the next thing you want to do is get everything level. When you set your tripod up you want to make sure that your legs are locked down tight and all the bubble levels are centered.

FINDING CENTER:
Generally speaking you want the camera to rotate around the center axis point of the camera lens. This can be difficult to get exactly right and is not as simple as centering the camera so don’t get frustrated. It is a mostly trial and error process but once you find the center point of a particular lens you can make some marks on your device and tripod to make it easier to find on your next outing.  Below Johnny shows us exactly how he finds center using his Gimbal:

“Luckily my Canon 60D has a flip out screen which makes it easier to see the screen to find the center of the image. I moved the camera up and down until the lens appears to line up with the knob on the Gimbal.”
Camera Rotation Light Painting Tool Tutorial Johnny Dickerson IMG_3092After spending an evening in my living room using Live View and aiming the camera at the lights on my internet modem, I found the center of the lens is just to the left of the white line of my level in Live View.
Camera Rotation Light Painting Tool Tutorial Johnny Dickerson IMG_3095With a silver Sharpie I marked the placement of the Gimbal whenever I choose to take it off, I can place it right where it was previously.
Camera Rotation Light Painting Tool Tutorial Johnny Dickerson IMG_3097Now when I prepare to shoot I use the Live View to adjust where the center of the frame will be.

This is a great way to make sure you are finding center however also keep in mind what Jelle says “My CRT is not perfectly centered at all, and in a way this is something I thought would be a problem, but I found out that a bit off center CRT can give different cool looking patterns compared to a perfectly centered CRT.

SHOOTING AND EXPOSURE:
Now you are ready to shoot. What you need to do is find the proper exposure for your scene, an important thing to remember is that bright spots that overlap will tend to over expose because you are basically doubling up on the amount of light hitting that part of the film or sensor. If you have lots of overlapping bright spots you might need to stop down to find the right exposure for your rotation as your camera is accumulating light. A proper exposure for a static shot might be too bright for a rotation.

Once you have your tripod level, you have found the center point of your lens, and the proper exposure its finally time to start rotating!

There are a few different techniques to rotation the first is simply open the shutter and start spinning, this will create a trail of lights like the image below.

Jason-D.-Page-Light-Painting-Liquor-Store

I spotted the Liquor Store on a road trip and thought it would make for a cool rotation because it was illuminated, on a corner, and it also was surrounded by dark space. I simply open up the shutter of the camera and started rotating.

GETTING PRECISE ANGLES:
Another technique is all about angles. For this rotation you will need some way to measure precise angles during the rotation. For instance say you want to have a 8 stop rotation that means you are going to stop the rotation every 45º. There are a few ways to do this. If your camera has a built in electronic-level/virtual-horizon like Jelle’s D750 then you can use that. If you don’t have a level built in you can attach a Angle Finder like Johnny’s here:

Camera Rotation Light Painting Tool Tutorial Johnny Dickerson IMG_3090

Or you can use your cell phone with a digital level app attached via the hot shoe mount like here:
Camera Rotation Light Painting Tool Tutorial Jason-Page-CRT

Once you have a way to measure your angles you can then stop the rotations exactly where you want making precise movements and geometric pattern in your images. To make images like the examples below you will also need to cover your lens between the rotations. To begin start the exposure with the lens covered at 0º take the cap off and expose for the predetermined amount of time for a proper exposure (say 5 seconds), put the cap back on turn the camera to 45º remove the cap for another 5 seconds replace the cap, rotate and repeat the process for the full 360º rotation. Using the same Liquor store as an example from above these are some different rotations using the lens cap technique stopping on different angles and distances.

Light-Painting-Jason-D.-Page-Liquor-Store

And here are a few more examples of this technique from Johnny, Jelle, Chris, and Juls.

Camera Rotation Light Painting Tutorial

I hope this has given you enough information to get started. Camera rotation is a very rewarding form of Light Painting Photography, the process can create stunning images out of a simple subject. I hope you will give it a try. Some advice from these artist is to be patient, persevere, think outside the box, and just make your life easy and buy a gimbal…

For the next section each of the artist is going to talk about how they created their favorite camera rotations, at the very bottom of the page you can read the full interviews from each artist for even more detailed information.


Chris Thompson Peak-District-CRT-rfs

Chris Thompson
My favorite so far has been during a collaborative shot with another light painter, Tim Gamble, using two tripods.  The main subject in this case, Tim, was focused and composed on Tripod 1 without a CRT, noting focus point, focal length and Tim’s positioning for later.  The camera is then transferred to Tripod 2 with a CRT, this one is then aimed off centre so that the centre of the subject is on the left hand third of the frame when the camera and tripod 2 are located on the right of centre.  This may sound complicated but all we then do is open the shutter on Tripod 2 and rotate the CRT while I spin an LED lit acrylic tube in a drill at the same time for one full 360 degree revolution on the CRT.  The lens cap is then placed on and the camera moved back to Tripod 1, adjusting the previously noted focus, focal length and making sure Tim is on his marker.  I then spin steel wool on a drill behind Tim with more LED lights in the mix.  Hope this hasn’t confused anyone!


Camera Rotation Light Painting Tutorial Juls Boo IMG_2569

Juls Boo:
I love this picture because in it there are all the ingredients I like in light painting. A pinch of urban exploration, light buddies and an environment favorable to share our passion for the light.

This image was shot during a night in a former paper mill. I was with Alexis Pichot and Stéphane Babatasi, I set up my Gyrocam with an old control array of a huge machine in the center of my frame, slightly on the left. Then I show my buddies where we can stand up and each one of us take part in this image by posing and by illuminating. The center of the frame is a little lower than the feet of the models, so they are no overlay.

When illuminating you need to stay focus on the subject and the remaining part of the picture should not be too bright because of the overlays.

Camera Rotation Light Painting Tutorial Johnny Dickerson IMG_1925

Johnny Dickerson:

My favorite so far has been a carnival ride called “Fireball”. Being a ring of light, I was hoping by rotating it 6 or 8 times it would resemble an atom. It didn’t disappoint! I aimed the center of the lens near the edge of the ring of light. I exposed it for about 5 or 6 seconds (counting in my head), lens cap, then adjust the Gimbal 45 degrees then repeat, giving me an 8 way rotation. It ended up being about a 3 minute exposure (in the middle of a crowded Fair) but it was well worth it!


Camera Rotation Light Painting Tutorial. Jelle Schuurmans Tunnel Frenzy


Jelle Schuurmans

My own personal favorite is one of my very first ‘real’ CRT shots I did in 2012, this was the first time it worked out just like I had in my mind and planned.

4 way rotation, 5 exposures in total. 4 times lighting up the inside of the tracks with green, and 1 time with light blue light for the silhouette in the back and spill light on the outer sides of the tracks. The orange is from the street lights above this tunnel.

1- I start with lining up the normal horizontal shot. In this case I set the center focus point on the horizon where the two tracks meet. This will be the overall center rotation point of the final image. I use live-view to check the alignment of the setup by rotating the camera while using a flashlight to light up the scene.

2- Now I set the main camera settings, usually ISO 100 and Aperture 8-11. I do some test shots on how long I have to light up the insides of the tracks with a green flashlight, 10 seconds in this case.

3- Open shutter.

4- Use green flashlight, after 10 seconds I put the lens cap back onto the lens. Now I rotate the camera 90 degrees. Remove the lens cap and expose for another 10 seconds using the green flashlight and put lens cap back on the lens. Repeat this 2 more times. In total you rotate the camera 4 times, ending back in the same position as the first shot. So you will have the base starting exposure, plus 3 exposures each 90 degrees rotated. Put lens cap back on the lens after the last 10 second exposure.

4- Position the camera horizontal again (that was the last rotation). Remove the lens cap for a 10 seconds exposure of a person standing on the tracks, back lit with a blue flashlight. Put lens cap back on the lens.

5- Close the shutter.

6- Check the final image.


FULL INTERVIEWS HERE:

LPP ∇ How long have you been doing Camera Rotation Light Paintings?

CT ∇ I started experimenting with the technique around the end of 2013.

JULS ∇ I started in 2012, but with just a rotation angle of 90°, at that time I was using rotation only with my tripod head, associated with some zooming. At the end of the year I did a picture of the Tour Eiffel I liked it very much and I thought about building something that could rotate 360°.  I don’t have any tools and any competence in engineering I was looking for something simple. From time to time I was thinking about it. In 2013 I built my tools, I called it “gyrocam” from Ancient Greek “gyro” https://en.wiktionary.org/wiki/gyro-

JD ∇ Since the beginning of 2014

JS ∇ In October 2012 I build my own custom CRT
LPP ∇ How did you get started, what was the inspiration? Was there an image in your head that you wanted to make or did you just stumble into by some divine fate?

CT ∇ I saw a rotated image on Flickr by Juls Boo which I found absolutely fascinating and quite literally ground breaking for me.  He may not have been the first to make an image like this but it certainly resonated with me and my light painting ‘style’ I was using at the time.

JULS ∇ Since I live in a very bright city I was often disappointed by the few dark places I can found, so I looked for another technique to do light painting. I get my inspiration from experimenting when I walk at night in Paris.

JD ∇ I was first inspired by Jelle Schuurman’s “tunnel frenzy” (https://www.flickr.com/photos/jelle-s/8139659777/in/dateposted/), and having no clue how he lined the train tracks up so perfectly. Then Chris Thompson’s early work with the CRT of just random things around town had me wondering how he did it. And then the mind blowing shots of Tim Gamble can provide inspiration for any light painter! I’m not so mechanically inclined so once I heard someone say the “Gimbal Tripod Head” works very similar I bought one right then and there!

JS ∇ I was experimenting with double/multi exposures and then I got this idea of a possible shot (“Tunnel Frenzy”) a ‘tunnel with railroad tracks, but then with tracks on the sides and ceiling as well’. I knew I had to find a way to rotate the image around the lens axis to get this effect I wanted, so I started building and experimenting, what ended up in my custom built CRT. After a few test shots with it I finally created that shot I had in my mind, “Tunnel Frenzy”, so I was very happy with this result and that inspired me to continue and experiment even more with light painting photography and tools like the CRT.


LPP ∇ What gear are you using? Gimbal, CRT, or something different?

CT ∇ I am currently using a Beike BK45 Gimbal, a device intended for sports and wildlife photographers.  When I first started out on the rotation journey, I developed, with my brother’s help, a camera rotation tool.  We made several versions, some really “Heath Robinson” contraptions looking back but we finalized a design we were happy with.  For me, my CRT is still the best way to rotate an image.

JULS ∇ I use a trash bike found in the street… During year 2013 I improved it but it’s still the pedaling mechanism of an old bicycle. I mount on it a tripod ball head.

JD ∇ I use a Gimbal Tripod Head.

JS ∇ Custom build CRT, from a heavy duty ball bearing and some metal/aluminum strips. Later I’ve added two heavy metal parts to get it stable and for a more smooth rotation effect.


LPP ∇ I find the most difficult part is finding the sweet spot to get an image centered, how do you get your images centered? Are there any tip you can share?

CT ∇ To start off with an evening’s camera rotation, I fix the camera and align by eye and take a test shot or two and adjust accordingly.  A CRT is maybe not a device for someone with OCD!  On my CRT, I have etched a line on the camera support plate meaning that I am more or less calibrated right away.  In the past, I have used a spacer such as a block of wood milled to the right size and place it along the back of the camera’s LCD screen and align from there.

JULS ∇ I give a try and after a look on the camera back screen I adjust.

JD ∇ Luckily my Canon 60D has a flip out screen which makes it easier to see the screen to find the center of the image. I moved the camera up and down until the lens appears to line up with the knob on the Gimbal.  After spending an evening in my living room using Live View and aiming the camera at the lights on my internet modem, I found the center of the lens is just to the left of the white line of my level in Live View. With a silver Sharpie I marked the placement of the Gimbal whenever I choose to take it off, I can place it right where it was previously. Now when I prepare to shoot I use the Live View to adjust where the center of the frame will be.

JS ∇ My CRT is not perfectly centered at all, and in a way this is something I thought would be a problem, but I found out that a bit off center CRT can give different cool looking patterns compared to a perfectly centered CRT. So in my case I takes more time to align and center and set the right position of the CRT, but nothing that a bit of trial and error cant fix. Otherwise I just go for it and see what happens.


LPP ∇ How do you get everything level, are there some tricks or tips that you can share?

CT ∇ I start by making sure the tripod is level on the spirit level bubble and the legs are locked tight, not likely to move etc.  Before I align the CRT I make sure the camera itself is level using the built in level meter.  Not every camera has a built in level gauge so I find it best to use a smartphone.

JULS ∇ I have enough place to use a tripod ball head to adjust my camera on my pedaling mechanism. Coupled with an old Pentacon 135mm (216mm with my APSC) it’s easier to calibrate exactly my tool and to put the rotation center at the frame center. After calibrating it I often use a wide angle lens.

JD ∇ I use an Angle Finder. They are about $8 at your hardware store. It has an magnetic base which is good, but once you start rotating it around you have to readjust it accordingly. There are apps out there for your phone (clinometer on Android), but I can’t mount it to my camera as it would clip the Gimbal on the 180 degree mark. There are digital angle finders out there as well but they are a little more expensive than what I use. Also wide angle lens tend to be the best. I use a 14mm Rokinon which is also good for rotating because I can lens cap between each rotation and not interfere with the focusing.

JS ∇ My D750 has a built-in electronic-level/virtual-horizon what can be really useful for CRT use. On my old D90 I used a spirit-level connected to the hot-shoe. Besides this I do several test shots in all directions to see if everything is level enough


LPP ∇ What do you use to get precise angles? Is it an app on your phone, a actual level or something different?

CT ∇ I fix a smartphone such as an iPhone / iPod / Android device to the top of the hotshoe on the camera with a couple of cheap gadgets available off eBay.  These smartphones usually have an angle gauge which is accurate enough for the job.  Personally I use an old iPod touch rather than my big expensive iPhone 6s Plus!

JULS ∇ I’m not looking at precise angle, I can only stop my tool with 6 different angles… Since long I have in my mind an idea to improve this but I’m still procrastinating.

JD ∇ Same as above but depending how I want to rotate a subject, I have to split the rotations within 360 degrees. For example a rotation of 4 is every 90 degrees, a rotation of 6 is every 60 degrees.

JS ∇My D750 has a built-in electronic-level/virtual-horizon what can be really useful for CRT use. On my old D90 I used a spirit-level connected to the hot-shoe. During exposure I use small markings on my CRT to know where I have to lock the CRT for the different exposures.


LPP ∇ What is your favorite “Thing” to do a camera rotation of?

CT ∇ I usually prefer to go shooting CRT in city environments and try not to go for the “obvious”.    I look for everyday objects such as a corner of a building or angular architecture and rotate it.  I also like to combine zoom pulling with the CRT at various angles, proper kinetic photography in my opinion!

JULS ∇  I did a lot of tour Eiffel and urban landscape but in fact I prefer the way it looks with people. I realized some family portraits.

JD ∇ Obviously! Light Paint with it! (see img_1824)

JS ∇ I am always in search of the next (personal) thing/effect/challenge so I don’t have one favorite thing to CRT, but I guess my own favorite CRT shots are with tunnel/bridges and the depth and leading lines it can create.


LPP ∇ I know since I started doing these a year or so ago I look at things completely different now. Is there something specific you look for when looking for a place or object to shoot for a camera rotation?

CT ∇ I like to shoot in areas where there may be lights surrounded by dark areas in order to create a cleaner CRT image.  I tend to aim for a corner of a building where I can only see a small amount of subject in the viewfinder and keep all the other areas in the frame dark so I don’t “light paint” or overexpose that part of the frame during the rotation process.

JULS ∇ When I’m in town I pay attention to keep a small dark place in my frame to include “traditional“ light painting. It’s easiest when it’s at the center of the frame since the camera will turn around.

JD ∇ I would say there has to be something bright surrounded by a dark space. So that way, when you rotate the frame the light area will overlap on top of the dark area i.e. campfire and city skylines.

JS ∇ For me a CRT is a tool just like any other, it all depends and how you use it, sometimes the most crazy or weird ideas have the best effect so trying to have an open mind and thinking outside the box is key.


LPP ∇ What is your favorite Camera Rotation that you have ever created and can you walk us through step by step how you created this image?

CT ∇ My favorite so far has been during a collaborative shot with another light painter, Tim Gamble, using two tripods.  The main subject in this case, Tim, was focused and composed on Tripod 1 without a CRT, noting focus point, focal length and Tim’s positioning for later.  The camera is then transferred to Tripod 2 with a CRT, this one is then aimed off centre so that the centre of the subject is on the left hand third of the frame when the camera and tripod 2 are located on the right of centre.  This may sound complicated but all we then do is open the shutter on Tripod 2 and rotate the CRT while I spin an LED lit acrylic tube in a drill at the same time for one full 360 degree revolution on the CRT.  The lens cap is then placed on and the camera moved back to Tripod 1, adjusting the previously noted focus, focal length and making sure Tim is on his marker.  I then spin steel wool on a drill behind Tim with more LED lights in the mix.  Hope this hasn’t confused anyone!

JULS ∇ I love this picture because in it there are all the ingredients I like in light painting. A pinch of urban exploration, light buddies and an environment favorable to share our passion for the light.

This image was shot during a night in a former paper mill. I was with Alexis Pichot and Stéphane Babatasi, I set up my Gyrocam with an old control array of a huge machine in the center of my frame, slightly on the left. Then I show my buddies where we can stand up and each one of us take part in this image by posing and by illuminating. The center of the frame is a little lower than the feet of the models, so they are no overlay.

When illuminating you need to stay focus on the subject and the remaining part of the picture should not be too bright because of the overlays.

JD ∇  My favorite so far has been a carnival ride called “Fireball”. Being a ring of light, I was hoping by rotating it 6 or 8 times it would resemble an atom. It didn’t disappoint! I aimed the center of the lens near the edge of the ring of light. I exposed it for about 5 or 6 seconds (counting in my head), lens cap, then adjust the Gimbal 45 degrees then repeat, giving me an 8 way rotation. It ended up being about a 3 minute exposure (in the middle of a crowded Fair) but it was well worth it!

JS ∇ My own personal favorite is one of my very first ‘real’ CRT shots I did in 2012, this was the first time it worked out just like I had in my mind and planned.

https://www.flickr.com/photos/jelle-s/8139659777

4 way rotation, 5 exposures in total. 4 times lighting up the inside of the tracks with green, and 1 time with light blue light for the silhouette in the back and spill light on the outer sides of the tracks. The orange is from the street lights above this tunnel.

1- I start with lining up the normal horizontal shot. In this case I set the center focus point on the horizon where the two tracks meet. This will be the overall center rotation point of the final image. I use live-view to check the alignment of the setup by rotating the camera while using a flashlight to light up the scene.

2- Now I set the main camera settings, usually ISO 100 and Aperture 8-11. I do some test shots on how long I have to light up the insides of the tracks with a green flashlight, 10 seconds in this case.

3- Open shutter.

4- Use green flashlight, after 10 seconds I put the lens cap back onto the lens. Now I rotate the camera 90 degrees. Remove the lens cap and expose for another 10 seconds using the green flashlight and put lens cap back on the lens. Repeat this 2 more times. In total you rotate the camera 4 times, ending back in the same position as the first shot. So you will have the base starting exposure, plus 3 exposures each 90 degrees rotated. Put lens cap back on the lens after the last 10 second exposure.

4- Position the camera horizontal again (that was the last rotation). Remove the lens cap for a 10 seconds exposure of a person standing on the tracks, back lit with a blue flashlight. Put lens cap back on the lens.

5- Close the shutter.

6- Check the final image.

From my more recent CRT work I like this one a lot, it’s a pretty tricky shot to setup/lineup and I had to come up with to me new technique for creating the “double exposed door effect”

https://www.flickr.com/photos/jelle-s/20807079871


LPP ∇ What is the best piece of advice you can give for someone wanting to give the form of Kinetic Light Painting a try?

CT ∇ My current thinking is that both camera and subject should move during the exposure, the effects can be quite radical and unexpected.  That makes it all the more fun for me!

JULS ∇ This is a creative discipline, it changes the way of seeing our environment. It may seem difficult at first but by persevering it quickly gets interesting results. Simply give it a try!

JD ∇ I would say be patient! It can be labor intensive and easily multiply the length your light paintings, but the finished result will be worth it

JS ∇ Invest some money and buy a Gimbal to begin with (just a cheap one will do just fine) and just start experimenting with it, no rules, no right or wrong, just see what you can come up with and try to go from there.

Camera Rotation Light Painting Photography, A Comprehensive How To Guide.

March 12, 2016 by Jason D. Page

Camera Rotation is a Light Painting technique that falls into the category of Kinetic Light Painting. Kinetic Light Painting means that the lights in the scene generally stay stationary (although they don’t have to) and the camera itself is moved to create a design within the frame during a long exposure photograph. Camera Rotation is exactly what it sounds like. The camera, while attached to some sort of device, is moved in a 360º motion during a long exposure, This process can create absolutely mind boggling geometric madness from the most mundane of subjects. The history of this technique can be traced back to 1953 and image below from Photographer David Potts.
David Potts Hennessy Neon Signs Piccadilly Circus London

David was widely recognized for his black and white documentary style photography when he began creating his colorful works. David said “Very simple. I wanted to explore what the available colour films would do.” These works slightly predate the elegant colourist compositions of legendary fellow LIFE photographers such as Ernst Haas. In his 1953 image Potts transforms the familiar London landmark into a swirling mandala of colour. “I had a Linhof 5×4 view camera I had bought from Max Dupain with a [film] back that rotated 360 degrees. I simply wanted to see what using the camera’s movements – turning the film around – would do [to Piccadilly Circus] during a long exposure.” (source)

Jump forward 63 years to now and this technique is still pretty rarely used. For this article I interviewed, Juls Boo, Jelle Schuurmans, Chris Thompson, and Johnny Dickerson a few of the Light Painters currently pioneering this lesser known technique to see exactly how they are creating their incredible Camera Rotations. Each of these Light Painting artists shared advice, the gear they use, and even walk us through how they created their favorite images so if you are inspired or gain some knowledge please let them know with a high five, a follow, and/or a thank you.

(NOTE: As with the Lens Swap article the information in the first portion is an abbreviated and combined version of the answers given by the Light Painting Artist listed above. At the bottom of the page you can read the full interview answers from each Light Painter)

INSPIRATION:
First let me give a little background of how each of these Light Painters started creating these types of images. Juls and Jelle both started rotating their images in 2012. Chris began creating his camera rotation light paintings in 2013 and Johnny in 2014. The inspiration to start doing camera rotations for both Jelle and Jules came from necessity. Juls lives in Paris, which is a pretty bright city, the lack of dark areas was forcing him to look at spaces differently to create his light paintings. While walking around the city one night he was struck with inspiration of creating rotated images.
Juls Boo IMG_8665

Jelle’s inspiration was also born from necessity in that he had visualized an image that he wanted to create, but didn’t know how to do it. He was experimenting with double exposures when he got the idea for “Tunnel Frenzy”. To create the shot below he had to find a way to rotate the image around the lens axis to get this effect he wanted, so he began experimenting eventually coming up with a rig that allowed him to realize his vision.
Jelle Schuurmans Tunnel Frenzy

Chris and Johnny both drew their inspiration from the work of Juls and Jelle. Chris says “I saw a rotated image on Flickr by Juls Boo which I found absolutely fascinating and quite literally ground breaking for me.  It resonated with me and my light painting ‘style’ I was using at the time.” Johnny was first inspired by Jelle’s Tunnel Frenzy shot he says “I was first inspired by Jelle Schuurman’s “Tunnel Frenzy” and having no clue how he lined the train tracks up so perfectly. Johnny was also inspired by Chris Thompson’s early work “with the CRT of just random things around town had me wondering how he did it.”

GEAR:
The tools for creating camera rotations for these 4 artist vary greatly. Juls and Jelle are using custom built CRT’s (Camera Rotation Tools) while Chris and Johnny are shooting with more off the shelf solutions. In true Light Painting innovation Juls took a bike from the trash and turned it into a device to rotate his camera.
Juls CRT IMG_0297

Jelle created his CRT (Camera Rotation Tool) from an industrial ball bearing and some strips of aluminum.

Camera Rotation Tool Light Painting Tutorial

If you don’t have the tools, space, time, or knowhow to build yourself one of these rigs thankfully there is a off the shelf solution! Chris and Johnny both use the Beike BK45 Tripod Gimbal that is intended for sports and wildlife photographers using long lenses. By simply turning your camera the tripod gimbal can be used for Camera Rotation.

Johnny Dickerson IMG_3093

GETTING STARTED (What to Shoot):
So lets say you have built yourself a rig or bought yourself a tripod gimbal now what? Well you need to find yourself something to shoot. Some of the favorites subjects of these artist are tunnels, bridges, and other everyday objects such as a corner of a building or angular architecture. One of the main things that all of these artist recommend looking for is something that is illuminated and surrounded by dark space. For instance a bridge, pier, or corner of a building. All of these make for incredible subjects for camera rotation, and believe me once you start rotating your camera you will look at the world through different eyes!

Camera Rotation Light Painting Tutorial

LEVEL IT OUT:
Lets say you have found the perfect subject to shoot the next thing you want to do is get everything level. When you set your tripod up you want to make sure that your legs are locked down tight and all the bubble levels are centered.

FINDING CENTER:
Generally speaking you want the camera to rotate around the center axis point of the camera lens. This can be difficult to get exactly right and is not as simple as centering the camera so don’t get frustrated. It is a mostly trial and error process but once you find the center point of a particular lens you can make some marks on your device and tripod to make it easier to find on your next outing.  Below Johnny shows us exactly how he finds center using his Gimbal:

“Luckily my Canon 60D has a flip out screen which makes it easier to see the screen to find the center of the image. I moved the camera up and down until the lens appears to line up with the knob on the Gimbal.”
Johnny Dickerson IMG_3092After spending an evening in my living room using Live View and aiming the camera at the lights on my internet modem, I found the center of the lens is just to the left of the white line of my level in Live View.
Johnny Dickerson IMG_3095With a silver Sharpie I marked the placement of the Gimbal whenever I choose to take it off, I can place it right where it was previously.
Johnny Dickerson IMG_3097Now when I prepare to shoot I use the Live View to adjust where the center of the frame will be.

This is a great way to make sure you are finding center however also keep in mind what Jelle says “My CRT is not perfectly centered at all, and in a way this is something I thought would be a problem, but I found out that a bit off center CRT can give different cool looking patterns compared to a perfectly centered CRT.

SHOOTING AND EXPOSURE:
Now you are ready to shoot. What you need to do is find the proper exposure for your scene, an important thing to remember is that bright spots that overlap will tend to over expose because you are basically doubling up on the amount of light hitting that part of the film or sensor. If you have lots of overlapping bright spots you might need to stop down to find the right exposure for your rotation as your camera is accumulating light. A proper exposure for a static shot might be too bright for a rotation.

Once you have your tripod level, you have found the center point of your lens, and the proper exposure its finally time to start rotating!

There are a few different techniques to rotation the first is simply open the shutter and start spinning, this will create a trail of lights like the image below.

Jason-D.-Page-Light-Painting-Liquor-Store

I spotted the Liquor Store on a road trip and thought it would make for a cool rotation because it was illuminated, on a corner, and it also was surrounded by dark space. I simply open up the shutter of the camera and started rotating.

GETTING PRECISE ANGLES:
Another technique is all about angles. For this rotation you will need some way to measure precise angles during the rotation. For instance say you want to have a 8 stop rotation that means you are going to stop the rotation every 45º. There are a few ways to do this. If your camera has a built in electronic-level/virtual-horizon like Jelle’s D750 then you can use that. If you don’t have a level built in you can attach a Angle Finder like Johnny’s here:

Johnny Dickerson IMG_3090

Or you can use your cell phone with a digital level app attached via the hot shoe mount like here:
Jason-Page-CRT

Once you have a way to measure your angles you can then stop the rotations exactly where you want making precise movements and geometric pattern in your images. To make images like the examples below you will also need to cover your lens between the rotations. To begin start the exposure with the lens covered at 0º take the cap off and expose for the predetermined amount of time for a proper exposure (say 5 seconds), put the cap back on turn the camera to 45º remove the cap for another 5 seconds replace the cap, rotate and repeat the process for the full 360º rotation. Using the same Liquor store as an example from above these are some different rotations using the lens cap technique stopping on different angles and distances.

Light-Painting-Jason-D.-Page-Liquor-Store

And here are a few more examples of this technique from Johnny, Jelle, Chris, and Juls.

Camera Rotation Light Painting Tutorial

I hope this has given you enough information to get started. Camera rotation is a very rewarding form of Light Painting Photography, the process can create stunning images out of a simple subject. I hope you will give it a try. Some advice from these artist is to be patient, persevere, think outside the box, and just make your life easy and buy a gimbal…

For the next section each of the artist is going to talk about how they created their favorite camera rotations, at the very bottom of the page you can read the full interviews from each artist for even more detailed information.


Chris Thompson Peak-District-CRT-rfs

Chris Thompson
My favorite so far has been during a collaborative shot with another light painter, Tim Gamble, using two tripods.  The main subject in this case, Tim, was focused and composed on Tripod 1 without a CRT, noting focus point, focal length and Tim’s positioning for later.  The camera is then transferred to Tripod 2 with a CRT, this one is then aimed off centre so that the centre of the subject is on the left hand third of the frame when the camera and tripod 2 are located on the right of centre.  This may sound complicated but all we then do is open the shutter on Tripod 2 and rotate the CRT while I spin an LED lit acrylic tube in a drill at the same time for one full 360 degree revolution on the CRT.  The lens cap is then placed on and the camera moved back to Tripod 1, adjusting the previously noted focus, focal length and making sure Tim is on his marker.  I then spin steel wool on a drill behind Tim with more LED lights in the mix.  Hope this hasn’t confused anyone!


Juls Boo IMG_2569

Juls Boo:
I love this picture because in it there are all the ingredients I like in light painting. A pinch of urban exploration, light buddies and an environment favorable to share our passion for the light.

This image was shot during a night in a former paper mill. I was with Alexis Pichot and Stéphane Babatasi, I set up my Gyrocam with an old control array of a huge machine in the center of my frame, slightly on the left. Then I show my buddies where we can stand up and each one of us take part in this image by posing and by illuminating. The center of the frame is a little lower than the feet of the models, so they are no overlay.

When illuminating you need to stay focus on the subject and the remaining part of the picture should not be too bright because of the overlays.

Johnny Dickerson IMG_1925

Johnny Dickerson:

My favorite so far has been a carnival ride called “Fireball”. Being a ring of light, I was hoping by rotating it 6 or 8 times it would resemble an atom. It didn’t disappoint! I aimed the center of the lens near the edge of the ring of light. I exposed it for about 5 or 6 seconds (counting in my head), lens cap, then adjust the Gimbal 45 degrees then repeat, giving me an 8 way rotation. It ended up being about a 3 minute exposure (in the middle of a crowded Fair) but it was well worth it!


Jelle Schuurmans Tunnel Frenzy


Jelle Schuurmans

My own personal favorite is one of my very first ‘real’ CRT shots I did in 2012, this was the first time it worked out just like I had in my mind and planned.

4 way rotation, 5 exposures in total. 4 times lighting up the inside of the tracks with green, and 1 time with light blue light for the silhouette in the back and spill light on the outer sides of the tracks. The orange is from the street lights above this tunnel.

1- I start with lining up the normal horizontal shot. In this case I set the center focus point on the horizon where the two tracks meet. This will be the overall center rotation point of the final image. I use live-view to check the alignment of the setup by rotating the camera while using a flashlight to light up the scene.

2- Now I set the main camera settings, usually ISO 100 and Aperture 8-11. I do some test shots on how long I have to light up the insides of the tracks with a green flashlight, 10 seconds in this case.

3- Open shutter.

4- Use green flashlight, after 10 seconds I put the lens cap back onto the lens. Now I rotate the camera 90 degrees. Remove the lens cap and expose for another 10 seconds using the green flashlight and put lens cap back on the lens. Repeat this 2 more times. In total you rotate the camera 4 times, ending back in the same position as the first shot. So you will have the base starting exposure, plus 3 exposures each 90 degrees rotated. Put lens cap back on the lens after the last 10 second exposure.

4- Position the camera horizontal again (that was the last rotation). Remove the lens cap for a 10 seconds exposure of a person standing on the tracks, back lit with a blue flashlight. Put lens cap back on the lens.

5- Close the shutter.

6- Check the final image.


FULL INTERVIEWS HERE:

LPP ∇ How long have you been doing Camera Rotation Light Paintings?

CT ∇ I started experimenting with the technique around the end of 2013.

JULS ∇ I started in 2012, but with just a rotation angle of 90°, at that time I was using rotation only with my tripod head, associated with some zooming. At the end of the year I did a picture of the Tour Eiffel I liked it very much and I thought about building something that could rotate 360°.  I don’t have any tools and any competence in engineering I was looking for something simple. From time to time I was thinking about it. In 2013 I built my tools, I called it “gyrocam” from Ancient Greek “gyro” https://en.wiktionary.org/wiki/gyro-

JD ∇ Since the beginning of 2014

JS ∇ In October 2012 I build my own custom CRT
LPP ∇ How did you get started, what was the inspiration? Was there an image in your head that you wanted to make or did you just stumble into by some divine fate?

CT ∇ I saw a rotated image on Flickr by Juls Boo which I found absolutely fascinating and quite literally ground breaking for me.  He may not have been the first to make an image like this but it certainly resonated with me and my light painting ‘style’ I was using at the time.

JULS ∇ Since I live in a very bright city I was often disappointed by the few dark places I can found, so I looked for another technique to do light painting. I get my inspiration from experimenting when I walk at night in Paris.

JD ∇ I was first inspired by Jelle Schuurman’s “tunnel frenzy” (https://www.flickr.com/photos/jelle-s/8139659777/in/dateposted/), and having no clue how he lined the train tracks up so perfectly. Then Chris Thompson’s early work with the CRT of just random things around town had me wondering how he did it. And then the mind blowing shots of Tim Gamble can provide inspiration for any light painter! I’m not so mechanically inclined so once I heard someone say the “Gimbal Tripod Head” works very similar I bought one right then and there!

JS ∇ I was experimenting with double/multi exposures and then I got this idea of a possible shot (“Tunnel Frenzy”) a ‘tunnel with railroad tracks, but then with tracks on the sides and ceiling as well’. I knew I had to find a way to rotate the image around the lens axis to get this effect I wanted, so I started building and experimenting, what ended up in my custom built CRT. After a few test shots with it I finally created that shot I had in my mind, “Tunnel Frenzy”, so I was very happy with this result and that inspired me to continue and experiment even more with light painting photography and tools like the CRT.


LPP ∇ What gear are you using? Gimbal, CRT, or something different?

CT ∇ I am currently using a Beike BK45 Gimbal, a device intended for sports and wildlife photographers.  When I first started out on the rotation journey, I developed, with my brother’s help, a camera rotation tool.  We made several versions, some really “Heath Robinson” contraptions looking back but we finalized a design we were happy with.  For me, my CRT is still the best way to rotate an image.

JULS ∇ I use a trash bike found in the street… During year 2013 I improved it but it’s still the pedaling mechanism of an old bicycle. I mount on it a tripod ball head.

JD ∇ I use a Gimbal Tripod Head.

JS ∇ Custom build CRT, from a heavy duty ball bearing and some metal/aluminum strips. Later I’ve added two heavy metal parts to get it stable and for a more smooth rotation effect.


LPP ∇ I find the most difficult part is finding the sweet spot to get an image centered, how do you get your images centered? Are there any tip you can share?

CT ∇ To start off with an evening’s camera rotation, I fix the camera and align by eye and take a test shot or two and adjust accordingly.  A CRT is maybe not a device for someone with OCD!  On my CRT, I have etched a line on the camera support plate meaning that I am more or less calibrated right away.  In the past, I have used a spacer such as a block of wood milled to the right size and place it along the back of the camera’s LCD screen and align from there.

JULS ∇ I give a try and after a look on the camera back screen I adjust.

JD ∇ Luckily my Canon 60D has a flip out screen which makes it easier to see the screen to find the center of the image. I moved the camera up and down until the lens appears to line up with the knob on the Gimbal.  After spending an evening in my living room using Live View and aiming the camera at the lights on my internet modem, I found the center of the lens is just to the left of the white line of my level in Live View. With a silver Sharpie I marked the placement of the Gimbal whenever I choose to take it off, I can place it right where it was previously. Now when I prepare to shoot I use the Live View to adjust where the center of the frame will be.

JS ∇ My CRT is not perfectly centered at all, and in a way this is something I thought would be a problem, but I found out that a bit off center CRT can give different cool looking patterns compared to a perfectly centered CRT. So in my case I takes more time to align and center and set the right position of the CRT, but nothing that a bit of trial and error cant fix. Otherwise I just go for it and see what happens.


LPP ∇ How do you get everything level, are there some tricks or tips that you can share?

CT ∇ I start by making sure the tripod is level on the spirit level bubble and the legs are locked tight, not likely to move etc.  Before I align the CRT I make sure the camera itself is level using the built in level meter.  Not every camera has a built in level gauge so I find it best to use a smartphone.

JULS ∇ I have enough place to use a tripod ball head to adjust my camera on my pedaling mechanism. Coupled with an old Pentacon 135mm (216mm with my APSC) it’s easier to calibrate exactly my tool and to put the rotation center at the frame center. After calibrating it I often use a wide angle lens.

JD ∇ I use an Angle Finder. They are about $8 at your hardware store. It has an magnetic base which is good, but once you start rotating it around you have to readjust it accordingly. There are apps out there for your phone (clinometer on Android), but I can’t mount it to my camera as it would clip the Gimbal on the 180 degree mark. There are digital angle finders out there as well but they are a little more expensive than what I use. Also wide angle lens tend to be the best. I use a 14mm Rokinon which is also good for rotating because I can lens cap between each rotation and not interfere with the focusing.

JS ∇ My D750 has a built-in electronic-level/virtual-horizon what can be really useful for CRT use. On my old D90 I used a spirit-level connected to the hot-shoe. Besides this I do several test shots in all directions to see if everything is level enough


LPP ∇ What do you use to get precise angles? Is it an app on your phone, a actual level or something different?

CT ∇ I fix a smartphone such as an iPhone / iPod / Android device to the top of the hotshoe on the camera with a couple of cheap gadgets available off eBay.  These smartphones usually have an angle gauge which is accurate enough for the job.  Personally I use an old iPod touch rather than my big expensive iPhone 6s Plus!

JULS ∇ I’m not looking at precise angle, I can only stop my tool with 6 different angles… Since long I have in my mind an idea to improve this but I’m still procrastinating.

JD ∇ Same as above but depending how I want to rotate a subject, I have to split the rotations within 360 degrees. For example a rotation of 4 is every 90 degrees, a rotation of 6 is every 60 degrees.

JS ∇My D750 has a built-in electronic-level/virtual-horizon what can be really useful for CRT use. On my old D90 I used a spirit-level connected to the hot-shoe. During exposure I use small markings on my CRT to know where I have to lock the CRT for the different exposures.


LPP ∇ What is your favorite “Thing” to do a camera rotation of?

CT ∇ I usually prefer to go shooting CRT in city environments and try not to go for the “obvious”.    I look for everyday objects such as a corner of a building or angular architecture and rotate it.  I also like to combine zoom pulling with the CRT at various angles, proper kinetic photography in my opinion!

JULS ∇  I did a lot of tour Eiffel and urban landscape but in fact I prefer the way it looks with people. I realized some family portraits.

JD ∇ Obviously! Light Paint with it! (see img_1824)

JS ∇ I am always in search of the next (personal) thing/effect/challenge so I don’t have one favorite thing to CRT, but I guess my own favorite CRT shots are with tunnel/bridges and the depth and leading lines it can create.


LPP ∇ I know since I started doing these a year or so ago I look at things completely different now. Is there something specific you look for when looking for a place or object to shoot for a camera rotation?

CT ∇ I like to shoot in areas where there may be lights surrounded by dark areas in order to create a cleaner CRT image.  I tend to aim for a corner of a building where I can only see a small amount of subject in the viewfinder and keep all the other areas in the frame dark so I don’t “light paint” or overexpose that part of the frame during the rotation process.

JULS ∇ When I’m in town I pay attention to keep a small dark place in my frame to include “traditional“ light painting. It’s easiest when it’s at the center of the frame since the camera will turn around.

JD ∇ I would say there has to be something bright surrounded by a dark space. So that way, when you rotate the frame the light area will overlap on top of the dark area i.e. campfire and city skylines.

JS ∇ For me a CRT is a tool just like any other, it all depends and how you use it, sometimes the most crazy or weird ideas have the best effect so trying to have an open mind and thinking outside the box is key.


LPP ∇ What is your favorite Camera Rotation that you have ever created and can you walk us through step by step how you created this image?

CT ∇ My favorite so far has been during a collaborative shot with another light painter, Tim Gamble, using two tripods.  The main subject in this case, Tim, was focused and composed on Tripod 1 without a CRT, noting focus point, focal length and Tim’s positioning for later.  The camera is then transferred to Tripod 2 with a CRT, this one is then aimed off centre so that the centre of the subject is on the left hand third of the frame when the camera and tripod 2 are located on the right of centre.  This may sound complicated but all we then do is open the shutter on Tripod 2 and rotate the CRT while I spin an LED lit acrylic tube in a drill at the same time for one full 360 degree revolution on the CRT.  The lens cap is then placed on and the camera moved back to Tripod 1, adjusting the previously noted focus, focal length and making sure Tim is on his marker.  I then spin steel wool on a drill behind Tim with more LED lights in the mix.  Hope this hasn’t confused anyone!

JULS ∇ I love this picture because in it there are all the ingredients I like in light painting. A pinch of urban exploration, light buddies and an environment favorable to share our passion for the light.

This image was shot during a night in a former paper mill. I was with Alexis Pichot and Stéphane Babatasi, I set up my Gyrocam with an old control array of a huge machine in the center of my frame, slightly on the left. Then I show my buddies where we can stand up and each one of us take part in this image by posing and by illuminating. The center of the frame is a little lower than the feet of the models, so they are no overlay.

When illuminating you need to stay focus on the subject and the remaining part of the picture should not be too bright because of the overlays.

JD ∇  My favorite so far has been a carnival ride called “Fireball”. Being a ring of light, I was hoping by rotating it 6 or 8 times it would resemble an atom. It didn’t disappoint! I aimed the center of the lens near the edge of the ring of light. I exposed it for about 5 or 6 seconds (counting in my head), lens cap, then adjust the Gimbal 45 degrees then repeat, giving me an 8 way rotation. It ended up being about a 3 minute exposure (in the middle of a crowded Fair) but it was well worth it!

JS ∇ My own personal favorite is one of my very first ‘real’ CRT shots I did in 2012, this was the first time it worked out just like I had in my mind and planned.

https://www.flickr.com/photos/jelle-s/8139659777

4 way rotation, 5 exposures in total. 4 times lighting up the inside of the tracks with green, and 1 time with light blue light for the silhouette in the back and spill light on the outer sides of the tracks. The orange is from the street lights above this tunnel.

1- I start with lining up the normal horizontal shot. In this case I set the center focus point on the horizon where the two tracks meet. This will be the overall center rotation point of the final image. I use live-view to check the alignment of the setup by rotating the camera while using a flashlight to light up the scene.

2- Now I set the main camera settings, usually ISO 100 and Aperture 8-11. I do some test shots on how long I have to light up the insides of the tracks with a green flashlight, 10 seconds in this case.

3- Open shutter.

4- Use green flashlight, after 10 seconds I put the lens cap back onto the lens. Now I rotate the camera 90 degrees. Remove the lens cap and expose for another 10 seconds using the green flashlight and put lens cap back on the lens. Repeat this 2 more times. In total you rotate the camera 4 times, ending back in the same position as the first shot. So you will have the base starting exposure, plus 3 exposures each 90 degrees rotated. Put lens cap back on the lens after the last 10 second exposure.

4- Position the camera horizontal again (that was the last rotation). Remove the lens cap for a 10 seconds exposure of a person standing on the tracks, back lit with a blue flashlight. Put lens cap back on the lens.

5- Close the shutter.

6- Check the final image.

From my more recent CRT work I like this one a lot, it’s a pretty tricky shot to setup/lineup and I had to come up with to me new technique for creating the “double exposed door effect”

https://www.flickr.com/photos/jelle-s/20807079871


LPP ∇ What is the best piece of advice you can give for someone wanting to give the form of Kinetic Light Painting a try?

CT ∇ My current thinking is that both camera and subject should move during the exposure, the effects can be quite radical and unexpected.  That makes it all the more fun for me!

JULS ∇ This is a creative discipline, it changes the way of seeing our environment. It may seem difficult at first but by persevering it quickly gets interesting results. Simply give it a try!

JD ∇ I would say be patient! It can be labor intensive and easily multiply the length your light paintings, but the finished result will be worth it

JS ∇ Invest some money and buy a Gimbal to begin with (just a cheap one will do just fine) and just start experimenting with it, no rules, no right or wrong, just see what you can come up with and try to go from there.

Filed Under: Light Painting Photography

Lens Swap Light Painting Tutorial

Light Painting Lens Swap James Deluna-Moon

Light Painting Lens Swap Jake Saari 02
Light-Painting-Lens-Swap-Jeremy-Jackson-01
Light Painting Lens Swap Tim Gamble 02
Light Painting Lens Swap Tim Gamble 01
Light Painting Lens Swap James Deluna-Fish

Light Painting Lens Swap Martin Barras 02
Light Painting Lens Swap Martin Barras 01
Light Painting Lens Swap Jake Saari 03
Light Painting Lens Swap Jake Saari 00
Light-Painting-Lens-Swap-Jeremy-Jackson-02

If you are not familiar with the Light Painting technique of a Lens Swap you are missing out on something pretty awesome that can twist and transform perspective to make some mind bending SOOC Light Paintings! For this article I interviewed some of the best Lens Swappers in the business James De Luna, Jeremy Jackson, Jake Saari, Martin Barras, and Tim Gamble. Each of them were kind enough to share tips, advice, and even walk us through some of their favorite Len Swap images that they have created! Read on…

(Note these answers are an abbreviated and combined version of the answers given by the Light Painting Artist listed above. At the bottom of the page you can read the full interview answers from each Light Painter)

LPP ∇ What is a Lens Swap?
A lens swap is a Light Painting technique of using more than one lens during a single exposure. Swapping lenses gives you the ability to change focal length to shrink or enlarge various objects during one opening of the camera shutter.

LPP ∇ How can is be utilized in Light Painting Photography?
It can be utilized however your imagination sees fit. Lens Swaps allow you to layer certain elements onto your composition, an effect usually only seen in photoshop work. Lens swapping is a great way to mess around and play with the POV and DOF in a shot, you can really mess with people’s minds!

LPP ∇ When is it best to use a Lens Swap?
Anytime is good, it’s a fun thing to do! If one element of the shot requires extreme close-up/macro and the other a wide field of view then it’s time to get swapping.I like to use this technique when I’m well suited to invest some extra effort into the shot. It’s great for playing with scale or juxtaposing objects or highlighting certain aspects in a creative way.

LPP ∇ What is the most difficult part of doing a Lens Swap?
Changing a lens over in complete darkness can be a pain, You need good spatial awareness and four sets of hands but with planning and practice it becomes easier. Another difficult part is keeping the camera steady during lens capping/uncapping or lens swapping. Lining up the frames can also prove tricky also starting with lit, moving objects like the moon you have to be quick if you don’t want a flared blur with no detail at all.

LPP ∇ The technique is similar to doing an in camera double exposure, a.k.a. Lens Cap, do
you have any advice to help to keep the elements in a scene lined up?

Two tripods rather than one or if only one available, marking spots on the ground where each tripod leg is supposed to sit. Glow in the dark markers on the floor are very useful especially when working alone. Select the grid overlay for live view with the most squares from your camera’s menu and make a mental note of where each element needs to be using this grid.

LPP ∇ Can you do a lens swap with any lens and camera or do you need to have special gear?
Any camera with a removable lens should work. If your camera has the ability to shoot in bulb mode and you have more than one lens (or a lens with a reversing ring) you can swap away. Old manual aperture and focus lenses work best. Obviously, you’re taking a risk when you try to swap lenses while your camera is in the middle of an exposure but without risk, there can be no reward.

LPP ∇ What advice would you give for other Light Painters wanting to give it a try?
Just give it a go, the more you practice the quicker and more confident you will become. Lens Swaps open up a whole different way of thinking about perspective and the relation between the visual elements of the world.

For the images below I asked each artist to pick one of their favorite Lens Swaps and walk us through how they made it. Continue on to learn how these incredible images below were created!

Light Painting Lens Swap James Deluna-Fairy

James De Luna:
I’m not sure I have a favourite swap … but the three or more lens swaps are the ones I’m most proud of I guess and I love this image from my fairy tales series.

I began by setting up the tripods one for each lens .. starting with the moon in my 70mm refracting telescope, I opened the shutter and immediately capped the scope. I then swapped the lens to a capped 50mm Nikon pointed at my fairy stencils on their clear film suspended by garden canes. I shone lights through them and waved my rainbow light painting brush around each fairy then capped the lens. I then swapped the lens to my 8mm Samyang which had a nice view of a large monument and nearby tree, uncapped that lens, lit the landscape with my torch then changed the aperture at intervals to get a comet effect to my stars. Finally I closed the shutter.

Light-Painting-Lens-Swap-Jeremy-Jackson-00

Jeremy Jackson:
One exposure painted at two locations via the lens cap trick. Canon t1i, ISO 100, 19 minutes. I started this time with my Nikkor 50mm pointed across the pond at f/8, painted the flowers using an umbrella, monkeylight, RGB strip, and flashlight cones then capped the lens. I then carried the camera to a marked spot in the woods, switched lenses to a Rokinon 14mm at f/8, uncapped it, and lit the trees with gels.

Light Painting Lens Swap Jake Saari 01

Jake Saari:
The last time I took a photo like this was in September.  I was intent on taking this type of photo as I was preparing for the evening, and as I explored the area I kept a lookout for a scene that would complement the subject.  When I found this framed structure I knew it could work.  I have an idea of what the subject will look like, so I started composing the background and experimenting with the angles, colors, and intensity of the light on it.  I may have spent a couple hours on this part as there are so many variables to work out.  I put a blur filter over the lens and used some blue light in the center and red around it.  Taking the blur filter off, I filled it in with white to get the true details of the scene.  Finally, the composition is ready to accept the subject.  Here is where I changed to the other lens to shoot the subject.  It is critical to keep the tripod stable and the focus set.  The lens used for the background was my 24mm.  I make sure to set it down specifically so when I pick it up the rear lens cap is easy to come off and mount to the camera.  I used a bean bag to shoot the subject.  I framed the light source to where I thought it should line up and adjusted it after some tests.  There was a lot of going back to the background shot to imagine how it will work.  At this point I get a little nervous about attempting to combine everything into the real shot.  There is a lot to remember about the angles and intensities and orders of operation. Once I got my mind sorted, I started the shot.  After the subject is exposed, I swapped to the 24mm lens and got the camera to the tripod safely and the settings were readjusted.  After about 10 minutes I was ready to end the exposure.  I was pretty happy the result because there were so many details to work out for this shot.

Light-Painting-Mart-Barras-00

Martin Barras:
I like them all really, but I’ll run you through a more recent one…..
Firstly I framed up the PCB using a reversed 50mm lens to create a really shallow macro DOF on the board, took a note of the position of the board and lens setting I then framed up another tripod facing my iPad, again noting the settings on the lens and position of the part I was going to expose from the iPad. I then finally I set another tripod up in my hallway to capture the jumping man part of the shot, again noting the setting of the lens. I then I started the shot, lighting the printed circuit board with a small torch with a coloured gel, cap on and removed the camera from the tripod, took the reversed 50mm off, and on with the sigma 18-35mm with the lens cap still on, on to the second tripod and I then adjusted the lens settings to what I had written down previously , lens cap off and exposed the iPad for a couple of seconds, Lens cap back on and off tripod two . on to tripod three with the Samyang 8mm, adjusted the setting on the lens to what I had noted before and moved into position and did the jump finally returning to the camera to replace the lens cap and finish the exposure.

Light Painting Lens Swap Tim Gamble "Rotating Thermal Convection"

Tim Gamble:
The night before this shot I was photographing oil on water and really 
liked the results but it was lacking something.  Lens swap  and camera rotation to the rescue.

Framed and focused on camera rotation part (the middle) noting focus and focal length using the Tamron 17-50mm next moved the camera to tripod 2 and framed and focused for the oil on water using the same lens but back-to-front using the reversing ring for the macro element.  I cut a minute disk of black card and floated it on the oil and water and positioned it in the middle of the frame.  This creates dead space which will be filled in later. Lights off and opened the shutter.  Lit the oil and water which was sat on some rainbow paper with my torch and took off the lens and turned it round as quickly as possible and removed the reversing ring before replacing the lens cap.  Moved to tripod two and mounted the camera on the my camera rotation tool.  Changed focus and length and took off the lens cap.  The middle part is bent coloured Perspex lit with a snooted flash on lowest power.  One pop of flash for every 45 degrees of camera rotation until I arrive back where I began.  

Full Interview Question and Answers Below:

LPP ∇ What is a Lens Swap?

MB ∇ A lens swap it a process whereas you start shooting the exposure with one lens attached, and swap to another during the same exposure

TG ∇ To swap the lens during a long exposure in complete darkness during a long exposure.

JD ∇ Lens swap light paintings are light painted photographs where the camera has been attached to two or more lenses of different focal lengths during one opening of the camera shutter.

JS ∇ This is a camera trick that uses more than one lens during a single exposure. It adds another plane of perspective and you can arrange various parts of the scene however you’d like.

JJ ∇ A lens swap is when you switch lenses during the course of one single long exposure to capture two separate compositions into one photographic frame. While the same trick can be done by using a lens cap between compositions, swapping lenses gives you the ability to change focal length to shrink or enlarge various objects.

LPP ∇ How can is be utilized in Light Painting Photography?

MB ∇ Lens swapping is a great way to mess around and play with the POV and DOF in a shot, you can really mess with people’s minds, as James does so well with his lost and alone series, whereas he lights a miniature version of himself into various household scenes

TG ∇ This technique can have many possible uses from a light painting perspective.

My main use for this technique is to be able to fill the frame with a small object at a longer focal length then change to a wider lens giving me more space to play with. For example if I want a pcb as the frame filling element I use my 50mm lens as I can get very close. If the next element is a dome rotation I will change to my Tokina @11mm as you can fit more domes in the frame giving a strange sense of perspective.

Another favourite trick of mine (learnt from Quornflake on a collab last year, thanks man) is to use a lens swap for a mid exposure aperture change. If you do not own a manual lens this comes in very handy if you are using light sources of varying strengths. If I wanted to photograph steel wool and el wire in the same shot I would struggle to expose both elements correctly without nd filters . One light source being very bright and the other very weak. For the wool you would set up one lens to expose at say F16. Frame and focus for that element and remove the lens ensuring you hold down the DOF preview button. Put the other lens on the body, frame and focus for the el wire and use an aperture of around F4. Fire the shutter and waft the el wire about, replace the lens cap and remove the first lens before quickly changing to the other. It must be pitch black for this as light can leak very easily onto the sensor thus blowing everything out. Lens cap off and spin the wool.

JD ∇ The difference in focal lengths firstly can provide an effect usually only seen in photoshop work … For example making a person appear extremely small or large next to everyday objects. You also gain the advantage of being able to set two or more focal points in a photo without actually moving the focus rings of the lenses used.

JS ∇ It allows you to layer certain elements onto your composition. Often, while composing photos there are parts of the scene that are distracting or in need of something more. Other times it just isn’t possible to frame things together the way you would like. With the lens swap you can get both the fine details and the entire scene all in one shot.

JJ ∇ It can be utilized however your imagination seems fit. I believe there are many different tricks that just haven’t been explored yet.

LPP ∇ When do you think it’s best to use a Lens Swap?

MB ∇ anytime is good, it’s a fun thing to do, try and just be creative with it, there is no hard and fast rules

TG ∇ When needs must really. If one element of the shot requires extreme close-up/macro and the other a wide field of view then it’s time to get swapping I wouldn’t do it all of the time as you always run the risk of either dropping one or the other lens fumbling around in the dark or blowing out the shot with unwanted light leaks.

JD ∇ Most of the time in my world.

JS ∇ I like to use this technique when I’m well suited to invest some extra effort into the shot. It’s great for playing with scale or juxtaposing objects or highlighting certain aspects in a creative way.

LPP ∇ What is the most difficult part of doing a lens swap?

MB ∇ Changing a lens over in complete darkness can be a pain, but persevere with it and it will get more natural, just be careful not to cross thread anything or damage the contacts on the lens whilst doing it…. if it doesn’t feel like it’s going on correctly don’t force it! Also Keeping light leak/spill to a minimum can be the big problem when you take to long to swap over the lens-the trick is to be quick with the change over, the quicker the better to stop this really being an issue

TG ∇ The act of swapping for me is the hardest part as it needs to be done blind as it is pitch black. You need good spatial awareness and four sets of hands but with planning and practise it becomes easier. Also use the bump on the barrel of the lens to feel your way to where the needs to be in lining up correctly with the camera.

JD ∇ For me, starting with lit, moving objects like the moon … you are the shutter here and you have to be quick if you don’t want a flared blur with no detail at all.

JJ ∇ The most difficult part is keeping the camera steady during lens capping/uncapping or lens swapping. Lining up the frames can also prove tricky but two tripods can solve this under most circumstances. A couple tips…. two tripods rather than one or if only one available, marking spots on the ground where each tripod leg is supposed to sit.

JS ∇ The hardest part is coming up with a good concept for the shot, but technically executing it comes with a lot of issues. You have to work out the image in reverse and juggle the details in the dark. You’ll surely want to avoid getting dust or debris onto the sensor while the mirror is up.

LPP ∇ The technique is similar to doing an in camera double exposure, a.k.a. Lens Cap, do you have any advice to help to keep the elements in a scene lined up?

MB ∇ Multiple tripods are very handy as well as noting the settings – focus etc. and placements of the elements when you working out the framing.

TG ∇ I find this element quite easy due to using my camera rotation tool in many of my light painting shots. I select the grid overlay for live view with the most squares from my camera’s menu and make a mental note of where each element needs to be using this grid. Two tripods with the same head set-up in predetermined spots comes in very handy also. Glow in the dark markers
on the floor are very useful especially when working alone.

JD ∇ I use as many tripods as I do lenses and marking the ground can help if something moving like a dog is going to be the subject.

LPP ∇ What camera and lens do you use when you for this technique?

MB ∇ The Camera I use is a Nikon D7100 but I have done them on my canon 550D too, and as for lenses, all of them really my Tokina 11-16mm, Samyang 8mm, Nikon 50mm and sigma 18-35mm.

TG ∇ Canon 650d, Tamron 17/50mm (sometimes using a reversing ring for macro) and my favourite Tokina 11/16mm.

JD ∇ I currently use a variety of Nikon fit lenses on a Sony A6000 body using an adapter. My favourites are my Samyang 8mm, my old Nikon 50mm, a reversed Nikon 35mm and my telescopes.

JS ∇ I mainly use a digital Pentax SLR with K mount lenses. The options are limited to what you can come up with. I like to play with perspective, so a photo shot with a telescope and a microscope would be on the extreme of that. Blending the elements together in an interesting way is the real trick. My personal favorite is a device I made that you can adjust the elements relative to each other and the sensor in combination with diffractive plates.

JJ ∇ I use a Canon Rebel and manual lenses. (Rokinon 8mm & 14mm, Nikkor 24mm & 50mm) But… I learned the lens cap trick from Dana Maltby and he always used his 18-55 auto kit lens which is difficult but can be done.

LPP ∇ Can you do a lens swap with any lens and camera or do you need to have special gear?

MB ∇ Any camera with a removable lens and a couple of lenses will work, I don’t know of any that it doesn’t work on as far as I’m aware.

TG ∇ I can see no reason why not. If your camera has the ability to shoot in bulb mode and you have more than one lens (or a lens with a reversing ring) you can swap away.

JD ∇ Any DSLR or SLR can be used … but the lenses matter. Old manual aperture and focus lenses are best, although I heard of others working .. best just to try.

JS ∇ It is best to use cameras with interchangeable lenses. Using a digital one allows you to see your test shots and make adjustments, so that’s what I use.

JJ ∇ I’m not sure what gear works and what gear doesn’t. Obviously, you’re taking a risk when you try to swap lenses while your camera is in the middle of an exposure but without risk, there can be no reward. If you’re into following the rules and meticulous with your equipment, this isn’t something you’ll even consider trying anyways.

LPP ∇ What advice would you give for other Light Painters wanting to give it a try?

MB ∇ Go for, it’s fun and a really good technique ….there are lots out there doing it now and that have previously swapped lenses before to check out to get you going for example James obviously , Jeremy Jackson, Dan Whittaker, Dave Astur, Manuel Paul and Led Eddie to name just a few.

TG ∇ As with all aspects of light painting just give it a go, the more you practise the quicker and more confident you will become. Its another tool in your arsenal to create something which will blow someone’s mind.

JD ∇ Go somewhere dark and interesting and take all your kids favourite toys ! You’ll have fun.

JS ∇ Definitely try it out because it opens up a whole different way of thinking about perspective and the relation between the visual elements of the world.

JJ ∇ Advice…. test smaller details before you go for the whole composition. That and plan to devote several hours to your one frame.

Thank you all for sharing these images and techniques! Be sure to check out more work from these creative geniuses on their webpages here: James De Luna, Jeremy Jackson, Jake Saari, Martin Barras, and Tim Gamble!

Lens Swap Light Painting

December 24, 2015 by Jason D. Page

Light Painting Lens Swap James Deluna-Moon

Light Painting Lens Swap Jake Saari 02
Light-Painting-Lens-Swap-Jeremy-Jackson-01
Light Painting Lens Swap Tim Gamble 02
Light Painting Lens Swap Tim Gamble 01
Light Painting Lens Swap James Deluna-Fish

Light Painting Lens Swap Martin Barras 02
Light Painting Lens Swap Martin Barras 01
Light Painting Lens Swap Jake Saari 03
Light Painting Lens Swap Jake Saari 00
Light-Painting-Lens-Swap-Jeremy-Jackson-02

If you are not familiar with the Light Painting technique of a Lens Swap you are missing out on something pretty awesome that can twist and transform perspective to make some mind bending SOOC Light Paintings! For this article I interviewed some of the best Lens Swappers in the business James De Luna, Jeremy Jackson, Jake Saari, Martin Barras, and Tim Gamble. Each of them were kind enough to share tips, advice, and even walk us through some of their favorite Len Swap images that they have created! Read on…

(Note these answers are an abbreviated and combined version of the answers given by the Light Painting Artist listed above. At the bottom of the page you can read the full interview answers from each Light Painter)

LPP ∇ What is a Lens Swap?
A lens swap is a Light Painting technique of using more than one lens during a single exposure. Swapping lenses gives you the ability to change focal length to shrink or enlarge various objects during one opening of the camera shutter.

LPP ∇ How can is be utilized in Light Painting Photography?
It can be utilized however your imagination sees fit. Lens Swaps allow you to layer certain elements onto your composition, an effect usually only seen in photoshop work. Lens swapping is a great way to mess around and play with the POV and DOF in a shot, you can really mess with people’s minds!

LPP ∇ When is it best to use a Lens Swap?
Anytime is good, it’s a fun thing to do! If one element of the shot requires extreme close-up/macro and the other a wide field of view then it’s time to get swapping.I like to use this technique when I’m well suited to invest some extra effort into the shot. It’s great for playing with scale or juxtaposing objects or highlighting certain aspects in a creative way.

LPP ∇ What is the most difficult part of doing a Lens Swap?
Changing a lens over in complete darkness can be a pain, You need good spatial awareness and four sets of hands but with planning and practice it becomes easier. Another difficult part is keeping the camera steady during lens capping/uncapping or lens swapping. Lining up the frames can also prove tricky also starting with lit, moving objects like the moon you have to be quick if you don’t want a flared blur with no detail at all.

LPP ∇ The technique is similar to doing an in camera double exposure, a.k.a. Lens Cap, do
you have any advice to help to keep the elements in a scene lined up?

Two tripods rather than one or if only one available, marking spots on the ground where each tripod leg is supposed to sit. Glow in the dark markers on the floor are very useful especially when working alone. Select the grid overlay for live view with the most squares from your camera’s menu and make a mental note of where each element needs to be using this grid.

LPP ∇ Can you do a lens swap with any lens and camera or do you need to have special gear?
Any camera with a removable lens should work. If your camera has the ability to shoot in bulb mode and you have more than one lens (or a lens with a reversing ring) you can swap away. Old manual aperture and focus lenses work best. Obviously, you’re taking a risk when you try to swap lenses while your camera is in the middle of an exposure but without risk, there can be no reward.

LPP ∇ What advice would you give for other Light Painters wanting to give it a try?
Just give it a go, the more you practice the quicker and more confident you will become. Lens Swaps open up a whole different way of thinking about perspective and the relation between the visual elements of the world.

For the images below I asked each artist to pick one of their favorite Lens Swaps and walk us through how they made it. Continue on to learn how these incredible images below were created!

Light Painting Lens Swap James Deluna-Fairy

James De Luna:
I’m not sure I have a favourite swap … but the three or more lens swaps are the ones I’m most proud of I guess and I love this image from my fairy tales series.

I began by setting up the tripods one for each lens .. starting with the moon in my 70mm refracting telescope, I opened the shutter and immediately capped the scope. I then swapped the lens to a capped 50mm Nikon pointed at my fairy stencils on their clear film suspended by garden canes. I shone lights through them and waved my rainbow light painting brush around each fairy then capped the lens. I then swapped the lens to my 8mm Samyang which had a nice view of a large monument and nearby tree, uncapped that lens, lit the landscape with my torch then changed the aperture at intervals to get a comet effect to my stars. Finally I closed the shutter.

Light-Painting-Lens-Swap-Jeremy-Jackson-00

Jeremy Jackson:
One exposure painted at two locations via the lens cap trick. Canon t1i, ISO 100, 19 minutes. I started this time with my Nikkor 50mm pointed across the pond at f/8, painted the flowers using an umbrella, monkeylight, RGB strip, and flashlight cones then capped the lens. I then carried the camera to a marked spot in the woods, switched lenses to a Rokinon 14mm at f/8, uncapped it, and lit the trees with gels.

Light Painting Lens Swap Jake Saari 01

Jake Saari:
The last time I took a photo like this was in September.  I was intent on taking this type of photo as I was preparing for the evening, and as I explored the area I kept a lookout for a scene that would complement the subject.  When I found this framed structure I knew it could work.  I have an idea of what the subject will look like, so I started composing the background and experimenting with the angles, colors, and intensity of the light on it.  I may have spent a couple hours on this part as there are so many variables to work out.  I put a blur filter over the lens and used some blue light in the center and red around it.  Taking the blur filter off, I filled it in with white to get the true details of the scene.  Finally, the composition is ready to accept the subject.  Here is where I changed to the other lens to shoot the subject.  It is critical to keep the tripod stable and the focus set.  The lens used for the background was my 24mm.  I make sure to set it down specifically so when I pick it up the rear lens cap is easy to come off and mount to the camera.  I used a bean bag to shoot the subject.  I framed the light source to where I thought it should line up and adjusted it after some tests.  There was a lot of going back to the background shot to imagine how it will work.  At this point I get a little nervous about attempting to combine everything into the real shot.  There is a lot to remember about the angles and intensities and orders of operation. Once I got my mind sorted, I started the shot.  After the subject is exposed, I swapped to the 24mm lens and got the camera to the tripod safely and the settings were readjusted.  After about 10 minutes I was ready to end the exposure.  I was pretty happy the result because there were so many details to work out for this shot.

Light-Painting-Mart-Barras-00

Martin Barras:
I like them all really, but I’ll run you through a more recent one…..
Firstly I framed up the PCB using a reversed 50mm lens to create a really shallow macro DOF on the board, took a note of the position of the board and lens setting I then framed up another tripod facing my iPad, again noting the settings on the lens and position of the part I was going to expose from the iPad. I then finally I set another tripod up in my hallway to capture the jumping man part of the shot, again noting the setting of the lens. I then I started the shot, lighting the printed circuit board with a small torch with a coloured gel, cap on and removed the camera from the tripod, took the reversed 50mm off, and on with the sigma 18-35mm with the lens cap still on, on to the second tripod and I then adjusted the lens settings to what I had written down previously , lens cap off and exposed the iPad for a couple of seconds, Lens cap back on and off tripod two . on to tripod three with the Samyang 8mm, adjusted the setting on the lens to what I had noted before and moved into position and did the jump finally returning to the camera to replace the lens cap and finish the exposure.

Light Painting Lens Swap Tim Gamble "Rotating Thermal Convection"

Tim Gamble:
The night before this shot I was photographing oil on water and really 
liked the results but it was lacking something.  Lens swap  and camera rotation to the rescue.

Framed and focused on camera rotation part (the middle) noting focus and focal length using the Tamron 17-50mm next moved the camera to tripod 2 and framed and focused for the oil on water using the same lens but back-to-front using the reversing ring for the macro element.  I cut a minute disk of black card and floated it on the oil and water and positioned it in the middle of the frame.  This creates dead space which will be filled in later. Lights off and opened the shutter.  Lit the oil and water which was sat on some rainbow paper with my torch and took off the lens and turned it round as quickly as possible and removed the reversing ring before replacing the lens cap.  Moved to tripod two and mounted the camera on the my camera rotation tool.  Changed focus and length and took off the lens cap.  The middle part is bent coloured Perspex lit with a snooted flash on lowest power.  One pop of flash for every 45 degrees of camera rotation until I arrive back where I began.  

Full Interview Question and Answers Below:

LPP ∇ What is a Lens Swap?

MB ∇ A lens swap it a process whereas you start shooting the exposure with one lens attached, and swap to another during the same exposure

TG ∇ To swap the lens during a long exposure in complete darkness during a long exposure.

JD ∇ Lens swap light paintings are light painted photographs where the camera has been attached to two or more lenses of different focal lengths during one opening of the camera shutter.

JS ∇ This is a camera trick that uses more than one lens during a single exposure. It adds another plane of perspective and you can arrange various parts of the scene however you’d like.

JJ ∇ A lens swap is when you switch lenses during the course of one single long exposure to capture two separate compositions into one photographic frame. While the same trick can be done by using a lens cap between compositions, swapping lenses gives you the ability to change focal length to shrink or enlarge various objects.

LPP ∇ How can is be utilized in Light Painting Photography?

MB ∇ Lens swapping is a great way to mess around and play with the POV and DOF in a shot, you can really mess with people’s minds, as James does so well with his lost and alone series, whereas he lights a miniature version of himself into various household scenes

TG ∇ This technique can have many possible uses from a light painting perspective.

My main use for this technique is to be able to fill the frame with a small object at a longer focal length then change to a wider lens giving me more space to play with. For example if I want a pcb as the frame filling element I use my 50mm lens as I can get very close. If the next element is a dome rotation I will change to my Tokina @11mm as you can fit more domes in the frame giving a strange sense of perspective.

Another favourite trick of mine (learnt from Quornflake on a collab last year, thanks man) is to use a lens swap for a mid exposure aperture change. If you do not own a manual lens this comes in very handy if you are using light sources of varying strengths. If I wanted to photograph steel wool and el wire in the same shot I would struggle to expose both elements correctly without nd filters . One light source being very bright and the other very weak. For the wool you would set up one lens to expose at say F16. Frame and focus for that element and remove the lens ensuring you hold down the DOF preview button. Put the other lens on the body, frame and focus for the el wire and use an aperture of around F4. Fire the shutter and waft the el wire about, replace the lens cap and remove the first lens before quickly changing to the other. It must be pitch black for this as light can leak very easily onto the sensor thus blowing everything out. Lens cap off and spin the wool.

JD ∇ The difference in focal lengths firstly can provide an effect usually only seen in photoshop work … For example making a person appear extremely small or large next to everyday objects. You also gain the advantage of being able to set two or more focal points in a photo without actually moving the focus rings of the lenses used.

JS ∇ It allows you to layer certain elements onto your composition. Often, while composing photos there are parts of the scene that are distracting or in need of something more. Other times it just isn’t possible to frame things together the way you would like. With the lens swap you can get both the fine details and the entire scene all in one shot.

JJ ∇ It can be utilized however your imagination seems fit. I believe there are many different tricks that just haven’t been explored yet.

LPP ∇ When do you think it’s best to use a Lens Swap?

MB ∇ anytime is good, it’s a fun thing to do, try and just be creative with it, there is no hard and fast rules

TG ∇ When needs must really. If one element of the shot requires extreme close-up/macro and the other a wide field of view then it’s time to get swapping I wouldn’t do it all of the time as you always run the risk of either dropping one or the other lens fumbling around in the dark or blowing out the shot with unwanted light leaks.

JD ∇ Most of the time in my world.

JS ∇ I like to use this technique when I’m well suited to invest some extra effort into the shot. It’s great for playing with scale or juxtaposing objects or highlighting certain aspects in a creative way.

LPP ∇ What is the most difficult part of doing a lens swap?

MB ∇ Changing a lens over in complete darkness can be a pain, but persevere with it and it will get more natural, just be careful not to cross thread anything or damage the contacts on the lens whilst doing it…. if it doesn’t feel like it’s going on correctly don’t force it! Also Keeping light leak/spill to a minimum can be the big problem when you take to long to swap over the lens-the trick is to be quick with the change over, the quicker the better to stop this really being an issue

TG ∇ The act of swapping for me is the hardest part as it needs to be done blind as it is pitch black. You need good spatial awareness and four sets of hands but with planning and practise it becomes easier. Also use the bump on the barrel of the lens to feel your way to where the needs to be in lining up correctly with the camera.

JD ∇ For me, starting with lit, moving objects like the moon … you are the shutter here and you have to be quick if you don’t want a flared blur with no detail at all.

JJ ∇ The most difficult part is keeping the camera steady during lens capping/uncapping or lens swapping. Lining up the frames can also prove tricky but two tripods can solve this under most circumstances. A couple tips…. two tripods rather than one or if only one available, marking spots on the ground where each tripod leg is supposed to sit.

JS ∇ The hardest part is coming up with a good concept for the shot, but technically executing it comes with a lot of issues. You have to work out the image in reverse and juggle the details in the dark. You’ll surely want to avoid getting dust or debris onto the sensor while the mirror is up.

LPP ∇ The technique is similar to doing an in camera double exposure, a.k.a. Lens Cap, do you have any advice to help to keep the elements in a scene lined up?

MB ∇ Multiple tripods are very handy as well as noting the settings – focus etc. and placements of the elements when you working out the framing.

TG ∇ I find this element quite easy due to using my camera rotation tool in many of my light painting shots. I select the grid overlay for live view with the most squares from my camera’s menu and make a mental note of where each element needs to be using this grid. Two tripods with the same head set-up in predetermined spots comes in very handy also. Glow in the dark markers
on the floor are very useful especially when working alone.

JD ∇ I use as many tripods as I do lenses and marking the ground can help if something moving like a dog is going to be the subject.

LPP ∇ What camera and lens do you use when you for this technique?

MB ∇ The Camera I use is a Nikon D7100 but I have done them on my canon 550D too, and as for lenses, all of them really my Tokina 11-16mm, Samyang 8mm, Nikon 50mm and sigma 18-35mm.

TG ∇ Canon 650d, Tamron 17/50mm (sometimes using a reversing ring for macro) and my favourite Tokina 11/16mm.

JD ∇ I currently use a variety of Nikon fit lenses on a Sony A6000 body using an adapter. My favourites are my Samyang 8mm, my old Nikon 50mm, a reversed Nikon 35mm and my telescopes.

JS ∇ I mainly use a digital Pentax SLR with K mount lenses. The options are limited to what you can come up with. I like to play with perspective, so a photo shot with a telescope and a microscope would be on the extreme of that. Blending the elements together in an interesting way is the real trick. My personal favorite is a device I made that you can adjust the elements relative to each other and the sensor in combination with diffractive plates.

JJ ∇ I use a Canon Rebel and manual lenses. (Rokinon 8mm & 14mm, Nikkor 24mm & 50mm) But… I learned the lens cap trick from Dana Maltby and he always used his 18-55 auto kit lens which is difficult but can be done.

LPP ∇ Can you do a lens swap with any lens and camera or do you need to have special gear?

MB ∇ Any camera with a removable lens and a couple of lenses will work, I don’t know of any that it doesn’t work on as far as I’m aware.

TG ∇ I can see no reason why not. If your camera has the ability to shoot in bulb mode and you have more than one lens (or a lens with a reversing ring) you can swap away.

JD ∇ Any DSLR or SLR can be used … but the lenses matter. Old manual aperture and focus lenses are best, although I heard of others working .. best just to try.

JS ∇ It is best to use cameras with interchangeable lenses. Using a digital one allows you to see your test shots and make adjustments, so that’s what I use.

JJ ∇ I’m not sure what gear works and what gear doesn’t. Obviously, you’re taking a risk when you try to swap lenses while your camera is in the middle of an exposure but without risk, there can be no reward. If you’re into following the rules and meticulous with your equipment, this isn’t something you’ll even consider trying anyways.

LPP ∇ What advice would you give for other Light Painters wanting to give it a try?

MB ∇ Go for, it’s fun and a really good technique ….there are lots out there doing it now and that have previously swapped lenses before to check out to get you going for example James obviously , Jeremy Jackson, Dan Whittaker, Dave Astur, Manuel Paul and Led Eddie to name just a few.

TG ∇ As with all aspects of light painting just give it a go, the more you practise the quicker and more confident you will become. Its another tool in your arsenal to create something which will blow someone’s mind.

JD ∇ Go somewhere dark and interesting and take all your kids favourite toys ! You’ll have fun.

JS ∇ Definitely try it out because it opens up a whole different way of thinking about perspective and the relation between the visual elements of the world.

JJ ∇ Advice…. test smaller details before you go for the whole composition. That and plan to devote several hours to your one frame.

Thank you all for sharing these images and techniques! Be sure to check out more work from these creative geniuses on their webpages here: James De Luna, Jeremy Jackson, Jake Saari, Martin Barras, and Tim Gamble!

Filed Under: Light Painting Photography

3D Light Painting Animation by Trunk Animation

November 9, 2015 by Jason D. Page

Light Painting Shilouette 01

I saw this Light Painting video called Floating Points ~ Silhouettes created by the creative team at Trunk Animation about a month or so ago and I completely dismissed it as a computer animation project, mainly because I was not smart enough to think that something like this could be done without post production. Well I just found the making of video (see bottom of post) and boy oh boy was I wrong and damn these guys are smart. This magical light painting animation took a team of creative and technical masterminds to complete, now I don’t know if anyone from the team will be reading this but if you are sorry for not understanding how amazing this is. You guys (ladies and gentlemen) are incredible, well done.

Directors: Junior Martínez, Pablo Barquín
Creative Team: Pablo Barquín, Anna Diaz Ortuño, Nathan Grimes, Junior Martínez
Executive Producers: H.I. (Hamill Industries) & Floating Points
Lead Producer: Anna Diaz Ortuño
Director of Photography: Nathan Grimes
Research & Technical Development: Pablo Barquín, H.I.
H.I. Technical Assistant: Joan Recasens
Editor: Anna Diaz Ortuño
Lead Animators: Fernando Domínguez, Wyz Borrero
Animators: Ohmyhood Luis “Inkclear” Redondo
Concept Artists: Junior Martínez , Michele Angelo
Plants Set Decorators: Estudio Sauvage
Post-production Team: Agus Verrastro, Florent Bastide
Production Assistants: Aida Busquets, Lidia Arruego
Digital Intermediate provided by RCO
RCO Colorist: Seth Ricart
RCO Producer: Marcus Lansdell
Special thanks to:
Fundación Rio Tinto, Ivan Rodriguez, 380 Monta Llum i Roda, Rab and Tanya Gordon, Chabeli Rodriguez, Marga Sardà, Alba Barneda, DVEIN, Agus Verrastro, Pamplona89, RCO, Laura Martinova, Pablo Hugo, Melissa, Saúl Narbona, Irina, Javo, Elsa Tejera, Jacinto Barquín, Marc Luelmo, Tinta, Cynthia, Sarah, Mita, Eric and specially to Sam for believing in this project since the very beginning.
Shot in Río Tinto, Huelva & Hamill Industries Headquarters
Barcelona, 2015

MAKING OF:

Filed Under: Light Painting Photography, Light Painting Video

« Previous Page
Next Page »

Copyright © 2026 · News Pro Theme on Genesis Framework · WordPress · Log in