Light Painting Photography

For the promotion and progression of Light Painting Art and Artist.

  • Home
  • Blog
  • History
  • Artists
    • Dean Chamberlain
    • Eric Staller
    • Susan Sims-Hillbrand
    • Vicki DaSilva
    • David Lebe
    • Troy Paiva
    • Bruno Mesrine
    • Chanette Manso
    • Patrick Rochon
    • Aurora Crowley
    • LAPP-PRO
    • JanLeonardo
    • Lightmark
    • Arturo Aguiar
    • Pete Eckert
    • Trevor Williams
    • Michael Bosanko
    • Jason D. Page
    • Nocturne
    • Brian Hart
    • Jeremy Jackson
    • Janne Parviainen
    • Jadikan-LP
    • Dana Maltby
    • Lichtfaktor
    • Dennis Calvert
    • TigTab
    • Hannu Huhtamo
  • Tools
    • Light Painting Brushes Starter Kits Introduction
    • Fiber Optics Light Painting Tools for Photography
  • Tutorials
    • Beginner Light Painting Tutorials
    • Light Painting Tutorials by Artists
    • Light Painting Tool Tutorials
    • Kinetic Light Painting Tutorials
    • Light Painting with Fire Tutorials
    • How To Light Paint A Flower
    • Light Painting Photography Tutorial: The Spiked Orb
    • How To Light Paint a Faberge Orb!
    • No More Orb Feet – Light Erases Darkness
    • The Tinfoil Light Painting Technique
    • How To Light Paint A Ghost
    • Electric Orb Light Painting Tutorial
    • Spirographs and Physiograms Tutorial
    • On Camera Light Source
    • Off Camera Light Source
    • Orb Techniques
    • Steel Wool Tutorial
    • Custom White Balance
    • Omnidirectional Light Cap
    • Gel Holder
    • Simple Orb Tool
    • 4 Ways to Add Color to your Plexiglass Light Painting Brushes
    • Driving Shots at Night
    • Wire Wool Spinning
    • El Wire Tutorial
    • Light Stencils
    • Orbs
    • Dome Tutorial
    • Battery Operated Cathode
    • Light Wheel
    • Double Wheel
    • Fire Wall Tutorial
    • Fire Rain Tutorial
    • Smoke
    • How To Light Paint with the Polaroid One Step +
    • How To Focus In The Dark
    • Light Painting Tutorial The Peacock Technique
    • How To Shoot Defocused Fireworks Tutorial
    • Drone Light Painting Tutorial
    • Light Stencil By Trevor Williams
    • Andrew Whyte Dome Tutorial
    • Light Painting Workshop by Patrick Rochon
    • Rob Turney Refractographs
    • SpiroJib by Johnny Griffin
    • Lens Swap Light Painting Tutorial
    • Camera Rotation Light Painting Tutorial
  • Videos
    • Light Painting Documentaries
      • Jason D. Page Documentary
      • Ball of Light
      • Night Photography: Finding Your Way In The Dark
      • Lightpainted Reality
      • SeeMe | In Focus : Pete Eckert
      • Pete Eckert – Dancing on The Edge of Perception
    • Dean Chamberlain
    • Vicki DaSilva
    • Patrick Rochon
    • Lichtfaktor Light Painting Videos
  • Terms
  • Links
  • Connect With Us!
  • About
You are here: Home / Archives for Jason D. Page

Light Painting Contest Winner, January 2016

February 3, 2016 by Jason D. Page

Light Painting Contest 21 january 2016

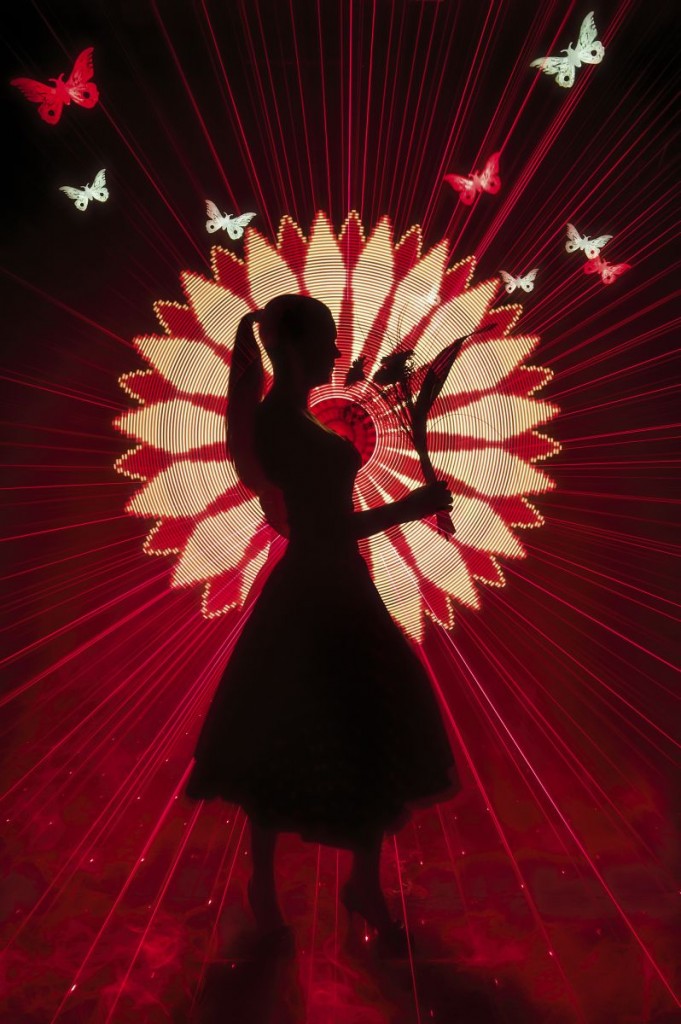
And the winner for the January 2016 Light Painting Contest Themed “Flowers” is… Marcel Fuhrmann and his light painting group Aurora Movement from Berlin who worked together to create the winning image entitled “Valentine”! Aurora Movement have only been light painting for one year they said they started with just a candle and now its a big part of their lives. They used many different tools to create this impressive Light Painting all in a single exposure. The tools Aurora Movements used including El-Wire, a Red Laser Pen, Blinky Tape, a Butterfly Stencil, a Flashlight and lots of fog.

Aurora Movement said this about the shot “The exposure time was 279 seconds with ISO 100 and variable aperture. We started with the butterfly stencil mounted on a P7 QC LED flashlight so that our model Xenija didn’t have to hold still for the whole time. Next Xenija positioned herself in front of the rotating disc with a programmable LED stripe by Blinky Labs attached to it. The flower bitmap was created in ‘Pattern Paint’. We used EL-Wire for the fog-like look above ground but used artifical fog for the entire room to emphasize the red laser beams. After practicing the choreography it was pretty easy to get the picture. The hardest part was for Xenija, because she had to hold still for almost three minutes.”

Check out more of Aurora Movements excellent light painting work at these links:
Facebook:
www.facebook.com/Aurora-Movement-859308900824449/
Flickr:
http://www.flickr.com/photos/auroramovement/
500px:
https://500px.com/auroramovement

For this fabulous creation Aurora Movement will receive a LPP prize pack filled with treasures from our sponsors below.

Light-Painting-Brushes-Banner

Click here to see the current contest theme and find out how to enter to win your LPP prize pack!
Filed Under: Light Painting Contest, Light Painting Contest Winner, Light Painting Photography

Light Painting with Time-Varying Light Sources by Dan Bennett

February 2, 2016 by Jason D. Page

Light Painting Dan Bennett 009, Hard Rock Cafe, Camera zoomed during the shot.

Light Painting Artist Dan Bennett sees things differently. From an early age he was fascinated with light, specifically time varying light sources. Dan has trained his eyes to see the unseen. On his website and in his book he offers many resources to help others see the light including tutorials on “Eyeball Jiggling” and “Mirror Jiggling”. Check out the full interview, images and videos below.

LPP ∇ Hey Dan your Light Painting work is very interesting can you tell me a little more about yourself and your work with time varying light sources?

DB ∇ My involvement with time-varying light sources goes back a looong way – I started when I was 4 years old! My bedroom had an electric heater in it, which had a neon indicator to show when it was on, and I remember kind of jiggling my head around in the dark and seeing a trace of orange dashes. Of course, at that age I didn’t know that the trace’s dashed appearance was due to the fact that the neon was switching on and off 100 times per second. (This was in the UK – in the US it would have been 120 times per second.)

I went on to develop a technique of moving my eyeballs deliberately so I could see the rapid time-varying behavior of various light sources, and had many years of pleasure doing that. Then in my 40s I decided it was time to write a book about it, and in preparing the book I found out that photographing time-varying lights is easily as much fun as observing them with the naked eye. Plus, it gives one the opportunity to really study the way a light source is varying, especially if its behavior is complex.

Then I found that by choosing the right light sources and moving the camera in the right kind of way, I was producing stunning images that stand up well as light painting art.


LPP ∇ How do you feel your work is different from Light Painting in the traditional sense?

DB ∇ Most light painters create images by doing stuff with lights over a time-scale of maybe 30 seconds to a couple of minutes, sometimes more. My time-scales are shorter – anything from a tenth of a second to 2 or 3 seconds. Whereas most painters use spatial changes in the scene to develop a cumulative time story which becomes the image, I take advantage of the fact that the lights I’m shooting are themselves changing very rapidly. My images are a “convolution” of the lights’ behavior and the motion of the camera.

Most light painters will be familiar with LED sources which leave high resolution dashed traces in the image – it’s a side-effect of the type of technology used in the LEDs, and maybe it’s regarded as a cool effect. You’ll see it if you wave a pixelstick too fast, for example. In my case, it’s this variation that is the source of my images. I simply move the camera and let the lights’ intricate time-varying activities paint the textures and features. After all, it’s much easier to shake yo’ camera than it is to wave a row of street lights around in front of a camera on a tripod!

Super quick tutorial: Set the camera to manual, with the shutter speed at, say, 1 second. Focus on the light source, then take the photo while sweeping the camera, or rotating it, or zooming it, or any combination of the three. If the image was too dark or light, change the aperture or the ISO. It’s that simple. 🙂

I remember one night visiting a garden where every tree was festooned in LED Christmas lights. There were people there using tripods and monopods… not me! Whizz! Sweep! Rotate! Zoom! I was having waaay more fun, and getting much cooler photos too!
Light Painting Dan Bennett 018, A group of LED-festooned Christmas Trees

LPP ∇ What is it about these Time Varying light sources that draws you to them specifically?

DB ∇ So I’d better define what I mean by “time-varying light sources”. I’m talking about lights – usually man-made, but sometimes natural – which are varying in brightness, color and/or pattern very rapidly. Too rapidly to see in normal circumstances. This includes almost every street light: you may think they’re just continuously illuminated, but far from it. They flash 100 or 120 times per second (and there are some LED ones out there that flash over 2000 times per second!). It’s possible to see this behavior with the naked eye – if you keep your eye moving. Here is tutorial on how to use a mirror in the technique of “Mirror Jiggling”

But street lights, though ubiquitous, aren’t the stars of my art images – for that I go to more complex sources such as neon tubes (the real neon, orange-red ones are amazingly complex in the time domain), LED displays (Las Vegas, baby!!!) and other sources. These give rise to the amazingly complex and attractive images you see here.

Since I can use my eyes to see the traces of time-varying lights, I can easily scope out a potential subject by jiggling my eyes for a moment. If I see cool traces, I pull out my camera.

Another aspect of these images is that it’s kinda mind-blowing that it’s so simple to produce such cool photos. Here is tutorial on how to capture the traces in your camera:

LPP ∇ Can you give me some examples of natural time varying light sources?

DB ∇ Twinkling stars can be observed by moving your eyes to see the brightness variations, but since their light’s so dim, it’s not very rewarding. It’s much more rewarding to photograph them! This photo of Sirius, taken by putting a moderate zoom (200mm or so) onto a Canon DSLR and pointing the camera at the star for a 1.6 second exposure while moving the camera in a loopy pattern. This lets us see what the eye can’t: (a) that the twinkling’s happening much faster than you might think (several hundred times per second), and (b) that it’s colored! (The explanation for this is amazing, but I don’t have room for it here.)

Light Painting Dan Bennett 003, Sirius, photographed by sweeping the camera in a loopy way

LPP ∇ Thats remarkable what are some others?

DB ∇ It’s well-known that lightning often consists of multiple strokes along the same path. This makes a wonderful – and very challenging – target for visual observation (where you have to be moving your eye or a mirror when the lightning happens) or for photography (where you have to be moving the camera). I’m including a lightning photo I took by operating the camera like a machine – sweep click sweep click sweep click – once per second for about two minutes!
Light Painting Dan Bennett 019, Lightning striking the same spot multiple times, camera swept sideways

Moths flying in the light of car headlights are good to observe. Obviously, the moths aren’t emitting light, but their wings reflect light in a rapid, periodic way which can be easily observed. In fact, you don’t even have to move your eyes, because the moths are moving for you!
Light Painting Dan Bennett 020, Two moths (a large one and a small one) flying in the light of an incandescent lamp

LPP ∇ It seems you have a very scientific approach to your light painting work, are you more interested in the science or art side of your work?

DB ∇ Good question. Yes, I deeply enjoy the science and technology side of lighting and vision; being able to explain what I can see or photograph is great. And yes, I also deeply enjoy producing great photos that stimulate the eye and brain. But that actually reveals what my main driving force is: enjoyment. 🙂 My book is all about going out and seeing and photographing time-varying light sources, and opening up a whole new world that’s all around us every night and is easy to see and shoot if only we know how. It’s all about enjoyment.

LPP ∇ What is your background? Did you study photography or science?

DB ∇ I have an degree in electronic engineering, but I’m not really an engineer. I’m definitely a bit of a science head; and I’ve been ramping up my photography skills over the last ten years or so, not just in the time-varying lights area.

LPP ∇ What are some of the ways your work could be used from a scientific standpoint?

DB ∇ Another good question… Actually, since most of my subjects are man-made lights, the people who design and manufacture them already know the technology well, so there’s not too much to add there. However, for people who enjoy seeing stuff and understanding stuff, it’s really cool to see into the minds of the engineers. For example, I can glance at a row of street lights and tell you in what configuration they’re connected to the three phases of the electrical supply.


Or I can glance at the LED tail lights of a car and tell you if there’s just one circuit driving them or multiple circuits, and how they achieve the change from tail light to brake light function.

One really interesting observation I once made by accident was when I saw a drop of water falling from a roof in bright sunlight. I wasn’t even watching it; but being a seasoned observer, I idly noticed that it made a dashed trace on my retinas. Well, usually that means that the light source is flashing, and if it had been a street light, that would have been the end of the story. But it was sunlight. I think we’d know by now if the sun was a pulsar… and it isn’t. 🙂 So what was the explanation? It was simply that the drop wasn’t spherical and was tumbling as it fell, catching the sunlight periodically – multiple times per second. This is a great example of the kind of observations you can make and enjoy if you train yourself.


LPP ∇ Getting a little off Light Painting here but thinking about observing the drop of water falling in sunlight. Do you have an interest in quantum theory and the role of the observer? It seems relevant to me especially related to how the lights are actually on and off but we see them as on, without noticing.

DB ∇ I guess it’s tempting to regard the fact that I saw the flashes of sunlight only by not looking directly at the falling drop, as somehow analogous to quantum theory, which states that as soon as you observe something, you’ve essentially changed it, so you can’t know everything about a system even if you observe it. That’s Heisenberg for you.

Well, that’s not really what’s going on here – the timescales are too long and the sizes of objects are too large for anything quantum to be involved. Let me explain the whole basis of visual (by eye) observation of time-varying lights.

The reason that you can’t see that a street light is flashing 120 times per second is that the cone cells on your retina don’t respond very quickly when a light stimulation finishes. They take a while to be ready to tell the brain, “OK, that light just switched off”. When the light source is pulsing rapidly, the next pulse comes along and restlimulates the cone cell before it ever had the chance to register the dark period between the pulses. That means that it’s essentially always stimulated, and you never see the flashing.

This is useful – engineers design all sorts of lights and displays knowing that they can get away with a flashing light output, because no one will see it. (Interestingly, insects can see it… imagine being an ant under a streetlight!)

However, by moving the eye – or by using a mirror to move the image across the retina – it’s possible to take advantage of the relatively slow response of the retina. Moving the image across the retina allows a fresh group of cone cells to be exposed to the next pulse of the light, and the slow decay of the image (persistence of vision) means that a trace is formed which you can see for long enough to interpret and enjoy. It’s actually a graph of light output vs. time, where the time axis is along the path of the trace. Unlike a camera, which records light on the sensor until the image has been captured and processed, the eye’s trace is transient, lasting maybe a fifth of a second; but it’s definitely enough to see all the things I’ve photographed here.

Of course, if you’re asking how the retina’s cone cells respond to light… well, that’s quantum. 🙂

LPP ∇ One last question, can you tell me a little more about your book and what readers will find inside?

DB ∇ The bulk of the book (A Field Guide To Time-Varying Light Sources) is exactly what it says on the packaging – an ordered presentation of all the different kinds of time-varying lights that are out there, from CRT monitors to twinkling stars, street lights to airplane propellers. (In fact, it’s probably the only book on the planet that validly categorizes “moths” and “pulsars” in the same section!) (Actually, it’s the only book on the planet about the topic of time-varying lights, period.)

The first part of the book covers seeing and photographing these lights, with a chapter devoted to photography. If nothing else, the book will provide explanations for some of the dashed-line artifacts that people might see in their light painted images; but hopefully it will also inspire artists to look for new sources of light in their palettes, and to regard time-variance as a class of visual brushes.

LPP ∇ Thank you Dan for taking the time to answer these questions, its a very interesting subject!

DB ∇ Thank you.

Filed Under: Light Painting Photography

LPWA Light House Meeting 2015

February 2, 2016 by Jason D. Page

IYoL logo_final

On December 19, 2015 the Light Painting World Alliance organized a meet up in Dorum-Neufeld (Germany) where 25 Light Artist from 5 different countries got together to create some really cool Light Paintings. During the meet up the group created a GIANT logo (Above) to celebrate the International Year of Light and Light Based Technologies (IYoL) by UNESCO. It looks like it was a blast sharing ideas and techniques with light painters from all over! Check out a few of the images for the meet up and the video below. For the full report head over to the LPWA HERE.


Filed Under: Light Painting Photography, Light Painting Video

Light Painting Photography Contest Entries, January 2016

January 23, 2016 by Jason D. Page

Light Painting Contest 00 January 2016

Here are the entries for the January 2016 Light Painting Photography Contest. Everyone PLEASE VOTE in the comment section of this page to pick your top 3 images, the images all have a number in the title (EXAMPLE… IF ONE OF YOUR FAVORITES IS THE IMAGE TITLED “Light Painting Contest 05 January 2016″ THEN YOU SHOULD PUT THE NUMBER 5 AS ONE OF YOUR CHOICES). Please remember that the theme of this contest was FLOWERS this means that there should be flowers included in the image in some way, shape or form. Voters that do not include 3 unique choices in their post will not be counted. In other words no 1,1,1, or 5,5,5, or 7,7,7,…..Please pick your three favorite IMAGES based on the image alone.

I would like to give a special THANK YOU to Ms. Riley Scroggins and all the students from her photography class that participated in this months contest! Great work and Good luck!


The light painting photography contest series is sponsored by the best damn companies on earth COAST Flashlights, Neon Flexible, LED Flexible,and Light Painting Brushes ! Please support these awesome companies that support our light painting art from, without them this contest series would not be possible!
Light-Painting-Brushes-Banner

Filed Under: Light Painting Contest, Light Painting Photography

Denis Smith Light Painting Workshops

January 21, 2016 by Jason D. Page

Light Painting Denis Smith 01


Light Painting Photographer Denis Smith a.k.a The Ball Of Light is taking the Light Painting Workshop to another level. Focused on education and the total experience, Denis is combining a full service Light Painting experience with some seriously epic locations! If you are a newbie looking to learn the art of Light Painting, an experienced Light Painter looking for guided access to some stellar locations, or an artist thinking about starting your own Light Painting workshops read on because Denis has shared a ton of valuable information in the interview below!

LPP ∇ Denis I am really digging the direction you are taking your workshops! It looks like you have a couple of different options from larger group settings at abandoned insane asylums to Light Painting dream field trips into the wilderness, can you tell me more about what you have going on?

DS ∇ At the beginning of 2015 we (my wife Kyrie, and business partner Sam) decided it was time to fulfill a long time dream of mine, to share some of the knowledge I have around light painting. Our initial event was designed for 30 participants in a huge refurbished warehouse. It sold out almost immediately, so we opened it up for another 2 nights, which also sold out.

On the back of that success we decided to design some more intimate events in more exciting locations. But the ultimate fantasy of mine was to take a small group into the Australian outback, which is where my light painting journey really began.

Denis Smith Light Painting Workshop 18

LPP ∇ I know there is a significant amount of work and money that you need to put up for just one workshop, what you are creating is a massive undertaking… what is it that made you take the leap? Was there a magic AH HA moment for you. Was it the success of the first ones that gave you the push to make a go of it?

DS ∇ With the success of the 2015 events and the amazing feedback we got it was a no brainer to extend the events into 2016. There was a very definite moment where I realized we had a thing. I was standing in front of a group of 15 at our Z-Ward event. This was our first really intimate and exclusive event in a very special location. I looked out across the small group and realized that 5 people had travelled by air, from quite a distance to be there. I felt incredibly humbled, and excited. They had a blast and all said the effort, and expense was well worth it. What a buzz!

LPP ∇ That must have been a great feeling! In the video promo you put out, and just from talking with you over the years, your passion for the Light Painting Art Form is very evident. I know that photography pretty much saved your life can you tell me a little about what you are so passionate about Light Painting?

DS ∇ Ah yes, “photography saved my life”. A huge call, but as the years roll on I feel more and more sure that my discovery of the camera at a time in my life when I truly believed there was no way out helped me climb out of a very deep, dark hole. I still suffer from some pretty aggressive mental health issues, and photography is where I go to find solace. It is a safe place for me, and I can shelter from daily life. What I have learned over the years, and since the release of the Ball of Light Documentary, is that more and more people are using the joy of photography as a means to relax and take time out for themselves.

My passion has not waned, in the slightest. Every time we hold a workshop I see people getting out into the wild and taking what they have learned further. On many cases they are sharing it with their own family, friends and other photographers, It feels like Light Painting is spreading through the photography community like wildfire. Everyone sees it and is in awe.

Denis Smith Light Painting Ball Of Light 24

LPP ∇ How does your passion translate to the workshops?

DS ∇ I have been Light Painting now for 6 years, which amazes me because I remember the first weeks that I discovered it with such clarity. I still go out now and look at the back of the screen with such excitement each and every time. When I have a room of 30, 15, or even a tour of 6 people I get so excited about seeing them experience the same thrill, and it is universal.

It doesn’t matter how tired I am from preparing the events, because it is an incredible amount of work, when that room is full, and the room goes dark, the energy and adrenaline that surges through my body it so much fun. I simply do not stop until the last person leaves for the night. It is hard to explain the thrill. I have no idea where the energy comes from.

Denis Smith Light Painting Brushes 04

LPP ∇ What is the craziest thing that has happened in one of your workshops so far?

DS ∇ We did a workshop in the Z-Ward Insane Asylum. It is quite legendary for being very haunted! I saw a guy about 2 weeks after the event, he relayed to me that he was in one of the cells, no one else next to him. He was sitting on the floor, looked away, then looked back and his camera was attached to his tripod, lying on the floor. No sound, not noise from it falling, not a mark on it, just on its side on the floor. Now this is a pretty straight up guy. He was a little shaken up by it and said he didn’t mention it on the night, as he didn’t want to freak me out!

Denis Smith Light Painting Workshop 08

LPP ∇ Something that really stands out to me about your workshops is the attention to detail, from the gear you have available all the way down to the presentation style. What should someone attending one of your workshops expect.

DS ∇ From the outset I wanted anyone attending the workshop, whether a complete novice, to an experienced light painter, to leave feeling like they had learned a significant amount.

At our events that are specifically designed for beginners we can even provide the cameras and tripods. But people can arrive with the most basic equipment and we cater to that. All events are designed to cater to 30 second exposures at F5.6, so a super basic camera and kit lens works perfectly.

We provide a full complement of light painting tools. This is really important. There is a huge amount of gear, which has been a huge investment for us. From torches to EL Wire, full RGB LED strip tools to basic light wands there is nothing missing.

We partner with some incredible companies that make this possible. The Light Painting Brushes system has been instrumental in making the workshops as comprehensive as they are. Without the Universal Connector we simply would not be able to cater for up to 30 participants properly. We have 30 basic torches that they can connect to the LPB tools we have, but more importantly it shows each participant that they can get creative and design their own tools. Of course a system like this is fantastic, and affordable for those that are not into making their own.

I am a LED Lenser International Ambassador, so I always have a great selection of that product on hand. For our Full Moon in the Flinders Tour participants, they receive a “welcome pack” when booking that includes one of the amazing LED Lenser T2QC torches and SEO3 headlamps. Without the incredible support of LED Lenser this would be impossible

Denis Smith Light Painting Brushes 08

LPP ∇ The workshops are more of a hands on experience, rather than a lecture series correct?

DS ∇ Oh yes! I have been to some photography workshops where you sit in rows and listen to some person delivering hours of theory and you don’t even pull out a camera. We do things differently. At the beginning of each event there is just enough theory to get you started. We have a private Facebook group, as soon as you book you get access to this page, Here you see all of the basics required to get started, there are hundreds of people who have been to an event who are exacted about answering questions.
After the short intro to the space and the light painting tools we have on hand it is all business, we get people straight into the light painting. We always have staff, experienced light painters, on hand right by their sides all night, answering questions and more importantly listening to people’s ideas and helping make them a reality.

I want everyone to leave with a memory card full of images that they created!


LPP ∇ The locations you have already had have been epic, what locations are on the 2016 roster?

DS ∇ This year is all about taking it outside. Our locations like an old insane asylum and will still be on the calendar, but this year we will be introducing our first Full Moon Tour. 4 days and 3 nights in my favorite locations. These are all inclusive, door to door experiences. We will be heading to the Flinders Ranges first. This place is stunning, deep in the Australian outback amongst the most ancient valleys on the planet. This will be extremely exciting and is limited to 6 people.

We will also be doing some great one night events out in the field. We will be heading into the forest; here we will break into small group sand shape the forest with light. We have many dry salt lakes here in South Australia. We will be heading out onto these for an extreme open space experience. There is nowhere to hide on the salt.

We will be holding the Z-Ward Experience again. This is a disused insane asylum here in Adelaide. We have a model with us and with only 12 people in this huge building it is a space to let the imagination run wild.

It is going to be a huge year!

Denis Smith Light Painting Workshop 04

LPP ∇ Wow man that is really exciting! Putting these workshops together especially when you’re taking people out in the field you must run into some challenges, what is the most difficult part of putting these things together?

DS ∇ The amount of time that goes into these events behind the scenes is amazing. I want these to be perfect! So the most challenging part is making sure that each participant gets the attention needed. I always make sure that we have enough experienced light painters on hand to make sure that any question is answered as soon as possible. A complete novice has to leave with the same thrill as an experienced pro, this takes a lot of planning!

LPP ∇ What is the most rewarding?

DS ∇ I greet and say good-bye to every participant as they come and go. It fills me with joy seeing the excitement and nerves as people arrive, then seeing eyes filled with wonder as they leave! I will never tire of the experience.

LPP ∇ Anywhere in the world; where would you want to take a group and teach them about light painting?

DS ∇ Oh boy! Anywhere? I have been light painting in the Angkor Wat temple in Cambodia on the night of a full moon. I would love to take a group there!

Denis Smith Light Painting Ball Of Light 05

Or maybe around the ancient temples of Luxor. I love the idea of doing such a cutting edge, modern form of art around ancient locations, and imagining the people of the time seeing what we are doing. Maybe the massive Moai heads of Easter Island?

LPP ∇ How about some advice for other Light Painters that are thinking about starting their own workshops? What are the things to look out for?

DS ∇ As with anything where people are paying you for a service, you need to set the right expectations, then over deliver. Holding events at the level we do takes a huge amount of time to prepare, organize and deliver the product. You have to have a capital behind you to hold a big event. The costs are up front, and often you don’t get the numbers and payment until close to the event. Time has value, and you must factor that in when preparing. Be careful who you partner with, they must bring real tangible value, or don’t do it. Everyone wants something for nothing and although a huge name might be attached to a partner, be ultra clear about what they are going to deliver, and get it in writing!

I don’t know what advice I would have liked, There were no real surprises. I have an amazing team around me and they make sure I miss nothing. I suppose just not to rely on anyone but myself and my closest allies. That way it is hard to be let down.

LPP ∇ Thank you very much for taking the time to answer all of these questions, I am sure that you will have a really successful 2016!

DS ∇ Thank You.

Want to sign up or just learn more about Denis and his workshop series check out his website HERE!

Filed Under: Light Painting Photography, Light Painting Video

Steven Erra Light Painting. “Losing His Sight, This Photographer Chases the Light.”

January 20, 2016 by Jason D. Page

Steven Erra Light Painting Evelyn_july_2_2012


Light Painting Photographer Steven Erra’s sees in his mind and creates his visions with light. Great Big Story has produced a short film about Steven and his work. Check it out below.

Artist Steven Erra’s vision is slowly deteriorating. He didn’t know he had a disease that would take his sight until he was nearly finished with his art degree. But that diagnosis only motivated Erra further. These days, he works with The Seeing With Photography Collective, a group of sight-impaired artists who specialize in Light Painting.

Filed Under: Light Painting Photography, Light Painting Video

Drone 100 by Ars Electronica Futurelab

January 12, 2016 by Jason D. Page

Light Painting Drone 100 01
Ars Electronica Futurelab focuses on the future at the nexus of art, technology and society. Along with technology and manpower from Intel, and Ascending Technologies, they recently set a new world record for the “Most Unmanned Aerial Vehicles (UAVs) airborne simultaneously”. 100 UAV’s flying about at the same time not running into each other is a feat all to itself but that was not enough for these smartypants. They also wanted to get creative and what better way than to take the 100 UAV’s and make some light painting magic. Check out the images and video below…

P.S The East Coast Light Painters Still Hold the First Light Painting Guinness World Record. HA HA.


Filed Under: Light Painting Photography, Light Painting Video

Lens Swap Light Painting

December 24, 2015 by Jason D. Page

Light Painting Lens Swap James Deluna-Moon

Light Painting Lens Swap Jake Saari 02
Light-Painting-Lens-Swap-Jeremy-Jackson-01
Light Painting Lens Swap Tim Gamble 02
Light Painting Lens Swap Tim Gamble 01
Light Painting Lens Swap James Deluna-Fish

Light Painting Lens Swap Martin Barras 02
Light Painting Lens Swap Martin Barras 01
Light Painting Lens Swap Jake Saari 03
Light Painting Lens Swap Jake Saari 00
Light-Painting-Lens-Swap-Jeremy-Jackson-02

If you are not familiar with the Light Painting technique of a Lens Swap you are missing out on something pretty awesome that can twist and transform perspective to make some mind bending SOOC Light Paintings! For this article I interviewed some of the best Lens Swappers in the business James De Luna, Jeremy Jackson, Jake Saari, Martin Barras, and Tim Gamble. Each of them were kind enough to share tips, advice, and even walk us through some of their favorite Len Swap images that they have created! Read on…

(Note these answers are an abbreviated and combined version of the answers given by the Light Painting Artist listed above. At the bottom of the page you can read the full interview answers from each Light Painter)

LPP ∇ What is a Lens Swap?
A lens swap is a Light Painting technique of using more than one lens during a single exposure. Swapping lenses gives you the ability to change focal length to shrink or enlarge various objects during one opening of the camera shutter.

LPP ∇ How can is be utilized in Light Painting Photography?
It can be utilized however your imagination sees fit. Lens Swaps allow you to layer certain elements onto your composition, an effect usually only seen in photoshop work. Lens swapping is a great way to mess around and play with the POV and DOF in a shot, you can really mess with people’s minds!

LPP ∇ When is it best to use a Lens Swap?
Anytime is good, it’s a fun thing to do! If one element of the shot requires extreme close-up/macro and the other a wide field of view then it’s time to get swapping.I like to use this technique when I’m well suited to invest some extra effort into the shot. It’s great for playing with scale or juxtaposing objects or highlighting certain aspects in a creative way.

LPP ∇ What is the most difficult part of doing a Lens Swap?
Changing a lens over in complete darkness can be a pain, You need good spatial awareness and four sets of hands but with planning and practice it becomes easier. Another difficult part is keeping the camera steady during lens capping/uncapping or lens swapping. Lining up the frames can also prove tricky also starting with lit, moving objects like the moon you have to be quick if you don’t want a flared blur with no detail at all.

LPP ∇ The technique is similar to doing an in camera double exposure, a.k.a. Lens Cap, do
you have any advice to help to keep the elements in a scene lined up?

Two tripods rather than one or if only one available, marking spots on the ground where each tripod leg is supposed to sit. Glow in the dark markers on the floor are very useful especially when working alone. Select the grid overlay for live view with the most squares from your camera’s menu and make a mental note of where each element needs to be using this grid.

LPP ∇ Can you do a lens swap with any lens and camera or do you need to have special gear?
Any camera with a removable lens should work. If your camera has the ability to shoot in bulb mode and you have more than one lens (or a lens with a reversing ring) you can swap away. Old manual aperture and focus lenses work best. Obviously, you’re taking a risk when you try to swap lenses while your camera is in the middle of an exposure but without risk, there can be no reward.

LPP ∇ What advice would you give for other Light Painters wanting to give it a try?
Just give it a go, the more you practice the quicker and more confident you will become. Lens Swaps open up a whole different way of thinking about perspective and the relation between the visual elements of the world.

For the images below I asked each artist to pick one of their favorite Lens Swaps and walk us through how they made it. Continue on to learn how these incredible images below were created!

Light Painting Lens Swap James Deluna-Fairy

James De Luna:
I’m not sure I have a favourite swap … but the three or more lens swaps are the ones I’m most proud of I guess and I love this image from my fairy tales series.

I began by setting up the tripods one for each lens .. starting with the moon in my 70mm refracting telescope, I opened the shutter and immediately capped the scope. I then swapped the lens to a capped 50mm Nikon pointed at my fairy stencils on their clear film suspended by garden canes. I shone lights through them and waved my rainbow light painting brush around each fairy then capped the lens. I then swapped the lens to my 8mm Samyang which had a nice view of a large monument and nearby tree, uncapped that lens, lit the landscape with my torch then changed the aperture at intervals to get a comet effect to my stars. Finally I closed the shutter.

Light-Painting-Lens-Swap-Jeremy-Jackson-00

Jeremy Jackson:
One exposure painted at two locations via the lens cap trick. Canon t1i, ISO 100, 19 minutes. I started this time with my Nikkor 50mm pointed across the pond at f/8, painted the flowers using an umbrella, monkeylight, RGB strip, and flashlight cones then capped the lens. I then carried the camera to a marked spot in the woods, switched lenses to a Rokinon 14mm at f/8, uncapped it, and lit the trees with gels.

Light Painting Lens Swap Jake Saari 01

Jake Saari:
The last time I took a photo like this was in September.  I was intent on taking this type of photo as I was preparing for the evening, and as I explored the area I kept a lookout for a scene that would complement the subject.  When I found this framed structure I knew it could work.  I have an idea of what the subject will look like, so I started composing the background and experimenting with the angles, colors, and intensity of the light on it.  I may have spent a couple hours on this part as there are so many variables to work out.  I put a blur filter over the lens and used some blue light in the center and red around it.  Taking the blur filter off, I filled it in with white to get the true details of the scene.  Finally, the composition is ready to accept the subject.  Here is where I changed to the other lens to shoot the subject.  It is critical to keep the tripod stable and the focus set.  The lens used for the background was my 24mm.  I make sure to set it down specifically so when I pick it up the rear lens cap is easy to come off and mount to the camera.  I used a bean bag to shoot the subject.  I framed the light source to where I thought it should line up and adjusted it after some tests.  There was a lot of going back to the background shot to imagine how it will work.  At this point I get a little nervous about attempting to combine everything into the real shot.  There is a lot to remember about the angles and intensities and orders of operation. Once I got my mind sorted, I started the shot.  After the subject is exposed, I swapped to the 24mm lens and got the camera to the tripod safely and the settings were readjusted.  After about 10 minutes I was ready to end the exposure.  I was pretty happy the result because there were so many details to work out for this shot.

Light-Painting-Mart-Barras-00

Martin Barras:
I like them all really, but I’ll run you through a more recent one…..
Firstly I framed up the PCB using a reversed 50mm lens to create a really shallow macro DOF on the board, took a note of the position of the board and lens setting I then framed up another tripod facing my iPad, again noting the settings on the lens and position of the part I was going to expose from the iPad. I then finally I set another tripod up in my hallway to capture the jumping man part of the shot, again noting the setting of the lens. I then I started the shot, lighting the printed circuit board with a small torch with a coloured gel, cap on and removed the camera from the tripod, took the reversed 50mm off, and on with the sigma 18-35mm with the lens cap still on, on to the second tripod and I then adjusted the lens settings to what I had written down previously , lens cap off and exposed the iPad for a couple of seconds, Lens cap back on and off tripod two . on to tripod three with the Samyang 8mm, adjusted the setting on the lens to what I had noted before and moved into position and did the jump finally returning to the camera to replace the lens cap and finish the exposure.

Light Painting Lens Swap Tim Gamble "Rotating Thermal Convection"

Tim Gamble:
The night before this shot I was photographing oil on water and really 
liked the results but it was lacking something.  Lens swap  and camera rotation to the rescue.

Framed and focused on camera rotation part (the middle) noting focus and focal length using the Tamron 17-50mm next moved the camera to tripod 2 and framed and focused for the oil on water using the same lens but back-to-front using the reversing ring for the macro element.  I cut a minute disk of black card and floated it on the oil and water and positioned it in the middle of the frame.  This creates dead space which will be filled in later. Lights off and opened the shutter.  Lit the oil and water which was sat on some rainbow paper with my torch and took off the lens and turned it round as quickly as possible and removed the reversing ring before replacing the lens cap.  Moved to tripod two and mounted the camera on the my camera rotation tool.  Changed focus and length and took off the lens cap.  The middle part is bent coloured Perspex lit with a snooted flash on lowest power.  One pop of flash for every 45 degrees of camera rotation until I arrive back where I began.  

Full Interview Question and Answers Below:

LPP ∇ What is a Lens Swap?

MB ∇ A lens swap it a process whereas you start shooting the exposure with one lens attached, and swap to another during the same exposure

TG ∇ To swap the lens during a long exposure in complete darkness during a long exposure.

JD ∇ Lens swap light paintings are light painted photographs where the camera has been attached to two or more lenses of different focal lengths during one opening of the camera shutter.

JS ∇ This is a camera trick that uses more than one lens during a single exposure. It adds another plane of perspective and you can arrange various parts of the scene however you’d like.

JJ ∇ A lens swap is when you switch lenses during the course of one single long exposure to capture two separate compositions into one photographic frame. While the same trick can be done by using a lens cap between compositions, swapping lenses gives you the ability to change focal length to shrink or enlarge various objects.

LPP ∇ How can is be utilized in Light Painting Photography?

MB ∇ Lens swapping is a great way to mess around and play with the POV and DOF in a shot, you can really mess with people’s minds, as James does so well with his lost and alone series, whereas he lights a miniature version of himself into various household scenes

TG ∇ This technique can have many possible uses from a light painting perspective.

My main use for this technique is to be able to fill the frame with a small object at a longer focal length then change to a wider lens giving me more space to play with. For example if I want a pcb as the frame filling element I use my 50mm lens as I can get very close. If the next element is a dome rotation I will change to my Tokina @11mm as you can fit more domes in the frame giving a strange sense of perspective.

Another favourite trick of mine (learnt from Quornflake on a collab last year, thanks man) is to use a lens swap for a mid exposure aperture change. If you do not own a manual lens this comes in very handy if you are using light sources of varying strengths. If I wanted to photograph steel wool and el wire in the same shot I would struggle to expose both elements correctly without nd filters . One light source being very bright and the other very weak. For the wool you would set up one lens to expose at say F16. Frame and focus for that element and remove the lens ensuring you hold down the DOF preview button. Put the other lens on the body, frame and focus for the el wire and use an aperture of around F4. Fire the shutter and waft the el wire about, replace the lens cap and remove the first lens before quickly changing to the other. It must be pitch black for this as light can leak very easily onto the sensor thus blowing everything out. Lens cap off and spin the wool.

JD ∇ The difference in focal lengths firstly can provide an effect usually only seen in photoshop work … For example making a person appear extremely small or large next to everyday objects. You also gain the advantage of being able to set two or more focal points in a photo without actually moving the focus rings of the lenses used.

JS ∇ It allows you to layer certain elements onto your composition. Often, while composing photos there are parts of the scene that are distracting or in need of something more. Other times it just isn’t possible to frame things together the way you would like. With the lens swap you can get both the fine details and the entire scene all in one shot.

JJ ∇ It can be utilized however your imagination seems fit. I believe there are many different tricks that just haven’t been explored yet.

LPP ∇ When do you think it’s best to use a Lens Swap?

MB ∇ anytime is good, it’s a fun thing to do, try and just be creative with it, there is no hard and fast rules

TG ∇ When needs must really. If one element of the shot requires extreme close-up/macro and the other a wide field of view then it’s time to get swapping I wouldn’t do it all of the time as you always run the risk of either dropping one or the other lens fumbling around in the dark or blowing out the shot with unwanted light leaks.

JD ∇ Most of the time in my world.

JS ∇ I like to use this technique when I’m well suited to invest some extra effort into the shot. It’s great for playing with scale or juxtaposing objects or highlighting certain aspects in a creative way.

LPP ∇ What is the most difficult part of doing a lens swap?

MB ∇ Changing a lens over in complete darkness can be a pain, but persevere with it and it will get more natural, just be careful not to cross thread anything or damage the contacts on the lens whilst doing it…. if it doesn’t feel like it’s going on correctly don’t force it! Also Keeping light leak/spill to a minimum can be the big problem when you take to long to swap over the lens-the trick is to be quick with the change over, the quicker the better to stop this really being an issue

TG ∇ The act of swapping for me is the hardest part as it needs to be done blind as it is pitch black. You need good spatial awareness and four sets of hands but with planning and practise it becomes easier. Also use the bump on the barrel of the lens to feel your way to where the needs to be in lining up correctly with the camera.

JD ∇ For me, starting with lit, moving objects like the moon … you are the shutter here and you have to be quick if you don’t want a flared blur with no detail at all.

JJ ∇ The most difficult part is keeping the camera steady during lens capping/uncapping or lens swapping. Lining up the frames can also prove tricky but two tripods can solve this under most circumstances. A couple tips…. two tripods rather than one or if only one available, marking spots on the ground where each tripod leg is supposed to sit.

JS ∇ The hardest part is coming up with a good concept for the shot, but technically executing it comes with a lot of issues. You have to work out the image in reverse and juggle the details in the dark. You’ll surely want to avoid getting dust or debris onto the sensor while the mirror is up.

LPP ∇ The technique is similar to doing an in camera double exposure, a.k.a. Lens Cap, do you have any advice to help to keep the elements in a scene lined up?

MB ∇ Multiple tripods are very handy as well as noting the settings – focus etc. and placements of the elements when you working out the framing.

TG ∇ I find this element quite easy due to using my camera rotation tool in many of my light painting shots. I select the grid overlay for live view with the most squares from my camera’s menu and make a mental note of where each element needs to be using this grid. Two tripods with the same head set-up in predetermined spots comes in very handy also. Glow in the dark markers
on the floor are very useful especially when working alone.

JD ∇ I use as many tripods as I do lenses and marking the ground can help if something moving like a dog is going to be the subject.

LPP ∇ What camera and lens do you use when you for this technique?

MB ∇ The Camera I use is a Nikon D7100 but I have done them on my canon 550D too, and as for lenses, all of them really my Tokina 11-16mm, Samyang 8mm, Nikon 50mm and sigma 18-35mm.

TG ∇ Canon 650d, Tamron 17/50mm (sometimes using a reversing ring for macro) and my favourite Tokina 11/16mm.

JD ∇ I currently use a variety of Nikon fit lenses on a Sony A6000 body using an adapter. My favourites are my Samyang 8mm, my old Nikon 50mm, a reversed Nikon 35mm and my telescopes.

JS ∇ I mainly use a digital Pentax SLR with K mount lenses. The options are limited to what you can come up with. I like to play with perspective, so a photo shot with a telescope and a microscope would be on the extreme of that. Blending the elements together in an interesting way is the real trick. My personal favorite is a device I made that you can adjust the elements relative to each other and the sensor in combination with diffractive plates.

JJ ∇ I use a Canon Rebel and manual lenses. (Rokinon 8mm & 14mm, Nikkor 24mm & 50mm) But… I learned the lens cap trick from Dana Maltby and he always used his 18-55 auto kit lens which is difficult but can be done.

LPP ∇ Can you do a lens swap with any lens and camera or do you need to have special gear?

MB ∇ Any camera with a removable lens and a couple of lenses will work, I don’t know of any that it doesn’t work on as far as I’m aware.

TG ∇ I can see no reason why not. If your camera has the ability to shoot in bulb mode and you have more than one lens (or a lens with a reversing ring) you can swap away.

JD ∇ Any DSLR or SLR can be used … but the lenses matter. Old manual aperture and focus lenses are best, although I heard of others working .. best just to try.

JS ∇ It is best to use cameras with interchangeable lenses. Using a digital one allows you to see your test shots and make adjustments, so that’s what I use.

JJ ∇ I’m not sure what gear works and what gear doesn’t. Obviously, you’re taking a risk when you try to swap lenses while your camera is in the middle of an exposure but without risk, there can be no reward. If you’re into following the rules and meticulous with your equipment, this isn’t something you’ll even consider trying anyways.

LPP ∇ What advice would you give for other Light Painters wanting to give it a try?

MB ∇ Go for, it’s fun and a really good technique ….there are lots out there doing it now and that have previously swapped lenses before to check out to get you going for example James obviously , Jeremy Jackson, Dan Whittaker, Dave Astur, Manuel Paul and Led Eddie to name just a few.

TG ∇ As with all aspects of light painting just give it a go, the more you practise the quicker and more confident you will become. Its another tool in your arsenal to create something which will blow someone’s mind.

JD ∇ Go somewhere dark and interesting and take all your kids favourite toys ! You’ll have fun.

JS ∇ Definitely try it out because it opens up a whole different way of thinking about perspective and the relation between the visual elements of the world.

JJ ∇ Advice…. test smaller details before you go for the whole composition. That and plan to devote several hours to your one frame.

Thank you all for sharing these images and techniques! Be sure to check out more work from these creative geniuses on their webpages here: James De Luna, Jeremy Jackson, Jake Saari, Martin Barras, and Tim Gamble!

Filed Under: Light Painting Photography

Riders Of Light 2016 Nude Art Light Project

December 18, 2015 by Jason D. Page


For the past year the Riders Of Light, Light Painting team of Ivan Lucio and Javier Jimenez, have been working with various models to blend the nude human form with Light Painting Photography. They have taken some of the 76 Portraits from this year long project and created a Light Painting Calendar for 2016. Check out a few of the shots below and for all the info and to get yourself a copy head over to their website HERE. This is way better than the 2016 Kitten calendar you were probably gonna get. 🙂


Filed Under: Light Painting Photography

Drone Light Painting, The Christmas Edit

December 17, 2015 by Jason D. Page

drones-light-painting-uav-uas-unmanned-aircraft-system-santa-claus-reindeer

Well this is freaking amazing. Ascending Technologies is a “leading UAS developer & manu­facturer of technology”, they also enjoy Light Painting. To showcase their flight planning software AscTec Navigator paired with their AscTec Falcon 8 UAV they created what has to be the best quality Light Painting Drone video that has been made to date. Check out the video below and for all the details check out their website HERE!

Filed Under: Light Painting Photography, Light Painting Video

« Previous Page
Next Page »

Copyright © 2025 · News Pro Theme on Genesis Framework · WordPress · Log in