Yes I said a phone designed for light painting. I am pretty sure you can also call people and send text messages but who cares? The camera on this phone was specifically designed with long exposure photography in mind, and that is pretty awesome! Photographer and all around creative genius Ben Von Wong is onboard producing the video below to give us a glimpse of what the Huawei P8 can do…
Light Painting Photography Contest April 2015
The theme for the light painting photography contest starting March 1, 2015 is Kinetic Light Painting otherwise known as “Camera Painting” this means that the camera moves and the lights in your scene stay stationary. Great examples of this are Camera Rotations like the images below, now you don’t have to rotate your camera you can use light from the moon and create a moonlight drawing, the key is the camera moves to create the design.
To Submit your Image:
Get your single best entry in to contest [at] lightpaintingphotography.com by April. 21, 2015 for a chance to win a featured post on the LPP website and a light painting prize pack from our super awesome sponsors listed below! Please remember to follow the THEME of the contest, include your name in the title of your submission, and resize your image to 1200 pixels on the longest side and 72 dpi. If you do not follow the theme of the contest your image will not be accepted, and as always no F#@&*! photoshop.
Here are two fine examples:
Camera Rotation by Chris Thompson

Moonlight Drawing by Jason D. Page

The light painting photography contest series is sponsored by the best damn companies on earth COAST Flashlights, Neon Flexible, LED Flexible,and Light Painting Brushes ! Please support these awesome companies that support our light painting art from, without them this contest series would not be possible!


Light Paint Live Mercury Version 2.0
The best live light painting software on the market just got an upgrade! Light Painting Artist Joerg Miedza and all around genius Josh Beckwith have been hard at work developing the Light Paint Live software for version 2.0 and I must say they have done a hell of a job creating an easy to use and versatile real time light painting tool!
Light Paint Live is a great software for seeing in realtime what you are creating while light painting and personally I think it has huge possibilities in the world of the Live Light Painting Performance! There are a few versions of the Light Paint Live software including the new and improved Mercury 2.0 which runs on google chrome that you can use to create and record full 1080P live light painting videos via a webcam or DSLR (with a plugin)! There are also 3 versions of an free open source Light Paint Live for developers!
Check out the images (by Joerg Miedza) and video (by Josh Beckwith) below to get a feel for what the new and improved software can do. After that head over to Light Paint Live to find out more and get the software right now for only $4.99!
Light Painting Break Down: Tim Gamble for “Stroma”
From time to time we come across a light painting and just stare it wondering how the F@#! did they do that?!?! Break Down is a series if which I only ask the artist one question “How the F@#! did you make this” its up to the artist to tell as little or as much as they want. For this Light Painting Breakdown Tim Gamble talks us through how he created the above image titled “Stroma”
So Tim how the F@#! did you make this?
GEAR USED:
Canon 650D
Tamron 17-50 f2.8
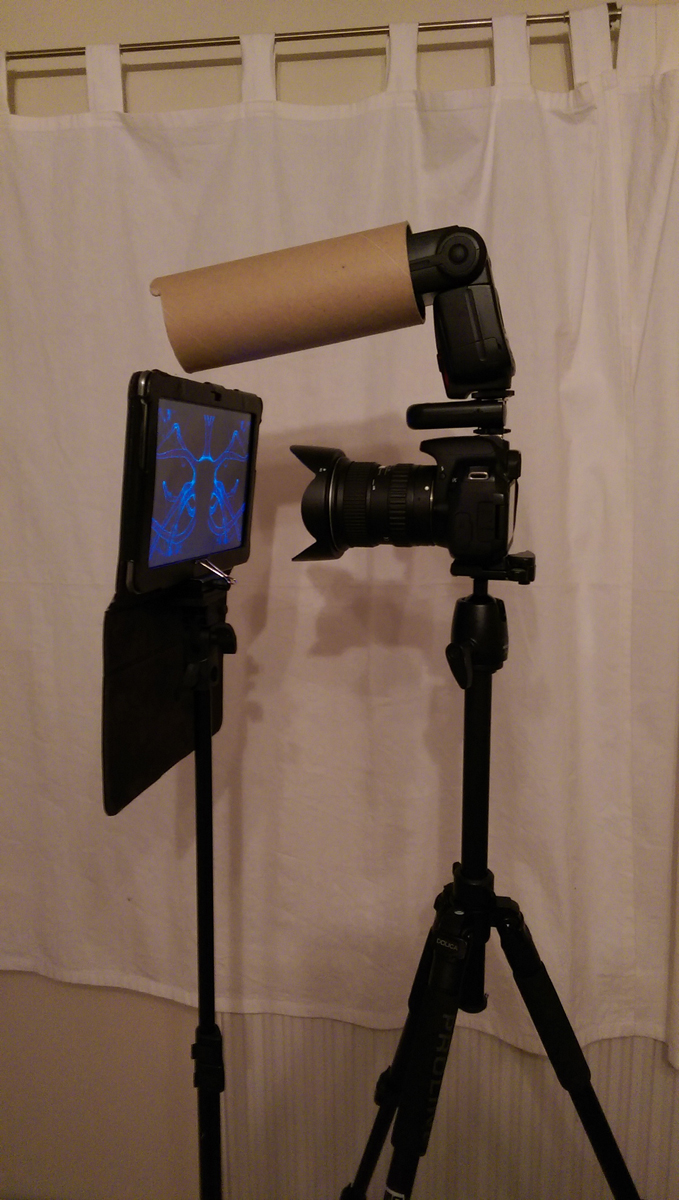
Yongnuo 565 ex + snoot
Samsung Tab 2
Tripod
Light stand with clamp for tablet
Yongnuo radio triggers for flash.
Patience 🙂
Settings
F-stop 14
Iso 100
63 seconds
Manual white balance
Firstly I took an image of a synapse and mirrored it for symmetry using a drawing app on the tablet. Next I used the same app to draw a head shaped space in black where I wanted my head to expose in the shot.

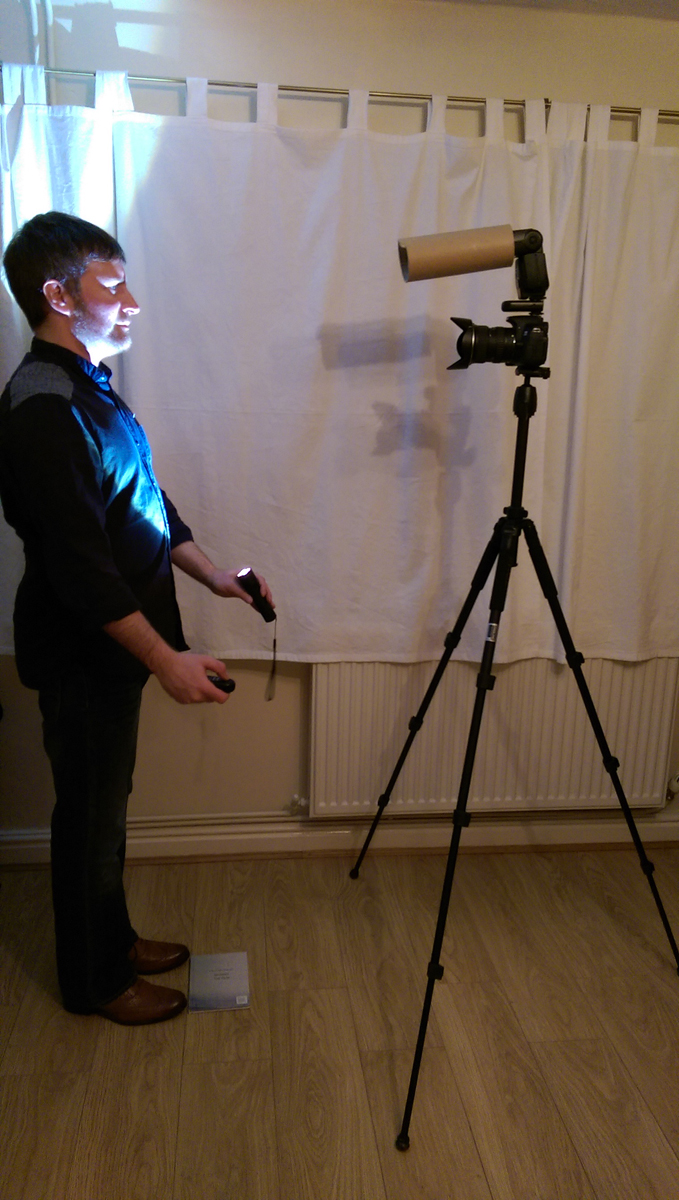
Set up the camera at head height and worked on the flash aspect of the shot. Ensuring my head was in the right place, focus was good and no light was spilling onto the wall behind me. I snooted the flash for this to concentrate the light from the flash onto my face. I used my radio triggers to fire the flash as this was the second part of the double exposure and therefore I wanted to choose when it went off. I also used my torch to illuminate under my chin to eradicate any shadows. Once happy I placed a marker on the floor and noted focus and focal length before moving onto the tablet.

I clamped my tablet to the light stand and used image 1 from before. Framed and focused and worked on the exposure time for this part. 1.5 seconds was enough to burn this part in. Once happy with everything I was ready to go.

Lights off and shutter fired. Counted to 1.5 seconds and put the lens cap on. Moved the tablet out of sight, reframed and focused for my head. Lens cap off and took up my position on my marker. Torch in one hand and radio trigger in the other I fired both at the same time ensuring I kept my head still.
The process took about 2.5 hours from start to finish.
The SpiroJib a Light Painting Mechanical Masterpiece by John Griffin
You probably know about Andrew Whyte’s DOME tool created out of a bike tire, if you don’t click HERE. Andrew’s dome tool is a clever way to use a bike wheel as a light painting tool, but that leaves the question WHAT ABOUT THE REST OF THE BIKE!?! A few weeks back Light Painter John Griffin shared a new light painting contraption with me that he had been working on, after picking myself up off the floor I found out John is calling his contraption the SpiroJib and it is F@!$ing amazing. I think its a tool the community is gonna be pretty excited about, I can see it even starting a mini Light Painting Evolution for the DIY light painters out there.
Inspired by this months Light Painting Photography contest themed Kinetic Light Painting, John set out to build a camera rig that would take camera rotation to a whole new level. Quickly the camera rig morphed into building the world’s first standing Light Painting Spirograph called the SpiroJib! The SpiroJib is a mechanical masterpiece made from the various pieces parts of a bike. The way it works is you chop a bike frame, weld a couple of sprockets, attach a “Light Bar”, throw in some ball bearings, run a chain around all of that, attach it on top of a light stand and power this beauty by hand cranking magic Light Painted Spirographs vertically in mid air!
Below are some samples of the same light illuminated while cranked around on the different sprockets.
I don’t think I need to tell you the endless possibilities that the SpiroJib brings to the Light Painting game, now whip the drool off of your keyboard and prepare yourself to get to work. The build of the SpiroJib is fairly complex and it will take some special tools and skill to build one but the good news is that John has created a detailed PDF available here, and he also made a detailed video walkthrough of the build itself (see below).
The giving spirit of the Light Painting Community never ceases to amaze me. John put a ton of work into creating the SpiroJib, the detailed PDF build guide and the Video. He did all of this work and he is giving it to all of us for nothing. I think I speak for the entire Light Painting Community when I say THANK YOU JOHN!
If you would like to see more of Johns work, ask him a few questions, or just say thanks check out his Facebook page HERE.
P.S. What is it with bikes and light painting tools?!?