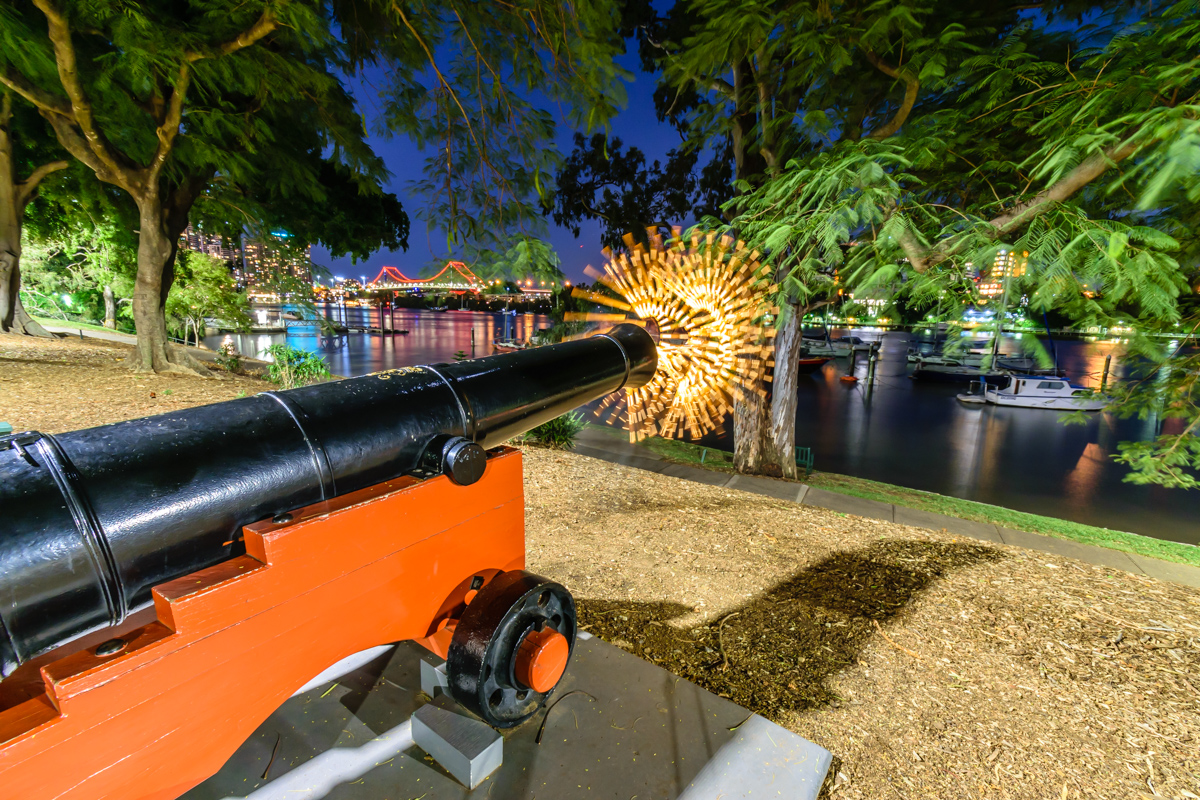
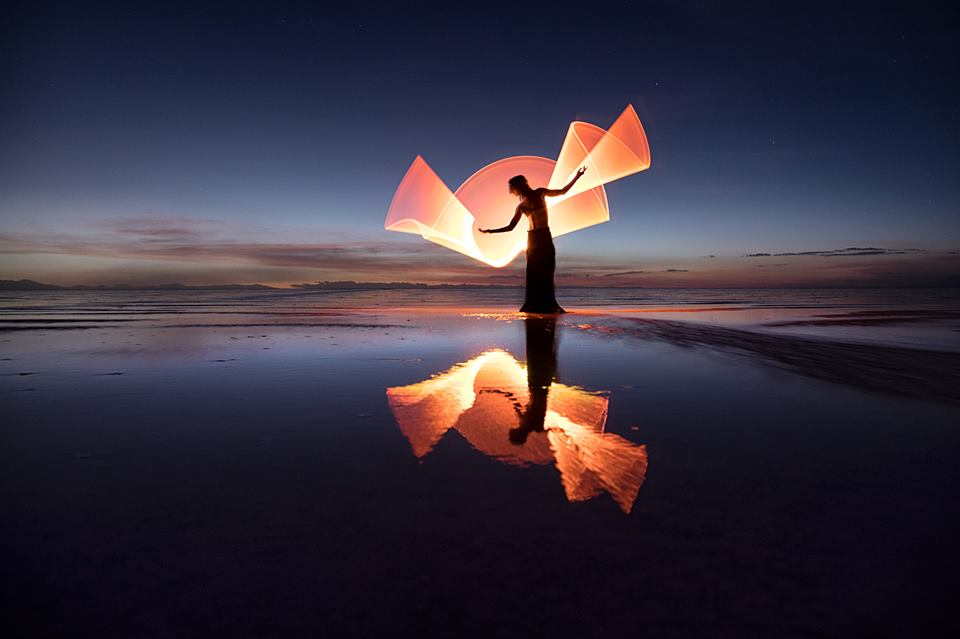
Light Painting Photography

For the promotion and progression of Light Painting Art and Artist.

  • Home
  • Blog
  • History
  • Artists
    • Dean Chamberlain
    • Eric Staller
    • Susan Sims-Hillbrand
    • Vicki DaSilva
    • David Lebe
    • Troy Paiva
    • Bruno Mesrine
    • Chanette Manso
    • Patrick Rochon
    • Aurora Crowley
    • LAPP-PRO
    • JanLeonardo
    • Lightmark
    • Arturo Aguiar
    • Pete Eckert
    • Trevor Williams
    • Michael Bosanko
    • Jason D. Page
    • Nocturne
    • Brian Hart
    • Jeremy Jackson
    • Janne Parviainen
    • Jadikan-LP
    • Dana Maltby
    • Lichtfaktor
    • Dennis Calvert
    • TigTab
    • Hannu Huhtamo
  • Tools
    • Light Painting Brushes Starter Kits Introduction
    • Fiber Optics Light Painting Tools for Photography
  • Tutorials
    • Beginner Light Painting Tutorials
    • Light Painting Tutorials by Artists
    • Light Painting Tool Tutorials
    • Kinetic Light Painting Tutorials
    • Light Painting with Fire Tutorials
    • How To Light Paint A Flower
    • Light Painting Photography Tutorial: The Spiked Orb
    • How To Light Paint a Faberge Orb!
    • No More Orb Feet – Light Erases Darkness
    • The Tinfoil Light Painting Technique
    • How To Light Paint A Ghost
    • Electric Orb Light Painting Tutorial
    • Spirographs and Physiograms Tutorial
    • On Camera Light Source
    • Off Camera Light Source
    • Orb Techniques
    • Steel Wool Tutorial
    • Custom White Balance
    • Omnidirectional Light Cap
    • Gel Holder
    • Simple Orb Tool
    • 4 Ways to Add Color to your Plexiglass Light Painting Brushes
    • Driving Shots at Night
    • Wire Wool Spinning
    • El Wire Tutorial
    • Light Stencils
    • Orbs
    • Dome Tutorial
    • Battery Operated Cathode
    • Light Wheel
    • Double Wheel
    • Fire Wall Tutorial
    • Fire Rain Tutorial
    • Smoke
    • How To Light Paint with the Polaroid One Step +
    • How To Focus In The Dark
    • Light Painting Tutorial The Peacock Technique
    • How To Shoot Defocused Fireworks Tutorial
    • Drone Light Painting Tutorial
    • Light Stencil By Trevor Williams
    • Andrew Whyte Dome Tutorial
    • Light Painting Workshop by Patrick Rochon
    • Rob Turney Refractographs
    • SpiroJib by Johnny Griffin
    • Lens Swap Light Painting Tutorial
    • Camera Rotation Light Painting Tutorial
  • Videos
    • Light Painting Documentaries
      • Jason D. Page Documentary
      • Ball of Light
      • Night Photography: Finding Your Way In The Dark
      • Lightpainted Reality
      • SeeMe | In Focus : Pete Eckert
      • Pete Eckert – Dancing on The Edge of Perception
    • Dean Chamberlain
    • Vicki DaSilva
    • Patrick Rochon
    • Lichtfaktor Light Painting Videos
  • Terms
  • Links
  • Connect With Us!
  • About
You are here: Home / Archives for Jason D. Page

Light Painting VLOG

August 1, 2017 by Jason D. Page

As you may have seen I the previous post I am taking a break from the BLOG for awhile while I am on a summer light painting road trip and working on some personal light painting projects. One of the projects that I have started on this trip is the Light Painting VLOG. The VLOG is to document my summer light painting road trip and also to provide some tips and inspiration along the way. Below are the first 4 episodes and I will post each new episode here on the LPP website as I create more. I am new to vlogging but I think they are getting better with each one so I hope you find them inspiring, informative, or at least slightly entertaining. If you would like to see new Light Painting Photography videos first please subside to our your tube channel here: https://www.youtube.com/channel/UCG-fAofOON8G3RwcpuMFy0g

ENJOY.

Filed Under: Light Painting Photography, Light Painting Video

LPP Blog Break

July 8, 2017 by Jason D. Page

I am going to be taking a break from the blog for a few weeks while I work on some personal projects. I will be back to sharing all the best light painting photography news and projects from around the world soonish… There is a bunch of awesome stuff hiding on this site that you have probably never seen before, please use that SEARCH feature and make some new discoveries! Thank you to everyone for all your support.

Jason

Filed Under: Light Painting Photography

Light Painting Photography Contest Winner, June 2017

July 5, 2017 by Jason D. Page

The winner for the June 2017 Light Painting Photography Contest themed “Light Drawing” is… Mario Lechu, a.k.a. (Le2) for the above image with incredibly placed light drawings entitled CATS. Here is how Mario created his winning image.

The settings for this shot were:
ISO100
18mm
f9
360 second exposure

Gear Used:
Canon Eos 1000d (Eos Rebel XS in USA and Canada)
Remote shutter and tripod

Post Production:
2:1 panoramic crop

“One really warm night, in the middle of a heat wave we had some weeks ago in Spain, I decided to go to the rooftop of the building where I live to light paint something.

The rooftop is a cool place because I am alone, nobody disturbs me and I can do whatever I want without problems. I love painting with people but this time, I worked alone. After thinking for a bit what I could light paint, I decided to draw some cats. Why cats? Because, in my opinion, they can be well combined with the background of the city where all the lights are shinning and, also, they are easy to draw. I’m not very good at freehand drawing and this is why I decided to draw simple animals, sitting down, walking, etc…

I began to practice how draw them in different positions. I thought about using different colour for each cat too. After practicing for a bit I took some test shots to calculate the proper exposure time. When it was calculated, I pressed the remote shutter to start the shot. The total exposure time for the final image was 6 minutes. After 3 attempts I had the picture I wanted. The shot finished and all cats were where I wanted them to be, the light was good enough and it was not too overexposed.

I smiled a lot when I looked at the camera display. I enjoyed drawing them, for me it’s all about having fun when I light paint. The cats also fit very well with the rest of the picture and I loved it at first sight.

The tool I used to draw them is the freehand rgb pen from Herramientas Light Painting. It is a really useful tool which allows you to quickly change between colours. It is not too big so you can use it very easily.

Remember! Let’s have fun when light painting and meooow!!!!”

Check out more of Mario’s Light Painting work here:
My website: www.le2.es
Facebook: www.facebook.com/le2photo

For this Cattastic light painting creation Mario will receive a prize package filled with treasures from our sponsors below! Please support these companies that support our art form, without them this contest series would not be possible!
Click here to see the current contest theme and find out how to enter to win your LPP prize pack!
Light-Painting-Brushes-Banner

Filed Under: Light Painting Contest, Light Painting Contest Winner, Light Painting Photography

Light Painting Photography Contest Entries, June 2017

June 23, 2017 by Jason D. Page

Here are the entries for the June 2017 Light Painting Photography, Light Drawing Contest! This was a pretty open theme for this contest the only requirement being that the light source much be seen by the camera and leave some sort of light streak in the image. Some really cool ones in here again this month!  Everyone PLEASE VOTE in the comment section of this page to pick your top 3 favorite images, the images all have a number in the title (EXAMPLE… IF ONE OF YOUR FAVORITES IS THE IMAGE TITLED “Light Painting Contest 05 June 2017″ THEN YOU SHOULD PUT THE NUMBER 5 AS ONE OF YOUR CHOICES). Voters please vote just one time and you must include 3 unique choices for your votes to be counted. In other words no 1,1,1, or 5,5,5, or 7,7,7,…..Please pick your three favorite IMAGES based on the image alone, thank you and enjoy. Voting ends June 30th at Midnight Eastern Standard Time.


The light painting photography contest series is sponsored by the best damn companies on earth COAST Flashlights, Neon Flexible, LED Flexible,and Light Painting Brushes ! Please support these awesome companies that support our light painting art from, without them this contest series would not be possible!
Light-Painting-Brushes-Banner

Filed Under: Light Painting Contest, Light Painting Photography

Black Fiber Optic Light Painting Tutorial by Gunnar Heilmann

June 5, 2017 by Jason D. Page

I am supposed to be taking a break from blogging for a little bit but this was to inspiring not to share… Gunnar Heilmann a member of the Light Painting Group Aurora Movement has been creating some really cool light painting portraits recently using black fiber optics! He was getting a lot of people asking how the heck are you getting these results so Gunnar was cool enough to make a video tutorial showing us all who to do it! Check out the short video tutorial and some of these awesome images below!


Filed Under: Light Painting Photography, Light Painting Tutorials, Light Painting Video

New Light Painting Blog!

June 1, 2017 by Jason D. Page

Just a quick post to let everyone know about an awesome new Light Painting Collaboration called the Light Painting Blog! Its a new blog/website all about light painting that has been created by some of the great artist in the our community. Make sure to check it out and follow along!

Filed Under: Light Painting Photography

Light Painting Tube Stories Episode 3

May 22, 2017 by Jason D. Page

Tube Stories Episode 3 by Eric and Kim Thats A LOT of Tubes… Enjoy.

Filed Under: Light Painting Photography, Light Painting Video

Light Painting Interval Exposure

May 9, 2017 by Jason D. Page

Innovation is in the fabric of the Light Painting Photography Art Form and community. For many of us so is inventing and/or modifying our own tools and gadgets to create a specific effect that we are looking for. Dennis Berka is one artist that loves to create his own gadgets for light painting. Recently, while exploring new ways to capture fire in long exposures, Dennis came up with something entirely new that he calls Interval Exposure! This technique brings to mind the early Photoflash work of Gjon Mili, but instead of using a flash Dennis achieves his effect using a pretty cool invention! Enjoy.

Interval Exposure by Dennis Berka

Inspiration
At first I wanted to create a better way to capture fire in long exposures. The problem with fire in long exposures is that it usually gets burned out on the sensor. Fire has a lot of dark and bright details but they move around all the time. So I was looking for a way to prevent the bright details from burning out the dark details.

In the back of my head I had an article about the effect a rolling shutter created on fast movements and I thought this could be a good solution. But you would have to open and close the lens very fast, so putting someone next to the camera with a piece of cardboard was out of the question.

I designed a few discs with holes in them so once you let them rotate in front of the lens this would interrupt the exposure in intervals.


After the first experiments I soon realized that the wanted effect on fire could be achieved but the whole concept had the potential to do amazing things with any light source because it gives the light source an effect as if it had a strobe.

It is fascinating that no one tried this so far, seeing how simple and easy it is, but I guess you can say this for many things in life.

Structure
I took a geared 12V motor (around 720 RPM) with a PWM controller to adjust the speed and put this in a printed box. The box was easily mounted on a tripod and the axis of the motor left blank to be able to put different discs on it.

The great question is “how can someone design such a tool”. I have the advantage of using a 3D printer for my tool designs, so I was able to design and print this pretty easy. The files to print out this tool can be found on Thingiverse.

If you don’t have a 3D printer at your disposal you can use black acrylic to cut out the discs (or any other material that can be cut in stable discs of this size) just make sure the discs are balanced or they create a lot of wobble if spun fast.

As a connector to the motor axis you can use spacers for linear shafts used in mechanics. They are rings with small screws that can be attached to a shaft like the one on the motor. Simply glue one of these rings to the disc in the exact center.

There are probably a lot of other ways to do this and I am curious to see what designs others will produce!

3D view of the case design.

After a few experiments I realized that a few different disc designs were very useful for different effects.

If you create a disc that has evenly distributed open and closed segments you half the exposure which gives any light source a strobe look. The speed and amount of open and closed segments controls how strong this effect is. You can see this effect most commonly in strobed flashlights or those dimmed with PWM. But you can apply this effect to any light source! No matter if it is fire, sparklers, a lamp or car trails.
Keep in mind that the amount of openings only influences the speed of the interval-effect. If you have a large variance in motor speed you just need one disc of this type.

Disc with evenly distributed open and closed segments.

If you use a disc that is mostly closed and only has small slits in it you get an effect that can be compared to shooting movement with a strobe flash. Because of the fast and short exposures any light source or lit object will appear relatively static on the photo. But keep in mind that even with small slits you will get a certain amount of movement blur depending on the speed of movement. Any light source (torches, sparklers, etc.) appears as if they are switched on and of real fast.

The amount of open segments in this type of disc influences the frequency of exposures. If you use wider segments you get more movement blur, if you use narrower segments you get sharper photo parts.

Keep in mind that you have to create the open segments with an edge along a line from the center of the disc to its circumference. This is because the further you go from the center the faster a point on a disc rotates. So if the open segments are wider at the outside the image gets exposed correctly everywhere. If the segment was the same width along its length the outer side of the photo would get less exposure then the inner side.

Usage tips

The most important thing to keep in mind is that the exposure is interrupted. This means that you increase your exposure time depending on how many open segments your disc has. If your disc has an even distribution of open and closed segments the exposure is halved. So if you would need 5 seconds for a scene to be lit correctly you will need 10 with the disc. With discs that have small slits this effect is even stronger. I use a disc that has two 10° slits, so only 20° of the whole 360° are open. This means that only 1/18 of the disc is open, which means the exposure time is multiplied by 18. One second exposure would then take 18 seconds.

You can combine this with normal techniques. So you could light a scene normally then cover the lens and put the disc in front of the lens and let it rotate, then remove the cover to create intervalled light streaks.

Also keep in mind that there will be a small gap between the lens and the disc, so any light that hits the disc from behind can be reflected into the lens and create flares and strange lights in your photo.

At the top right you can see some strange light that were created by reflections of colored light behind the camera.

Examples

Car trails

EL wire, the normal blink frequency of most EL controllers is usually much slower.

Black fiber optics and a fast turning disc. The tips of the fiber optics create an awesome light rain effect

The “trunk” was created with EL wire and the “crown” with a blade

A pair of dance instructors helped me test out this technique shooting human movements.

A test with steel wool on Lightpainting meeting from Lightpaitning Helpdesk in Berlin.

Conclusion

Even though this technique is really simple it has a lot of potential. I have tried out a couple of different lightpainting elements with it already and found out that it is worth to try it out on any old technique you know. It can create quite amazing effects even with techniques you know for years.

I have a lot more experiments planned for this, so stay tunes for even more examples and results.

I hope a few other light painters will adapt this technique and build their own interval exposure tools. Looking forward to see your amazing photos and results using this technique!

If you have questions you can reach Dennis on his Facebook page Ryu’s Lightworks.

Filed Under: Light Painting Photography

Light Painting Photography Contest Winner, April 2017

May 7, 2017 by Jason D. Page

And the winner for the April 2017 Light Painting Photography Contest themed “Refractograph” is… Tim Gamble for the above titled image “Primordial” Tim shared with us how he created the winning image and he also provided a awesome video tutorial below, Enjoy!

Here is how Tim Created his winning image: “David Hull and Rob Turney inspired, kitchen based, deep space exploration light art. I fashioned a new cardboard diorama with a smaller planet which I was keen to pair with some lenslessness.”

“This being a pinpricked A3 piece of black card with a hole cut in the middle. Then a slightly larger disc of black card stuck over the hole to allow the light to leak through.”

“Next my Led Lenser covered in tinfoil with a tiny pin hole pointing at a glass, about 2 meters away sat on a lightstand. No lens on my camera and positioned a wine glass bottom in front of the camera until happy with the pattern shown in live view. Two seconds of exposure and placed the 50mm manual Samyang on the camera and swapped tripods for the planet part for which I had already focused and set aperture.”

“I took the lens cap off and I lit the card from behind with the Light Painting Brushes colour filters and hoods. One torch with orange for the planet rim and the other two with a purple and blue for the stars.”

Here is a tutorial video I created describing and going through the process.

For this fantastical light painting creation Tim will receive a prize package filled with treasures from our sponsors below! Please support these companies that support our art form, without them this contest series would not be possible!
Click here to see the current contest theme and find out how to enter to win your LPP prize pack!

Light-Painting-Brushes-Banner

Filed Under: Light Painting Contest, Light Painting Contest Winner

Light Painting Tube Stories 2, by Eric Pare.

May 5, 2017 by Jason D. Page

Eric and Kim have released the latest version of Tube Stories documenting their light painting photography adventures around the world, check it out!

Filed Under: Light Painting Photography, Light Painting Video

« Previous Page
Next Page »

Copyright © 2026 · News Pro Theme on Genesis Framework · WordPress · Log in