Light Painting Photography

For the promotion and progression of Light Painting Art and Artist.

  • Home
  • Blog
  • History
  • Artists
    • Dean Chamberlain
    • Eric Staller
    • Susan Sims-Hillbrand
    • Vicki DaSilva
    • David Lebe
    • Troy Paiva
    • Bruno Mesrine
    • Chanette Manso
    • Patrick Rochon
    • Aurora Crowley
    • LAPP-PRO
    • JanLeonardo
    • Lightmark
    • Arturo Aguiar
    • Pete Eckert
    • Trevor Williams
    • Michael Bosanko
    • Jason D. Page
    • Nocturne
    • Brian Hart
    • Jeremy Jackson
    • Janne Parviainen
    • Jadikan-LP
    • Dana Maltby
    • Lichtfaktor
    • Dennis Calvert
    • TigTab
    • Hannu Huhtamo
  • Tools
    • Light Painting Brushes Starter Kits Introduction
    • Fiber Optics Light Painting Tools for Photography
  • Tutorials
    • Beginner Light Painting Tutorials
    • Light Painting Tutorials by Artists
    • Light Painting Tool Tutorials
    • Kinetic Light Painting Tutorials
    • Light Painting with Fire Tutorials
    • How To Light Paint A Flower
    • Light Painting Photography Tutorial: The Spiked Orb
    • How To Light Paint a Faberge Orb!
    • No More Orb Feet – Light Erases Darkness
    • The Tinfoil Light Painting Technique
    • How To Light Paint A Ghost
    • Electric Orb Light Painting Tutorial
    • Spirographs and Physiograms Tutorial
    • On Camera Light Source
    • Off Camera Light Source
    • Orb Techniques
    • Steel Wool Tutorial
    • Custom White Balance
    • Omnidirectional Light Cap
    • Gel Holder
    • Simple Orb Tool
    • 4 Ways to Add Color to your Plexiglass Light Painting Brushes
    • Driving Shots at Night
    • Wire Wool Spinning
    • El Wire Tutorial
    • Light Stencils
    • Orbs
    • Dome Tutorial
    • Battery Operated Cathode
    • Light Wheel
    • Double Wheel
    • Fire Wall Tutorial
    • Fire Rain Tutorial
    • Smoke
    • How To Light Paint with the Polaroid One Step +
    • How To Focus In The Dark
    • Light Painting Tutorial The Peacock Technique
    • How To Shoot Defocused Fireworks Tutorial
    • Drone Light Painting Tutorial
    • Light Stencil By Trevor Williams
    • Andrew Whyte Dome Tutorial
    • Light Painting Workshop by Patrick Rochon
    • Rob Turney Refractographs
    • SpiroJib by Johnny Griffin
    • Lens Swap Light Painting Tutorial
    • Camera Rotation Light Painting Tutorial
  • Videos
    • Light Painting Documentaries
      • Jason D. Page Documentary
      • Ball of Light
      • Night Photography: Finding Your Way In The Dark
      • Lightpainted Reality
      • SeeMe | In Focus : Pete Eckert
      • Pete Eckert – Dancing on The Edge of Perception
    • Dean Chamberlain
    • Vicki DaSilva
    • Patrick Rochon
    • Lichtfaktor Light Painting Videos
  • Terms
  • Links
  • Connect With Us!
  • About
You are here: Home / Archives for Light Painting Categories

Light Painting Break Down: Johnny Dickerson for Onboard Memory

July 27, 2015 by Jason D. Page

Light Painting Onboard Memory

From time to time we come across a light painting and just stare it wondering how the F@#! did they do that?!?! Break Down is a series if which I only ask the artist one question “How the F@#! did you make this” its up to the artist to tell as little or as much as they want. For this Light Painting Breakdown Johnny Dickerson talks us through how he created the above image titled “Onboard Memory”

So Johnny how the F@#! did you make this?

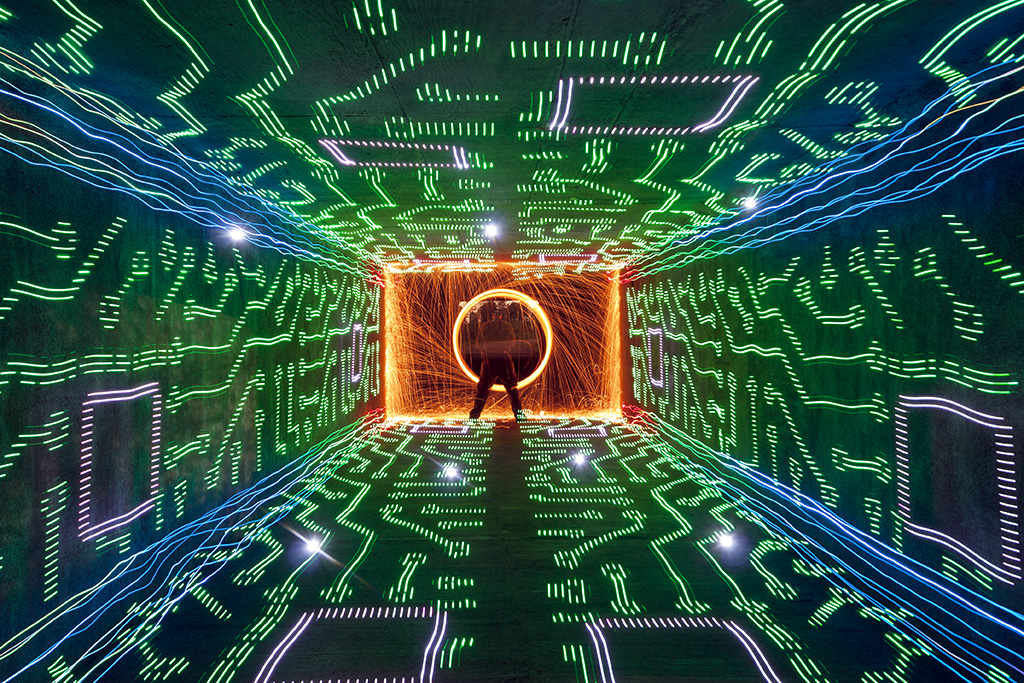
Originally, I had the idea that I wanted to create a shot where it looked like I was completely immersed inside a computer. The only way I thought that I could it, is to make a “tunnel” of light using the Digital Light Wand (Editor Note: The Digital Light Wand was created by Michael Ross and was the predecessor to The Pixelstick) and have me at the end. I first tried to create it in my backyard with unsatisfactory results.
Light Painting IMG_3210

The walls did not line up like I would have liked, and there was no way to make the ceiling line up right with the walls. I even tried nailing down some string in the ground to give me a straight line to work with. It still was not acceptable with what I had in mind, so I put the idea to the side for awhile.

Flash-forward several months, while out scouting for potential areas to light paint, I came across a bike tunnel that was about 12 feet wide by 8 feet high and about 200 feet in length.
Light Painting IMG_9202

There was not (and still to this day) any lights in there; which makes it perfect to light paint in. It’s completely dark for the most part, except for a warehouse floodlight that spills in a little, but you can shoot further down and avoid it’s light pollution. This is what it looks like when you shoot straight down the middle.
Light Painting IMG_9207

I thought I just hit the jackpot for light painting! Even to this day, I refer to it to my light painting buddies around town as just “the tunnel”, they know. I was ready to try my idea of being immersed inside a computer.

I had a pattern of a computer that I used for the Digital Light Wand and decided to walk down the tunnel against the wall.
Light Painting IMG_9234

By using the walls of the tunnel to walk down, the pattern lined up exactly how I wanted it! I later came to realize how dark it was in there and needed a reference point from where I needed to start light painting. I found a fairly large rock outside and placed it halfway through the tunnel in the corner. So, when I start the exposure, I slowly walk to the rock and start light painting at the same spot every time. For the shot “Onboard Memory”, I walked the Digital Light Wand against each wall, twice on the floor, and twice on the ceiling making 6 passes. Realizing there was nothing in the corners to “connect” the DLW passes, I decided to make a pass with the LEDs on a bike tire (made well known by TCB).
Light Painting IMG_9236

Once I seemed up the corners, I went back to where the rock was and spun some steel wool. To top it off, I created some flares by just shining a flashlight at the camera for a couple of seconds, hoping the flares would line up with some of the computer pattern.
Light Painting Onboard Memory

So obviously this is amazing work but Johnny also sent in a few others that are absolute JAW DROPPERS that were created very much in the same way, check these out!


If you are not following Johnny’s work you are missing out. Be sure to check out his website, his Facebook page for more incredibleness!

Filed Under: Break Down, Light Painting Photography

Light Painting Break Down: Mart Barras

February 8, 2015 by Jason D. Page

From time to time we come across a light painting and just stare it wondering how the F@#! did they do that?!?! For my own sanity and to hopefully enlighten some of rest of the light painting community I am starting a new series on the LPP website called Break Down. Basically if you put out some crazy, confusing, mind boggling, or just plain different work that the rest of us can’t figure out I am going to harass you to share some of your secrets. Now relax, I am not going to ask for a step by step so we can all rip you off. I am asking for just a piece of inside knowledge maybe a little hint as to how you’re creating your compelling work! I will only ask the artist one question “How the F@#! did you make this” its up to the artist to tell as little or as much as they want.

For the first one in the Break Down series we are prying open the mind of Light Painting Photographer Mart Barras for this WTF image:
Light-Painting-Mart-Barras

Mart how the F@#! did you make this?

Here is the Break Down:
GEAR USED
Camera: Nikon D7100
Lens: 18-35mm
iPad with Stand
Custom Camera Rotation Tool
Magic

Settings:
F-Stop: F16
ISO: 100
Exposure Time: 93 seconds

IPAD as the Light Source.
Basically it like using stencils but doing it from an iPad.

Capping The Lens
You expose one at a time, each image to the lens (capping the lens between images).

Masking and Camera Rotation
It does require some masking, and a lot of lining up to get parts of the image to sit right or even behind what you want in front so I used a mask cut out using black tape roughly the same size as the fire atom at the front and placed it over the image of a few laser beams and rotated the shot twice (180 degrees).

Finally a Zoom Pull
I then exposured a shot of a PCB and and a star field that I zoomed pulled, then an image of some smoke then finally exposed the image of the fire atom and done, though it did take lots of goes to get the alignment right and the exposure too.

Check out a few of the set up shots Mart shared of a recent shoot he did using similar techniques to create another WOW image seen below and for even more beautiful masterpieces check out Marts Flick Profile HERE:


Light Painting Mart Barras 2

Filed Under: Break Down, Light Painting Photography

« Previous Page

Copyright © 2026 · News Pro Theme on Genesis Framework · WordPress · Log in