Light Painting Photography

For the promotion and progression of Light Painting Art and Artist.

  • Home
  • Blog
  • History
  • Artists
    • Dean Chamberlain
    • Eric Staller
    • Susan Sims-Hillbrand
    • Vicki DaSilva
    • David Lebe
    • Troy Paiva
    • Bruno Mesrine
    • Chanette Manso
    • Patrick Rochon
    • Aurora Crowley
    • LAPP-PRO
    • JanLeonardo
    • Lightmark
    • Arturo Aguiar
    • Pete Eckert
    • Trevor Williams
    • Michael Bosanko
    • Jason D. Page
    • Nocturne
    • Brian Hart
    • Jeremy Jackson
    • Janne Parviainen
    • Jadikan-LP
    • Dana Maltby
    • Lichtfaktor
    • Dennis Calvert
    • TigTab
    • Hannu Huhtamo
  • Tools
    • Light Painting Brushes Starter Kits Introduction
    • Fiber Optics Light Painting Tools for Photography
  • Tutorials
    • Beginner Light Painting Tutorials
    • Light Painting Tutorials by Artists
    • Light Painting Tool Tutorials
    • Kinetic Light Painting Tutorials
    • Light Painting with Fire Tutorials
    • How To Light Paint A Flower
    • Light Painting Photography Tutorial: The Spiked Orb
    • How To Light Paint a Faberge Orb!
    • No More Orb Feet – Light Erases Darkness
    • The Tinfoil Light Painting Technique
    • How To Light Paint A Ghost
    • Electric Orb Light Painting Tutorial
    • Spirographs and Physiograms Tutorial
    • On Camera Light Source
    • Off Camera Light Source
    • Orb Techniques
    • Steel Wool Tutorial
    • Custom White Balance
    • Omnidirectional Light Cap
    • Gel Holder
    • Simple Orb Tool
    • 4 Ways to Add Color to your Plexiglass Light Painting Brushes
    • Driving Shots at Night
    • Wire Wool Spinning
    • El Wire Tutorial
    • Light Stencils
    • Orbs
    • Dome Tutorial
    • Battery Operated Cathode
    • Light Wheel
    • Double Wheel
    • Fire Wall Tutorial
    • Fire Rain Tutorial
    • Smoke
    • How To Light Paint with the Polaroid One Step +
    • How To Focus In The Dark
    • Light Painting Tutorial The Peacock Technique
    • How To Shoot Defocused Fireworks Tutorial
    • Drone Light Painting Tutorial
    • Light Stencil By Trevor Williams
    • Andrew Whyte Dome Tutorial
    • Light Painting Workshop by Patrick Rochon
    • Rob Turney Refractographs
    • SpiroJib by Johnny Griffin
    • Lens Swap Light Painting Tutorial
    • Camera Rotation Light Painting Tutorial
  • Videos
    • Light Painting Documentaries
      • Jason D. Page Documentary
      • Ball of Light
      • Night Photography: Finding Your Way In The Dark
      • Lightpainted Reality
      • SeeMe | In Focus : Pete Eckert
      • Pete Eckert – Dancing on The Edge of Perception
    • Dean Chamberlain
    • Vicki DaSilva
    • Patrick Rochon
    • Lichtfaktor Light Painting Videos
  • Terms
  • Links
  • Connect With Us!
  • About
You are here: Home / Search for "Digital Light Wand"

Search Results for: Digital Light Wand

Digital Light Wand Upgrade by Light Painting Photographer Michael Ross

May 21, 2013 by Jason D. Page

DLW_NEW_1

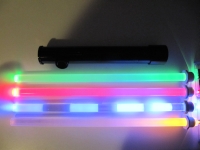
Light painting photographer, Digital Light Wand Inventor, and all around genius Michael Ross a.k.a TxPilot has given yet another gift to the light painting community. Building off some upgrades made by Flickr handle is0-Mick, Mr. Ross has reinvented what is possible with this amazing light painting tool! Here’s whats new…

The new Digital Light Wand’s have up to 60 LED’s per meter as opposed to 32 on the old models and they have been upgraded with all the following menu items that can be manipulated in the field:

1 – File Selection
2 – Brightness setting
3 – Initial Delay time
4 – Frame Delay (how long each pixel frame is displayed)
5 – Dual Delay (adjustment for interlace offset, depends on the speed the wand is normally used)
6 – Left to Right or Right to Left
7 – Number of times to repeat the same file
8 – Repeat delay (delay between repeats)
9 – Push On/Off Mode (Push button to start, repeats until button is pushed again.) (Great for pattern repeats)

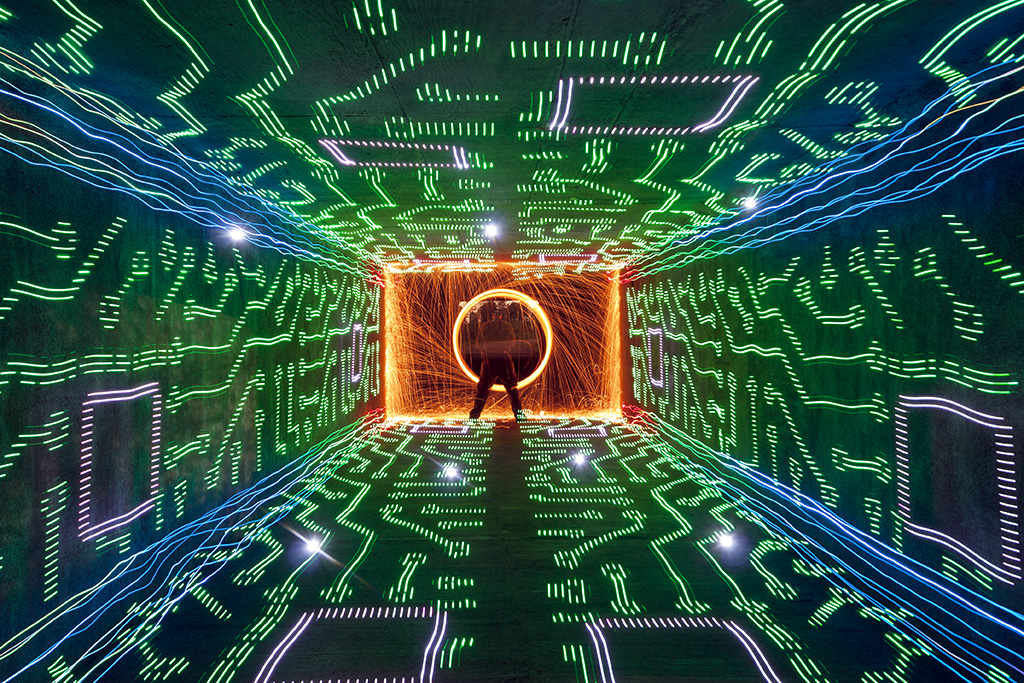
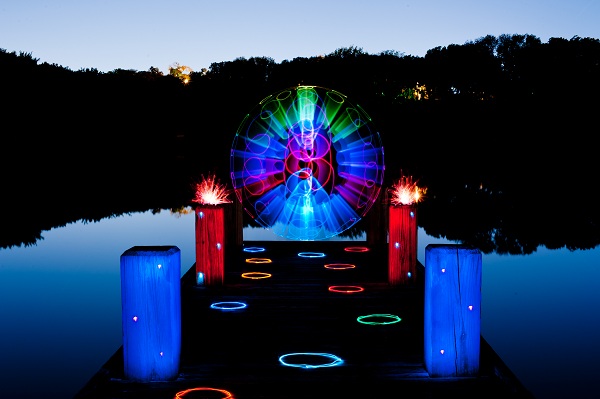
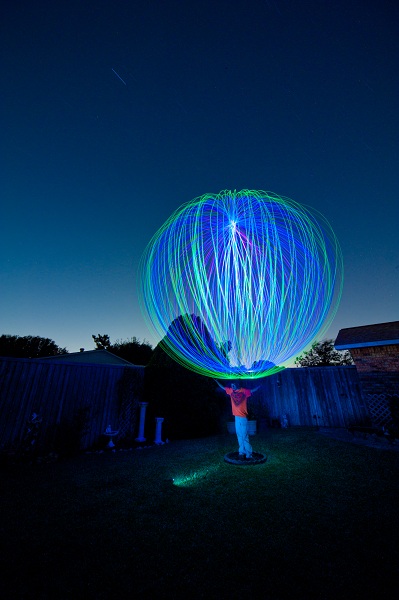
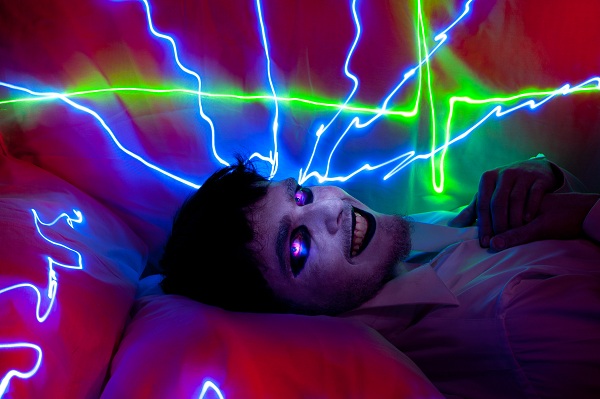
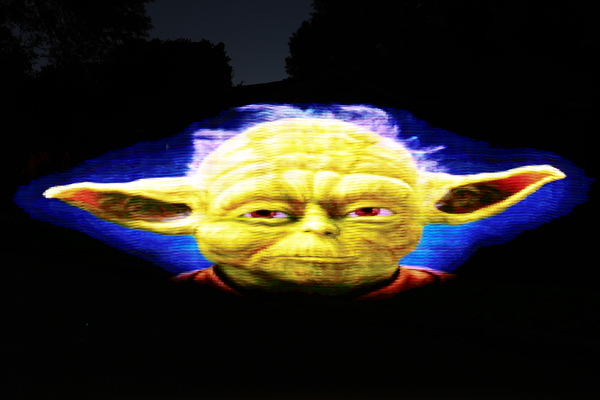
Check these sample images and keep reading below for even more details!


LPP ∇ Hey Mike I see you upgraded your Digital Light Wand, can you tell us whats new….

MR ∇ The Digital Light Wand has gone through some changes since the first one I created three and half years ago. There have been a few varying designs based on the original and each of them made the use of the tool in the field more convenient. The most recent changes incorporate some new LED strips that have been made available recently that feature a higher density of LEDs per meter and full color manipulation compared to the original Addressable LED strips. These new strips now have 52 and even 60 LEDs per meter compared to the 32 LEDs per meter of the original. The color range is also much easier to deal with from a programming standpoint and there are a full 2.1 million colors easily available in these new strips.

LPP ∇ Sounds awesome what inspired the upgrade?

MR ∇ A guy that goes by the name of iso-mick on flickr changed the original design a while back and incorporated an SD card along with an LCD display so that several BMP files could be stored and played back on demand while in the field without having to reprogram the strip between each use! So taking iso-mick’s work, I have made some changes to the programming code to allow two of the higher density LED strips to be placed side by side with an offset to gain a greater resolution in the final image. Without getting into the technical challenges that this represents in making this work for a variety of light painters, I made some further changes to the programming code to allow for making fine tuned adjustments in the field. There are several variables that can occur such as how fast the wand is moved during the creation of a light painting photo. There are also other variables involved such as the preference of moving the wand from right to left instead of from left to right and of course just dealing with different levels of ambient lighting. Once a light painter is comfortable with specific settings on the new version of the Digital Light Wand, they can choose those defaults and only make minor adjustments between uses.

LPP ∇ Whats up with the software does it work with for us Mac users too?

MR ∇ There are versions of the Arduino software for Windows, MAC, and Linux so as long as you can format an SD card to the proper format and create 24-Bit BMP files of the images you want use, then you should be good to go!

I have the Arduino code ready to download on my website along with detailed wiring diagram, parts lists, and basic assembly instructions. And if you run into any issues, just post a question on the blog. There are plenty of others willing to help out with it!

LPP ∇ Awesome work Mr. Ross, Thank you for sharing!

Filed Under: Light Painting Photography

Michael Ross Interview, The Digital Light Wand

July 13, 2011 by Jason D. Page

Michael Ross, a.k.a. TxPilot is a light painter and self proclaimed geek, nerd, and techie. He has a passion for creating new light painting tools. Michael is the creator of The Digital Light Wand, it is a programable LED light strip that can create just about any design a light painter can think of. Michael recently uploaded a lengthy and detailed tutorial showing other light painters how to create his greatest invention to date. Below is a interview I did with Michael about this insane light painting tool.

LPP ∇ First give me a little of your back ground how long have you been light painting?

MR ∇ I got started in Light Painting about 2 years ago. The typical long exposures with Sparklers on the 4th of July story. I really got deep into it when I ran across a light painting by TigTab on Flickr. It just blew me away and I had to learn more.

LPP ∇ We have all been there…lol, when did you get into photography?

MR ∇ I have been into photography on an small scale all of my life, but at the start of 2009 I made a decision to try to learn to master it.

LPP ∇ So I saw your massive tutorial recently about how to make the digital light wand, when did you first create this tool?

MR ∇ I had the idea of creating it when I first started to get into light painting. But it was around October of 2009 that I ran across the addressable light strip and I knew I would be able to make it work with that. I experimented with the electronics for a few months and finally had a break through with it in December of 2009.

LPP ∇ Can you explain a little bit about what it is and how it works?

MR ∇ Without getting into the technical details. The light strip is an RGB LED strip that will take software commands. Each LED can be controlled separately for the color mix and on and off state. I used the Arduino Mega Microcontroller board to connect to the strip to send the commands to it to control the colors and on and off sequencing. I then created a spreadsheet program that I use to “visualize” the image that I want the light strip to make and it generates the software code needed to make it happen. Once the software is downloaded to the microcontroller and power is turned on, the strip will play the sequence.

LPP ∇ Holy s@#!, so are you an electrical engineer, mad scientist, of just really smart?

MR ∇ Ha! I have been called a “Mad Scientist” on more than one occasion! I do have a background in electronics as I was an Avionics Tech in the Navy. My Grandfather and Father also were into electronics heavily.

LPP ∇ What inspired the original idea? Were you trying to accomplish a specific image or just exploring the possibilities of light painting? With your original concept I mean…

MR ∇ I have been known to think outside that is outside the box a lot. I am constantly thinking of new ideas and tools that will work with Light Painting and at this point I have a list of ideas so long it will take a lifetime to complete them all! Ha. The original idea was to be able to create a tool that I can use to light paint the Mona Lisa in the air! I haven’t reached that goal yet but I will!

LPP ∇ WOW I really like where your headed with this idea! That takes me to my next question, The tool looks like it can do just about anything what are the limitations of the Digital Light Wand?

MR ∇ There are several things that I would like to improve with this tool, the two major limitations are the color range for each LED and the “Resolution” or basically how far apart the LEDS are from each other. I already have version 2 AND 3 designed in my head and the parts have been sitting under my desk at home now for a year. Just have not had the time to work on them yet.

LPP ∇ Cant wait to see what you can come up with in the next version of this little monster…. Recently flickr has given some exposure to a guy that goes by the name mechatronics for his work with something similar have you seen his images?

MR ∇ Yes, I have seen his images and the tool he created. One of my employees told me about it the day he made his announcement on Reddit.

LPP ∇ Some folks in the LP community feel like maybe he ripped your idea and didn’t give you the credit you rightfully deserve for being the originator of this idea, whats your take?

MR ∇ I don’t really feel that way. He basically had the same vision I did and created a tool that is similar but different in a lot of ways. When he made his announcement, I guess some others must have steered him my direction. He contacted me via email and we are talking about combining our efforts and creating a single tool that will give everyone the best of both worlds! Both of the designs have advantages that the other does not have.

LPP ∇ Thats good to hear…. It is awesome that you made the tutorial for everyone to try to create their own but for those of us who will electrocute ourselves do you plan on making any for SALE?

MR ∇ I don’t know if I will market them. My goal with the tutorial was to try to make it as detailed and easy to follow that anyone with some basic DIY skills could build one. I will keep working towards that and by releasing the way I did, I am really hoping that some others will take it and add to it to make it even easier to build and use. At this point I am looking forward to moving on to some other projects for Light painting that I think will even put this one to shame!

Oh… and no one should worry about being electrocuted with this. There is no way any part of this tool could hurt anyone. Unless you were hit by it that is!

LPP ∇ Thanks for taking the time to answer some questions we are all looking forward to seeing your next invention!

MR ∇ No problem at all. It was my pleasure.

To view the entire Digital Light Wand tutorial visit Michael’s website HERE

Filed Under: Light Painting Photography, Light Painting Tools

Light Painting Break Down: Johnny Dickerson for Onboard Memory

July 27, 2015 by Jason D. Page

Light Painting Onboard Memory

From time to time we come across a light painting and just stare it wondering how the F@#! did they do that?!?! Break Down is a series if which I only ask the artist one question “How the F@#! did you make this” its up to the artist to tell as little or as much as they want. For this Light Painting Breakdown Johnny Dickerson talks us through how he created the above image titled “Onboard Memory”

So Johnny how the F@#! did you make this?

Originally, I had the idea that I wanted to create a shot where it looked like I was completely immersed inside a computer. The only way I thought that I could it, is to make a “tunnel” of light using the Digital Light Wand (Editor Note: The Digital Light Wand was created by Michael Ross and was the predecessor to The Pixelstick) and have me at the end. I first tried to create it in my backyard with unsatisfactory results.
Light Painting IMG_3210

The walls did not line up like I would have liked, and there was no way to make the ceiling line up right with the walls. I even tried nailing down some string in the ground to give me a straight line to work with. It still was not acceptable with what I had in mind, so I put the idea to the side for awhile.

Flash-forward several months, while out scouting for potential areas to light paint, I came across a bike tunnel that was about 12 feet wide by 8 feet high and about 200 feet in length.
Light Painting IMG_9202

There was not (and still to this day) any lights in there; which makes it perfect to light paint in. It’s completely dark for the most part, except for a warehouse floodlight that spills in a little, but you can shoot further down and avoid it’s light pollution. This is what it looks like when you shoot straight down the middle.
Light Painting IMG_9207

I thought I just hit the jackpot for light painting! Even to this day, I refer to it to my light painting buddies around town as just “the tunnel”, they know. I was ready to try my idea of being immersed inside a computer.

I had a pattern of a computer that I used for the Digital Light Wand and decided to walk down the tunnel against the wall.
Light Painting IMG_9234

By using the walls of the tunnel to walk down, the pattern lined up exactly how I wanted it! I later came to realize how dark it was in there and needed a reference point from where I needed to start light painting. I found a fairly large rock outside and placed it halfway through the tunnel in the corner. So, when I start the exposure, I slowly walk to the rock and start light painting at the same spot every time. For the shot “Onboard Memory”, I walked the Digital Light Wand against each wall, twice on the floor, and twice on the ceiling making 6 passes. Realizing there was nothing in the corners to “connect” the DLW passes, I decided to make a pass with the LEDs on a bike tire (made well known by TCB).
Light Painting IMG_9236

Once I seemed up the corners, I went back to where the rock was and spun some steel wool. To top it off, I created some flares by just shining a flashlight at the camera for a couple of seconds, hoping the flares would line up with some of the computer pattern.
Light Painting Onboard Memory

So obviously this is amazing work but Johnny also sent in a few others that are absolute JAW DROPPERS that were created very much in the same way, check these out!


If you are not following Johnny’s work you are missing out. Be sure to check out his website, his Facebook page for more incredibleness!

Filed Under: Break Down, Light Painting Photography

The Light Lasso by Joerg Miedza

September 20, 2014 by Jason D. Page

Joerg Miedza Light Lasso 9


Sometimes is go to go back to the basics. Going out and shooting with just a single light and a camera can be the most refreshing form of light painting. Think of it as getting back to your roots before all the Digital Light Wands and Pixel Sticks. In this new film by Light Painting Photographer Joerg Miedza the goal was just that to get back to the basics. Entitled “The Light Lasso” Joerg describes the work as “Back To Basic – one light, one man, one location” although there are a few different lights used and a couple of locations you get the point. Its a beautifully simple light painting film that is comprised of 2987 still images and was not so simple to make.

Joerg says “It´s hard to do a 100% perfect round circle in a real performance, so you can see the sequences are hopping a little bit. You have to move exactly to end on 360° where you started at 1°, is very tricky. That´s light painting as I know it, it need´s a well prepared and correctly accomplished movement in the dark – if the light painter has moved all fine, the result is awesome. I can tell you, I work hard on perfect movements and the results are getting better and better!”

The film making process was not without a few fails. Joerg says “sometimes my steps were not good enough, sometimes the lamp crashed to a tree or a wall so I would have to redo the production”. In one of the more notable re-takes one of Joerg’s horses walked over in the field to see what all the lights were about… Check out the animated gif of the horse incident and the full Light Lasso film below!
M02-2316_000121

Filed Under: Light Painting Photography, Light Painting Video

LightPaintingTools.com and LightPaintingPhotography.com, Team Up

March 27, 2012 by Jason D. Page

One of the questions that I get the most here on Light Painting Photography is what tools should I get and where can I get them. I had been working on some ideas, trying different ways of putting a store together to supply the products that light painters’ need. Then a few months back I saw light painting photography’s very own technical genius Michael Ross had already done it! Mike started the website LightPaintingTools.com where he makes some really cools S*!@ for light painters, things like Light Markers, Orb Tools, and RGB Light Wands.


So Mike and I started talking about what he was trying to do and why he started the website.  We have a similar love of light painting photography and a passion for sharing it with the world. Soooooo we teamed up. In the tools section of this site you will now find links to the products offered at LightPaintingTools.com. I will keep you updated with his new tools as they become available! Now get over there and buy something so Mr. Ross can keep creating innovative tools like The Digital Light Wand for the light painting world.


Filed Under: Light Painting Photography

Pixelstick Review by Ian Hobson

September 24, 2014 by Jason D. Page

Pixelstick-Review
Unless you have been living under a rock or in a comma for the last year you have probably heard of the light painting tool called The PixelStick. The Pixelstick is that light painting tool that looks a lot like Michael Ross’s Digital Light Wand created around 2010, huh hummmm… The Pixelstick received mass exposure and raised nearly 6 times its Kickstarter funding goal, a total of $628,417.00 to go into production! That was in December of 2013, well just about a month ago veteran Light Painter Ian Hobson got a hold of one of the first production models. Ian was kind enough to put The Pixelstick through its paces and write an in depth, honest and impartial review to let us all know if its worth the $325.00, check it out below.

Images and words by (Ian Hobson)
I have no axe to grind, nor am I an evangelist for fancy tools, but I am passionate about light painting. I want to share my thoughts with others who take the artform seriously, and are not simply looking for a ‘magic bullet’ style device to turn them into spectacularly competent light painters overnight. So by writing this, I’m doing nothing more than calling it how I see it. I’m not sure how well kickstarter projects usually do, but Bitbanger Labs must have been pretty pleased with how their second one turned out. It seemed that almost as soon as they’d set up the kickstarter for the Pixelstick, it had exceeded it’s required target and was set to become a real product. Now it is a real product, and is one of very few commercially available dedicated light painting tools.

Is It Worth The Money, Light Painting

Is It Worth The Money

For those of you who are unfamiliar with it, the Pixelstick is an array of 200 addressable RGB LEDs. This means each LED can produce almost any colour, and each one can be instructed to flash on and off at a particular speed and colour sequence. With the right set of instructions, the LEDs can be used to mimic the pixels of a bitmapped image, so as the Pixelstick is moved through space, the LEDs effectively ‘draw’ the bitmap in midair and can be captured during a long exposure photograph.

As a concept, this is not new. The first such light painting tool appeared a few years ago and in January 2010, pioneering work by Mike Ross (TxPilot on Flickr) used the open source Arduino platform to send the instructions to the LEDs. ( Mike’s first example of this is here: https://www.flickr.com/photos/txross/4268235686)
At the time, this required some tricky manipulation to generate the code to ‘paint’ a bitmap, and the hardware had to be self-assembled. The amount of technical effort made doing this quite a headache, and despite Mike’s excellent online tutorial describing how to build what he dubbed the ‘Digital Light Wand’ many people who were keen to try it, were put off by the headache inducing complications of self-build.
Subsequently, other versions of the concept were tried, such as the LightScythe by ‘Mechatronics Guy’ in Australia, and more recently electronics component suppliers Adafruit have published online tutorials on using the latest versions of addressable LED strips with Arduino and Raspberry Pi platforms. But this still requires the user to self-build, and this puts a lot of people off.

Bitbanger Labs filled the gap in the market in October 2013 when they launched their kickstarter project to produce an ‘off the shelf’ version of this concept. Happily for them, they reached their target with 5 weeks to spare, and the Pixelstick went into production in early 2014, and started shipping in the late summer. Bitbanger are marketing it as a game changer, claiming it will ‘Change the way you take photographs forever’.
So does it live up to the hype?

The Parts Unboxed

The Parts Unboxed

The main thing that stands out is the Pixelstick is pretty much plug-and-play. There’s no mucking about with soldering irons, no banging your head at a screen trying to program arduino code. There’s minimal assembly, slap a bitmap onto an SD card and away you go. For those who aren’t sure how to manipulate a bitmap, Bitbanger provide a few pre-loaded test patterns that don’t even require an SD card, and they also have a few pre-prepared bitmaps for download from their site.

Another major consideration that formed a large part of the pre-release update emails for the Kickstarter is the build quality. Bitbanger seemed quite determined that they would produce a robust piece of kit. They have used extruded aluminum for the backbone and decent quality plastic to form the control box housing the circuitry. The cables are well sheathed and have durable connections to the LED strips and the control box. Nothing rattles about, the LCD screen displaying the user interface is just about the right size to combine ease of use without being so big it gets in the way. The LED strips are good and bright, being able to shine through ambient light well enough to allow it to be used under moderate streetlighting. The LED strip is in two sections, and they fit together snugly, with an adjustable bracket holding the two sections of supporting aluminium securely together. The control box and the battery holder are both attached to the back of the aluminium backbone by adjustable screw fittings, so they can be positioned anywhere along the length of the device. The central bracket also has a fitting to insert a small length of metal rod which serves as a handle, and a surrounding section of tube allows the stick to be spun around the handle should the user so desire.

So far so good, when assembled, the pixelstick feels solid, but is not so heavy as to be unwieldy. At 1.8m length, it’s not something you’d wave about easily like a lightsaber, but there is the option of using only half the LEDs to create a more manageable tool, and it works perfectly well in this configuration if you need to fit it into small spaces where the full length would be a hindrance.

It stands up well to being spun about in a circle

It stands up well to being spun about in a circle

The big winner for me though, is the interface. I’ve used a few variations of self-build Arduino Digital Light Wands, and whilst the current state of the art versions using the adafruit SW2012 Neopixel LEDs have the edge over the pixelstick in terms of image quality, they suffer from less accessible interface. In short, it’s awkward to change from one bitmap to another, or to alter the speed at which the bitmap is displayed by the LEDs. This is where Bitbanger have come up trumps.

The Pixelstick interface is intuitive, being simple to use yet also comprehensive. It allows to user to easily select from the bitmaps loaded onto the SD card, and has a number of other features that indicate the designers did some serious thinking about what light painters would want to do with the device. It allows you to alter the speed, brightness of the bitmap with ease, there’s an option to repeat the bitmap up to 99 times, or even reverse the left-right direction by which the bitmap is displayed. There’s an option for a timer delay, so the LEDs will wait for the prescribed number of seconds before lighting up, all of which increase the creative potential of the device. Another aspect of the interface that shows the designers were thinking of functionality is that the buttons are extruded from the control box enough to allow operation in the dark, i.e. with a bit of practise, they are big enough, and well spaced enough that you can feel where they are without needing to see them. The ‘fire’ button which sends the selected bitmap to the LEDs is set apart, and is bright yellow, which is a small thing, but it helps a lot when you’re jumping about in the dark, as does the separate power switch, which is placed on the top edge of the box, where it’s easily accessible, but out of the way so you don’t hit it by accident when operating the device.

A well designed interface

A well designed interface

Another function I have not yet had time to explore fully is the ‘Increment’ feature of the interface. This allows sequentially numbered bitmaps to be executed one after another by hitting the ‘fire’ button. Making it very useful for those who seek to create light painted animations of the bitmaps stored on their SD card. Add to this the nice carry bag (handily sporting a bright yellow interior to make it more visible in dark situations, so you don’t find yourself scrambling about looking for it when shooting), the option for inserting different grades of diffuser in front of the LEDs and the ability to trigger the LEDs via a standard wireless remote control, then there are a good number of positive points to be made about this device.

But it can’t be all perfect can it? No. There are a few issues I have with the pixelstick, because I’m a picky so-and-so.

First off, the handle is wrong. It’s a short pole sticking out at right angles from the main section, and it is fixed centrally, so there’s no option to place it where you as an individual feel comfortable with it. A handle more like a pistol grip would have been a better option, as though this wouldn’t allow spinning, it would make it a lot easier to pull the stick through the air, and the way the device is designed, the two types of handle could easily be interchanged.

In terms of the quality of the images it produces, I have no complaints. The firmware interprets 24 bit .bmp files very well indeed. The colours are accurate, and if they seem a bit washed out, then just drop the brightness, or increase your F Stop, and all will be well. The resolution is very good, with 100 LEDs per metre being substantially less than the 144 LED/m available from Adafruits Neopixels, the diffuser compensates to a large extent, and the images do look sufficiently photorealistic. It’s worth putting some dither on tight edged lines in bitmaps though, as I found that the smooth lines from rasterized vector graphics do look a little jaggedy around the edges without a bit of dithering.

Smooth lines need dithering to avoid jagged edges

Smooth lines need dithering to avoid jagged edges

I’m also critical of the SD card slot, it’s tight and holds the card well, but the card sticks out slightly. There’s nothing to stop grit/moisture from getting in around the edges to infiltrate the control box, which could become a problem eventually. A flexible cover like those found on cameras covering the usb slots would have been much preferable. But it shouldn’t be too much trouble to make one from Sugru or even just a bit of tape will be better than nothing. A raised plastic ridge around the slot would have been a good thing too, as I’ve noticed a tendency for the card to release when the device is laid down on that side. As the card hits the ground first, it springs out as if you were pushing it with your finger to get it out. A ridge would prevent this.

Out and about at the beach, sand or water could get into the control box

Out and about at the beach, sand or water could get into the control box

One last niggle. The firmware seems to ignore trailing or leading black pixels in a bitmap. So if you have a 200px wide black bitmap with a small white dot in the middle, when you hit ‘fire’ the white dot will appear at the edge of the image displayed by the LEDs. I assume there’s a workaround out there, presumably by using a line of pixels that are 99.9% black, but not entirely, so that the firmware doesn’t ignore them, but they’re not bright enough to show up on camera.

In conclusion, the Pixelstick is a decent bit of kit. It’s not a game changer in the way that had been suggested before it’s release, as it’s not offering anything substantially different from the functionality already on offer from it’s precursors, to whom it undeniably owes an unacknowledged debt, and which can be created for a fraction of the price. But if you’re not keen on making your own tools and you’re prepared to shell out the cash, it will offer hours of fun and increase the creative opportunities for light painters.
Other reviewers, perhaps less immersed in the world of light painting have declared it to take long exposure photography to the next level and that it’s the best light painting tool they’ve seen well, that’s a matter of opinion.
For light painting snobs such as myself, the lack of skill required to employ it in it’s most basic form means that the novelty could wear off pretty quickly. But it also means that the creative challenge to use it in ways that go beyond simply dragging a bitmap through the air is worth taking into consideration.
One thing I can confidently state is that it lives up to my expectations, I didn’t expect it to revolutionise my light painting, but I did expect it to be worth the financial outlay in terms of it’s quality of construction and operation, and it is. Above all, I hope it’s success as a business project will inspire other manufacturers to realise that there is a vast untapped market for quality light painting tools out there.

Bottom Line: It’s a good piece of kit and does the job well, but you could make one yourself for less cash.

Fruity Oaty Pixels

Fruity Oaty Pixels

(LPP Admin NOTE)
One other subject that should be noted are the incredible opportunities Pixelstick offers in the field of stop motion animation using its ‘Increment’ feature as seen in the video below, create by Bitbanger Labs. Check it out and to get your own head on over HERE.

Filed Under: Light Painting Photography, Light Painting Video

Michael Ross

Light painting photographer Michael Ross, a.k.a. TXPilot, is smarter than you and thank sweet baby Jesus he found light painting photography. Coming from an IT background you would think he would be able to come up with some gadgets, but Mike has taken it to the next level with inventions like The Digital Light Wand. Not only is he a Mad Scientist innovating light painting tools for the rest of us he also uses his genius to create some super cool images. Mike is known for his willingness to share his inventions and is always ready to help out a fellow light painter. Read Mike’s full light painting photography interview below, check out some of his images below!


Light Painting Photography Interview with Michael Ross.

LPP ∇ What is your name?

MR ∇ Michael R. Ross

LPP ∇ Do you have an alias that you go by?

MR ∇ TxPilot on Flickr and a few other places on the internet.

LPP ∇ Are you a soloist or are you part of a Light Painting group? If a group who is in your group?

MR ∇ I am a soloist mainly, but I do get some help from my sons, Kevin and Cameron, sometimes also. Cameron (http://www.flickr.com/photos/txmini/) is also into photography and has created some of his own Light Painting Photos. I have also had the pleasure of shooting with several other Light Painting Photographers scattered around the U.S. and Canada.

LPP ∇ What education do you have?

MR ∇ Some college and technical and leadership schools in the U.S. Navy also. I was in the Navy as an Avionics Tech which has helped tremendously in my Light Painting work. I have had no formal training in photography.

LPP ∇ What is your occupation?

MR ∇ I had a very successful career in I.T. for over 30 years and recently left all of that behind to open a photography school called Little Photo School (http://www.littlephotoschool.com/) . I have spent the last several months working out a detailed business plan and I am currently in the process of pinpointing the right location to get it going! Very exciting stuff!

LPP ∇ How long have you been a photographer?

MR ∇ I have had a camera in my hands most of my life and dabbled in the intricacies of it all every now and then. Every once in a while I would get lucky with some good shots. I started getting more serious about it in the early 90’s but really started getting into the more professional side of things about 3 years ago. This photo of Hale-Bopp Comet (http://www.flickr.com/photos/txross/6613797781) was taken back in 1997 on film.

LPP ∇ How long have you been light painting?

MR ∇ My first attempts at light painting where with my nieces during a family get together over the Independence Day Holiday in 2009. Probably the same way a lot of us get into it, using sparklers to draw light trails during long exposures.

LPP ∇ How did you discover Light Painting Photography?

MR ∇ After playing with the sparklers for a bit, I ran across a Light Painting image on flickr created by TigTab http://www.flickr.com/photos/tigtab This image (http://www.flickr.com/photos/tigtab/3976058678/in/set-72157622106954112/), which was created using cold cathodes and light stencils literally just blew me away! At that point I started digging more into it and experimenting on my own with different light sources. I ran across images created by Cindi and Austin Poole (http://www.flickr.com/photos/24491005@N06/sets/72157609144669334/ ) as well as Jeremy Jackson (http://www.flickr.com/photos/tackyshack/) and Duane Schoon (http://www.flickr.com/photos/duaneschoon/) which just helped to drag me into it even more! I became addicted to it very quickly!

LPP ∇ What was your first Light Painting Image?

MR ∇ This is the first LP image that thought was good enough to show anyone else. http://www.flickr.com/photos/txross/3885538349/in/set-72157622234691540
Everything prior to that was just experimentation with different lights and sparklers.

LPP ∇ Film or Digital?

MR ∇ Both. Digital for Light Painting primarily, but I also shoot Film as well. The instant feedback that you get from Digital is, in my opinion, what has really made Light Painting, and photography in general for that matter, take off over the past several years. But, that technical challenge of getting an image right the first time with film is a great thing as well. It is hard to beat film in certain areas of night photography, particularly when it comes down to really long exposure times.

LPP ∇ Do you believe in aliens?

MR ∇ I have seen them in many places! My hallway (http://www.flickr.com/photos/txross/4317547233/in/set-72157622234691540) , my backyard along with an alien Dog! (http://www.flickr.com/photos/txross/6335969859/in/set-72157622234691540) , and in Roswell, New Mexico! 😉 Even the Walmart in Roswell had a large sign on the front of the store stating that “All species welcome”, so they must exist right? Seriously, after sitting in the middle of the desert, looking up at the Milky Way and capturing images like this (http://www.flickr.com/photos/txross/5960153070), and thinking about the Rare Earth Equation and The Drake Equation. I think anything is possible! Even the possibility that everyone is wrong in making assumptions only on what is “known”, or thought to be known. One thing is for certain, it is impossible to rule ANYTHING out!

LPP ∇ What is your standard Light Painting Photography setup?

MR ∇ I shoot with a Nikon D700 and the lens that I use the most with Light Painting Photography is a Nikon 50mm f/1.4. I really like the way that lens handles the star burst effects with its aperture blade configuration. But it is sweet lens no matter how you slice it! I do use other lenses if the situation calls for it though and I have even used a 70-200mm zoom for a few shots and a 16mm fisheye as well. Of course a remote shutter release is pretty much mandatory for longer Light Painting work and a good tripod as well.

LPP ∇ What is your favorite color?

MR ∇ Blue

LPP ∇ Who influences your Light Painting Photography work?

MR ∇ Just about everyone! It is hard to pinpoint a specific “style” with my light painting images. There are specific details that I add to my images that could identify my work but I have a tendency to jump around a lot with different subject matter and different techniques. I like experimenting with a variety of subjects, tools, and techniques and that is probably fairly obvious if you look at my work. But just about every Light Painter I have run across influences my work in one way or another.

LPP ∇ Who is your favorite Light Painting Artist?

MR ∇ That is a tough one. I have a great respect and admiration for many different Light Painting Artists! They each have their own style and spin that they put on their work and there are images created by many of them that I would consider great works of art. It is impossible for me to hold them up to each other to compare them because they are all so different. However, there are some that I follow more closely than others simply because they put a lot of planning, preparation, and thought into their work. Troy Paiva (http://www.flickr.com/photos/lostamerica/), TigTab (http://www.flickr.com/photos/tigtab/), Blacklodge (http://www.flickr.com/photos/thebadseed/), Dennis Calvert (http://www.flickr.com/photos/denniscalvert/), Danny (http://www.flickr.com/photos/catch-light-ca/), Julian Cash (http://www.flickr.com/photos/juliancash/), Denis Smith (http://www.flickr.com/photos/biskitboy/), Julian Marshall (http://www.flickr.com/photos/julian_marshall/), JanLeonardo Wöllert (http://www.flickr.com/photos/lapp/), are all great examples and that is just a partial list!

LPP ∇ What is your favorite food?

MR ∇ Asian food primarily. Vietnamese Phở (a beef noodle soup) is right up there at the top along with spicy Thai Red Curry! But I can also go for a nice rare steak or BBQ just about any time also!

LPP ∇ Do you create in any other mediums other than light painting? If so what are they?

MR ∇ Yes, I do pencil drawings, pen and ink drawings, and have also worked with acrylics on canvas and water colors as well. I have an interest in wood carving also and have created some pieces in that area. On top of that, I have been a musician since I was very young and have played guitar, keyboards, trumpet, French horn, and the Ukulele as well! I still play the guitar and Uke every chance I get.

LPP ∇ What is your favorite Light Painting Photography image that you have created?

MR ∇ I think that the one that I personally like the most is the photo I call “Stoned Again!”. http://www.flickr.com/photos/txross/4887489438/in/set-72157622234691540 This was a photo that was created for a small Light Painting contest with the theme being “Mythology”. So I chose to create a magical scene were Medusa was turning a warrior to stone with her powerful gaze. So much planning, preparation, and experimenting with different techniques went into that shot that it turned into a major production. Besides having my son and future daughter-in-law helping me with the shot, I had help from friends as well in helping me to get ready for it. There is even a long story behind the title itself. So the reasons I like it are more for personal reasons than just the image itself, but I am pleased with the overall outcome.

LPP ∇ What is your favorite Light Painting Photography image of another artist?

MR ∇ Some of these questions are difficult questions to answer! It is hard to pick one favorite, but I have a few printed photos created by TigTab (http://www.flickr.com/photos/tigtab/) , Dennis Calvert (http://www.flickr.com/photos/denniscalvert/) , Jeremy Jackson (http://www.flickr.com/photos/tackyshack/) , Denis Smith (http://www.flickr.com/photos/biskitboy/) , and some others as well and I would like to add some prints from Freezelight (http://www.flickr.com/photos/freezelight/) and others too! Well thought out and carefully planned Light Painting images always catch my attention and easily top my list. TigTab’s “Secret Garden” shot and Freezelight’s “Lady and horse” image are very good examples. (http://www.flickr.com/photos/tigtab/5390151702) (http://www.flickr.com/photos/freezelight/5087707172)

As a side note, I have started collecting Light Painting Photo books that have been created by Light Painting Artists. There are a lot of great LP artists out there and the number is increasing all the time which is simply fantastic! The more the merrier!

LPP ∇ What is the most difficult part of Light Painting Photography?

MR ∇ To me, the most difficult part of Light Painting Photography is getting the exact effect I am looking for with specific light tools and getting everything spaced and aligned the way I want it. Dealing with live subjects in a long exposure shot can also be a bit challenging.

LPP ∇ How do you get your Light Painting Photography work seen?

MR ∇ Primarily via the internet, my website, Flickr, 500px, Google Plus, YouTube, etc.

LPP ∇ Do you sell your Light Painting Photography work?

MR ∇ Yes, Fine art prints of my work are available via my website.

LPP ∇ Are you represented by a gallery?

MR ∇ Not at this time, but I am working on that.

LPP ∇ Where can we see more of your work?

MR ∇ Most of my work can be found on my personal website or on my flickr account.
http://www.mrossphoto.com
http://www.flickr.com/txross

LPP ∇ What is your favorite quote?

MR ∇ It is a quote a friend told me a while back that I think originated somewhere else and then I might have turned it around a bit. It goes “Shoot for Moon! Even if you miss and land among the stars, you have still made a great accomplishment!”

LPP ∇ Who is your favorite artist?

My favorite at the moment is a street artist in Melbourne, Australia that I have been watching that goes under the alias of Kaff-eine. (http://www.flickr.com/photos/_kaff-eine_/)

LPP ∇ What is you favorite activity other than light painting?

MR ∇ Flying! I have been a pilot since the late 80’s and there is nothing quite like the feeling of spreading wings and taking to the air. One of these days I will figure out the best way to combine Flying with Light Painting! 😉

LPP ∇ Tell me a good light painting story.

MR ∇ I have met up with several light painters that I have met online and have had the pleasure of doing collab sessions with about 17 or so different Light Painters to date! They are all great people and there is a great story to tell about each of the sessions! But probably the best (and craziest) meeting that I had was with Danny (http://www.flickr.com/photos/catch-light-ca/) of Catch-Light Photography (http://www.catch-light.ca/) in south central Ontario, Canada!

This trip started with me tagging along with a friend of mine to the big air show (AirVenture) in Oshkosh, Wisconsin at the end of July in 2011. My friend owns a super sweet airplane and it is a treat to fly with him every chance I get! But being able to fly from Texas to Wisconsin with him and then go to one of the biggest and best air shows in the world was a huge treat!

Well, it just so happens that this friend has a daughter that has chosen to live and go to school in a little town in Ontario, Canada, about an hour away from Toronto, and he said we would be stopping in and spending a day or two with her on the trip as well. So I sent an email to Danny to see if he would be available to meet up while I was there. I lucked out with it all and everything fell together with the timing so Danny and I made plans to meet up during this trip. Danny also had the perfect place for us to go!

So, after 3 days of wearing myself out, walking around and taking photos at the air show and getting my “aviation fix”, we flew to Port Huron, Michigan, rented a car, crossed the border into Canada, and started the drive to little town that my friend’s daughter lives in. I dropped him off about noon and took off to meet Danny in the little town where he lives in Stayner, Ontario which is just off the south end of Georgian Bay. It was about a 4 and half hour drive to get to where I was going. I met Danny at a coffee house and we were soon off on another 3 hour drive north to the small town of Burk’s Falls, Ontario.

Along the way, Danny and I stopped in a small town for dinner and had some great conversation about photography, Light Painting and a life in general. We continued on towards Burks’ Falls and the sun was setting just as we arrived at our destination. Danny was ultimately taking me to a place that was literally out in the middle of nowhere called The Screaming Heads! It was simply amazing! Danny is a great guy and we did a lot of talking and a lot of shooting and we literally stayed there all night until the sun started to lighten the sky on the horizon the next morning! I think we both had a fantastic time! Even though it was scary as hell out in the middle of that country, where bears, moose, and I am sure other things roam the night! And I can’t get past this story without mentioning the kazillions of monster mosquitoes that tried to carry Danny, me, AND our camera equipment away! When Danny told me there were bears in the area, I looked at him and said, so this is where that old funny saying comes in that I don’t have to outrun the bear, right!? I just HAVE to outrun YOU! 😉

I had such a great time shooting with Danny that I would go out of my way to do it again! And that WILL happen someday! It was awesome! (Did I say that already?) After we left, I drove the 7 and half hours back to pick up my friend and we headed back to the airport to make our way back to Texas. I was absolutely exhausted, but it all well worth it!

LPP ∇ Tell me a nightmare light painting story.

MR ∇ I haven’t had anything happen that I would call a full nightmare yet, but I am sure my turn is coming! I have been scared to point of finally shutting things down and getting the hell out of Dodge a few times though! One was while out in the middle of the Sonoran desert, East of Tucson, Arizona, just after midnight in an area where Cougars and Mexican Grey Wolves were seen regularly. That in itself was enough to keep my adrenalin pumping! It always seems like when you are out in an area like that, the sounds around you are amplified and you always get the feeling that you are being watched! All of this after getting a few unexpected “surprises” while doing a bit of exploring earlier in the night. Let me tell you, when you walk up to a Saguaro Cactus after dark and notice a hole in the side of it, and then you shine a light inside to see how deep the hole is and suddenly see a large reptile peering back at you from inside, it can REALLY get your heart racing! Nothing like having a large lizard staring you down just inches away when you really were not expecting anything to be in there! Not really a nightmare, but I don’t want THAT type of nightmare!

LPP ∇ Have you ever been arrested or ticketed for light painting?

MR ∇ Not yet! But I was beginning to think that was going to happen when a Travis County Sherriff and some Austin Police officers came up on us during the Texas-By-Light tour. This was in May 2010 when Marko93 was here from France meeting up with Light Painters in different areas of Texas for the filming of the Texas By Light project. Other artists included Marko (http://www.flickr.com/photos/marko-93/), David Wilhelm (http://www.flickr.com/photos/artandsteel/), Matt Crawford (http://www.flickr.com/photos/earsaregood/), Jake Ramirez (http://www.flickr.com/photos/sumerianlights/), and several others as well. We were all at an old railroad bridge that Jake had created some images at prior to the meeting. The bridge is located in a city park which closed at 10:00 PM and it was well after midnight by that time.

The bridge is known by the law enforcement there to be a popular drug hangout so when they saw a crowd of cars and people there, they were definitely suspicious. I talked to them for a little while and explained what we were doing while showing them some light painting images that I keep stored on my phone for such occasions. They were skeptical and some of the props that were laying around on the bridge such as skulls and other things didn’t help the situation, but they finally let us continue but told us to get things wrapped up and out of there soon.

LPP ∇ What do you say to people when they see you light painting and they ask “what the hell are you doing”?

MR ∇ I am probably one of the few Light Painters that has actually had the opposite happen to me. While doing some Light Painting in an art district in Downtown Dallas, and actually in the middle of a shot, a guy walked past us on the sidewalk and said, “Doing some Light Painting!?” I was shocked speechless!! That is the ONLY time that has ever happened to me.

MR ∇ Usually when someone asks what I am doing, I will take the time to stop and explain it to them and show them the examples I might have on the camera or on my phone.

LPP ∇ Where do you find inspiration for your Light Painting Photography?

MR ∇ In anything and everything around me all of the time! I think that this is probably true with photographers in general but even more so with Light Painting Photographers, it is hard not look at things and think about how it would look light painted or how it might be used in light painting.

LPP ∇ Who would you like to punch?

MR ∇ I better keep that one to myself. Not many get the “honor” of being on that list and the list is not long at all, but those that do make the list have earned it! And they know who they are!

LPP ∇ Who would you like to kiss?

MR ∇ Ummm… I better keep that one to myself too! ☺ It is a self incrimination thing! Ha!

LPP ∇ Why do you Light Paint?

MR ∇ It is the challenge and creation of art of that draws me to it! It is that moment when the image appears on the LCD screen on the back of the camera to reveal the final work. It is the disappointment of something not being just right and then doing it all over again! It is working towards that perfection. It is the work towards achieving the goals of creating an image that was only a part of imagination prior to that moment. It is the individuality of it. It is the awe of watching someone else create a light painting image for the first time and watching the magic in the eyes of those that see it happen. It is everything about it that is the reason I Paint with Light!

LPP ∇ What is your favorite time to shoot?

MR ∇ Dark:30! Actually, Anytime I can get time to shoot is my favorite time! But the later the better, particularly if I am in a public area that usually has a lot of people around it during the day.

LPP ∇ What is your favorite subject to shoot?

MR ∇ I like shots that involve people, but landscapes and cityscapes are also something I enjoy.

LPP ∇ Where is your favorite place to shoot?

MR ∇ The desert! Or anywhere where the Light Pollution is minimal. The desert is an awesome place to be in the middle of the night. The stars are, well, literally, out of this world! It is definitely spooky but really cool!

LPP ∇ If you could travel anywhere to Light Paint where would you go?

MR ∇ There would be so many places that I would go if I could go anywhere. Canada, Alaska, Ireland, Australia, Mexico, Easter Island, Egypt…, the list is long! I would have a really hard time choosing only one place though but Easter Island would be really awesome! There are many places right here in the U.S. that I would love to visit and work some magic with as well. I will get there! One place at a time!

LPP ∇ Have you ever invented a Light Painting Photography tool? If so what was it and how did it work?

MR ∇ Yes, several of them! The list is really too long to list them all here. I have been called the Guru of Light Tools on more than one occasion and called a Mad Scientist even more often! So that should tell you something! Even the people at Radio Shack have looked at me really weird when I have walked up to counter to check out in the past with hands full of LEDs and other electronic components.

The most significant tool that I have created, and definitely the one I have the most work in to, is the Digital Light Wand which you have covered on your site (https://lightpaintingphotography.com/?s=Digital+Light+Wand) when I released the tutorial on how to make one (http://mrossphoto.com/wordpress32/light-painting/) so I won’t get into too much detail with it. It is a programmable RGB LED light strip that uses an Arduino Microcontroller to control the LEDs in turning on and off and with specific colors in a timed sequence. I have a complete video and PDF tutorial on how to build one on my website.

Another invention is one that I call the Light Painting Muli-Tool (http://mrossphoto.com/wordpress32/portraits/light-painting-multi-tool/). Others have called it “The Swiss Army Knife” for Light Painters. I have photos of it on my website as well. It is a tool that can be used for creating perfect orbs, circles, UFO’s and Domes among other things.

I have also created many different types of light tools to do specific things such as calligraphy writing, creating small spheres, etc. I even created a small device to create a little 3 inch high orb and another one to create an orb that is 17 feet across and almost 6 feet off the ground! And yet another tool with levered arms to create an orb Snowman! Inventing new tools is part of the fun of Light Painting for me and I have a long list of ideas that will take many years to work my way through! For those tools that I have created already, I have photos of most of them on my website or my flickr site.
LED Sword Assortment

LPP ∇ Do you ever get sick of explaining your work to people?

MR ∇ No, not at all. I love spreading the word about this truly unique art form and it is personal mission of mine to do just that! I want the rest of the world to know about what we do!

LPP ∇ How many times have you heard the word photoshop when someone was describing or asking about your work?

MR ∇ Too many! And it does get annoying sometimes! But there are plenty of people out there that are just that way. They think that they know it all and they have it all figured out. I actually feel sorry for them in a way. If they are so closed minded that they don’t allow themselves to see other possibilities, they will miss a LOT of the beauty and wonder that is all around them!

LPP ∇ What makes you happy?

MR ∇ Learning something new and teaching others something that is new to them.

LPP ∇ What makes you mad?

MR ∇ People with closed minds that seem to have a problem seeing past their own ego.

LPP ∇ What part of Light Painting Photography do you enjoy the most?

MR ∇ The creative release. The discovery of new techniques and invention of new tools to make new things happen in the world of Light Painting.

LPP ∇ What part of Light Painting Photography do you hate the most?

MR ∇ Light Pollution! Some day the world will figure out that we don’t need to have all of the friggin’ lights on all the time! Of course, living so close to a metroplex that has 6.3 Million people in it (Dallas/Fort Worth), light pollution is something that I have to deal with all the time. But I am at least thankful that it is not as bad here as it is along the north eastern coast of the U.S. or other parts of the world. At least here, I can still drive for a few hours and get to a point where I can see the Milky Way with no problems.

LPP ∇ Do you have a website? If yes what is the address?

MR ∇ http://www.mrossphoto.com
http://www.facebook.com/mrossphoto
https://plus.google.com/113179096930771919621
Grandchildren
http://500px.com/TxPilot
http://www.youtube.com/user/michaelrross1
http://www.LittlePhotoSchool.com
http://www.facebook.com/LittlePhotoSchool

LPP ∇ What is Light Painting Photography?

MR ∇ Light Painting Photography to me is Art! It is the photography equivalent to an artist using oils and a brush on canvas. It can be as simple as using light to highlight objects in a night photograph or can be as complex as creating an entire scene using nothing but different light tools and everything in between. Just like with oils and canvas, the art that is created is unique to the artist. How the artist uses these tools for creative expression is the ultimate beauty in what we do!

LPP ∇ Give me some advice for anyone that might like to try Light Painting Photography.

MR ∇ Buy my eBook! 😉 Ha! Actually, the best advice I can give goes along with the quote I mentioned earlier! Shoot for the Moon! Practice! Experiment! Aim for the top and create something that you will be proud of! Anyone can do anything if they set their mind to it. Just set the goal and, in the words of one of my favorite Star Ship Commanders, “Make it so!”

LPP ∇ Are you scared of the dark?

MR ∇ No, I am not scared of the dark. However, I AM scared of what else comes out IN the dark! 😉 I have this HUGE fear of being eaten alive by a Mountain Lion! So… In order to make sure that doesn’t happen, or being attacked by anything else for that matter, I usually do not go out without being armed! 🙂

Michael Ross Interview

January 3, 2012 by Jason D. Page

Light Painting Photographer Michael Ross, Inventor of the “Digital Light Wand”, has been hard at work promoting and progressing light painting. He has started a photo school that will teach courses specific to light painting photography, he has written a light painting photography book, and he will have some of his own work published this month in Photo Technique Magazine. I got the chance to catch up with mike recently to how the F*#! all this happened…..

LPP ∇ Hey Mike so you have a lot going on in your photography world, your school, light painting book, and getting published tell me whats happening…

MR ∇ That is for sure! There is a lot going on in my world right now. I have been in the process of starting up a Photography School that will offer courses which will focus on specific areas, such as a course to teach moms how to take better photos of their kiddos and of course a Light Painting course.

In the midst of all of this, I have been able to complete a Light Painting “How To” book that is focused on teaching beginners not only the basics of how to use their DSLR cameras, but how to use them with light painting to give them a good solid kick start in the art form.

LPP ∇ That is a full plate are you still working a “normal” job as well or is this your full time gig now?

MR ∇ I have left the I.T. career that I have been working in for over 30 years behind. I am pursuing my dream now.

LPP ∇ Thats is awesome I bet it feels great! you say you are in the process of starting the photography school, have you already taught some classes or are you still putting it all together?

MR ∇ I have been teaching small classes and informal sessions on the side for quite some time. I am still in the process at the moment to find a good location for Little Photo School and have also been working on creating the formal course materials and presentations. It is a TON of work but I am having a blast doing it!

LPP ∇ Is the building of the Little Photo School the inspiration for your new light painting book? Will it be used as sort of a text book?

MR ∇ The book has been something I have been working on for a while. And with all of the work on the school materials in teaching the basics of how the camera works, along with the experiences that I have had in teaching others camera basics and Light Painting, I decided it was a really good time to complete it all. It helped me put together a good foundation for teaching photography basics as well for some of the other classes I will be offering in the School.

This specific book, “LIGHT PAINTING PHOTOGRAPHY – A Complete How To Guide for Beginners” was written for someone that wants to get into Light Painting and may have even purchased their first DSLR to get into it. It could basically be looked at as a guide for jumping into “Manual Mode” by using Light Painting Photography as the subject.

LPP ∇ Thats great! I know there are a few other light painting books out there, but I think this will be the first “HOW TO” book. Do you have a lot of people that come to you wanting to learn specifically light painting? Our art form is growing everyday, do you see the growth in your teaching with more people wanting to learn?

MR ∇ There has definitely been a lot of interest in Light Painting and it seems to be growing more every day! I have had the pleasure of leading a few Light Painting Photowalks that were offered by one of the largest camera shops in the Dallas/Fort Worth area and that is where the idea for the book first hit me. For each of the walks, a lot of time was spent at the start teaching folks how to get their cameras set up for Light Painting. It just seemed like there was a need for the book, so I worked on putting it together to fill the need.

LPP ∇ Did any other light painters contribute to the book?

MR ∇ None of them did directly. But I do mention a lot of them throughout the book and have a few pages of “Other resources” listed where I provide links to their work.

LPP ∇ Thats nice of you to give a shout to your fellow light painters… I saw that you are also getting some images published tell me about that.

MR ∇ That has been in the works for a while now and actually started with a college student in Oslo, Norway contacting me about doing an article on me for a project in his school work. I agreed and to make a long story short, he did great with the article with his school work and then ended up submitting the article to Photo Technique Magazine. They had received another article from photographer Stan Patz in New York, who does different types of studio Light Painting, and they decided to dedicate an issue to show the extreme differences in Light Painting.

LPP ∇ Wow that is sooo cool you help out a random student in Norway and you end up in Photo Technique Magzine! When will it be out?

MR ∇ It is the Jan/Feb issue of Photo Technique and should be on its way to subscribers and newsstands as we speak.

LPP ∇ Are these the first light painting images you have had published?

MR ∇ Not the first, I had a few images published in a Photo magazine in France as well. This one has a much larger circulation though I think which is really exciting!

LPP ∇ How many copies are you gonna buy?

MR ∇ LOL I think at least 10 of them!

LPP ∇ I would clear the rack….. Well congratulations on all your much deserved success, where can people find your book, “LIGHT PAINTING PHOTOGRAPHY – A Complete How To Guide for Beginners” and where can they find out more information about taking some classes at the Little Photo School?

MR ∇ The book is available both on my personal website at http://www.mrossphoto.com/wordpress32/ebooks/ and the Little Photo School website as well which is located at http://www.littlephotoschool.com/

LPP ∇ Thanks for taking the time to answer a few questions now get back to work….


Filed Under: Light Painting Photography

Copyright © 2026 · News Pro Theme on Genesis Framework · WordPress · Log in