Check out this cool profile video on last months contest winner and Light Painter Jelle Schuurmans created by Zoom.NL for Nikon. Click on the CC on the bottom of the video for the English subtitles after you press PLAY.
For the promotion and progression of Light Painting Art and Artist.
Check out this cool profile video on last months contest winner and Light Painter Jelle Schuurmans created by Zoom.NL for Nikon. Click on the CC on the bottom of the video for the English subtitles after you press PLAY.

Prepare to have your mind blown out of your head.
You may have seen recently Light Painting Photographer Patrick Rochon teamed up with the creative design team at Infinity to create the most beautiful automotive advertising campaign ever. I know I am a little bias but oh my goodness this is some stunning work! Now that things have settled down a bit for this inspiring light painter, Patrick finally had a few minutes to answer some questions about the project. Check out these images, the BTS video and the short interview with Mr. Rochon below!


LPP ∇ Holy cow Patrick this is just great, how did this project come about?
PR ∇ It came through email from TBWA. The Infiniti client was looking for something fun, new and creative to do. TBWA saw the Red Bull wakeboard video and asked me if I could do something with cars.
LPP ∇ Who else was involved? Did you work with any other light painters on this project?
PR ∇ Evan Jones is my partner on this, he’s the mind behind the Red Bull project we did last year. As soon as I got this offer I got him on board. It’s amazing to me that he invested two months on this going at it non stop never knowing if this was going to work. This was a big risk for him but he sticked in all the way until we got a green light. We did a photo shoot and the making of video as a first part and we also created a live show similar to the shoot in front of a crowd at the Dubai Motor festival.
For the live part I reached out to Cisco and his partner William. First to get the live light trail on the video screen and second for Cisco to do portraits with participant, he’s a specialist at this. So we ended up with a team from Orlando, Los Angeles, Montreal, Paris, Morocco. Plus in Dubai the local team was composed of “we are the world” with so many nations working together, it was great!
LPP ∇ This must have taken some time to bring this vision to life, can you tell me a little more about the process what was involved?
PR ∇ Like I said before, enormous time of preparation, thinking, designing, bouncing ideas and negotiating with the client. I was spending hours every day and sometimes full days with Evan on Skype. The project started six months prior but it took a good four months of work.
LPP ∇ How many lights were on those cars?
PR ∇ Each vehicle has a total of 2,520 LEDs with output exceeding 30,000 lumens. Designing and assembling the Light Rigs took a team of six specialists several weeks. The specially-made LED strip lighting is a proprietary product manufactured in China under U.S. specification.
LPP ∇ Where were the final images created?
PR ∇ In Dubai
LPP ∇ Thats a pretty awesome place! How many trips did you get to make there?
PR ∇ Just one, I worked from Montreal the whole time by Skype. The computer is now such a resource, a real powerhouse. Then I went one week in Orlando to meet with Evan and work on the final preps tests and tweaking of the lighting on the cars. From there, we went to Dubai for three weeks. First one for the shoot, the second for the edit and the third for the live show.
LPP ∇ What were some of the technical challenges of a project of this magnitude?
PR ∇ The technical challenges!??!! That’s basically what we did all day every day. Solve problems. It is impossible to list the amount of difficulties we had, it was like a non stop fight uphill. That is why I chose my team wisely and this became one of the main keys to this successful accomplishment. To name one, time was one of the biggest challenges, we needed more time to do this. We were constantly working in emergency mode. We had to change the design of the rig on the car three times because of the lack of time we had once the first deposit was given.
LPP ∇ You also did a live performance for the launch?
PR ∇ The live was amazing because of the direct response and contact from the crowd. This was a tour de force with many obstacle heading our way. We would like to refine it and push it further.
LPP ∇ What was the most rewarding part of the whole project?
PR ∇ Seeing the dream go from mind to matter and the feedback we are getting from the public watching, definitely.
LPP ∇ It is just wonderful work congratulations on a very successful project!
PR ∇ Thank you.
To learn more about the project check out the Infinity website HERE.
Recently I saw a post from Carlotte Bertelli showing some 3D live light painting. I said HUH, Wait WHAT?!?! it was incredible, something I have never seen before.
Then I started to check out her LampLighter Project website and fell face first into live light painting madness the likes of which I have never seen. To say that Carlotte is pushing the boundaries of live light painting would be an understatement. I like to think I am pretty knowledgable about whats is going on in the light painting community, how this incredible work slipped by me I have no idea, but I am glad I have finally found it and can share it. Carlotte was kind enough to answer a few questions and share a little more about her incredible work. Check out the videos and short interview below and for even more awesomeness check out The Lamplighter Project!
LPP ∇ WOW Carlotte, you are doing some incredible things with live light painting with your LampLighter Project.
CB ∇ THANK YOU!
LPP ∇ How long have you been creating your work?
CB ∇ I STARTED LIGHTPAINTING 3 YEARS AGO – I USED TO BE A FASHION PHOTOGRAPHER, UNTIL I HAPPENED TO FIND MYSELF ON SET WITHOUT ELECTRICITY – I HAD TO USE A FLASHLIGHT AND FROM THEN ON I’VE NEVER STOPPED. IN 2013 I FOUNDED THE LAMPLIGHTER PROJECT AND NOW I WORK AS A FULLTIME PROFESSIONAL LIGHTPAINTER.
LPP ∇ Obviously there has to be a team of talent involved, who are you working with?
CB ∇ OF COURSE! THE LAMPLIGHTER PROJECT IS ALSO A PROFESSIONAL TEAM OF CREATIVES AND EXPERTS FROM ALL KINDS OF FIELDS. IN PARTICULAR, IT IS THE SYNERGY WITH THE BEST VIDEO AND SOUND DESIGNERS THAT GUARANTEES THE MOST INNOVATIVE LIVE PERFORMANCE!
LPP ∇ Can you tell me more about the software that your using, is it something that you can buy or custom created?
CB ∇ IT WAS CUSTOM CREATED BY THE GENIUS OF ANGELA DI TOMASO AND NOW WE ARE LOOKING FOR BUSINESS ANGELS TO TURN IT INTO AN APP.
LPP ∇ Are you doing these performances for events? If so what has the reaction been?
CB ∇ YES! WE HAVE JUST DONE A PERFORMANCE FOR “TISSOT POWER OF LIGHT EVENT” – IT WAS HOSTED BY THE MUSEUM OF SCIENCE AND TECHNOLOGY IN MILAN IN FRONT OF 200 FROM NATIONAL AND INTERNATIONAL PRESS & BUYERS. IT WAS THE FIRST LP LIVE PERFORMANCE EVER MADE IN ITALY AND THE FIRST IN THE WORLD OF THIS KIND (JUST THINK ABOUT ALL THE MEDIA INVOLVED)…I DON’T MEAN TO SOUND BOASTED, BUT GUESS WHAT THE REACTION WAS! 😉
LPP ∇ What is the most difficult part of putting a performance like this together my guess would be either the technical or the choreography?
CB ∇ YOU GUESS RIGHT – BOTH! WHAT DISTINGUISH OUR PERFORMANCE IS THE STORYTELLING: AFTER A BRIEFING WTH THE CLIENT WE PRODUCE A STORYBOARD, LIKE A SHORT MOVIE! THEN WE MIX TOGETHER LIGHTPAINTING INTERACTION AND VIDEO PROJECTION AND SYNC IT ALL TOGETHER WITH MUSIC TO CONVEY THE CLIENT’S MESSAGE IN THE MOST EFFECTIVE WAY.
LPP ∇ How long does it take you to put a piece like TISSOT POWER OF LIGHT together?
CB ∇ IT TOOK US ABOUT 2 MONTHS OF HARD TEAM WORK, DEALING WITH BOTH TECHNICAL AND CREATIVE ISSUES.
LPP ∇ What if you screw up mid performance, how do you get back on track?
CB ∇ IMPOSSIBLE! 😉 just kidding, luckily it never happened but I think in these cases the best thing to do is to keep going somehow… THE SHOW MUST GO ON!
LPP ∇ I saw you have been working on some 3D light painting, can you tell me more about that?
CB ∇ SURPRISE! WE ARE FINALIZING IT AND RESULTS WILL BE SOON PUBLISHED ON OUR WEBSITE AND FACEBOOK PAGE.
LPP ∇ I feel like you are really making some breakthroughs with this work, whats next? What is your dream?
CB ∇ I AM ALWAYS WORKING ON NEW DIFFERENT PROJECTS, NOW I AM PREPARING MY NEXT EXHIBITION IN PARIS MID NOVEMBER DURING THE PARIS PHOTO BUT WE WILL SOON BE BACK WITH A NEW LIVE PERFOTMANCE! NEXT YEAR IS THE INTERNATIONAL YEAR OF LIGHT AND WE DONT WANT TO MISS ANY APPOINTMENTS!
MY DREAM? TO KEEP EXPLORING THE UNIVERSE WITH MY FLASHLIGHT, TO INSPIRE AND INVOLVE ALL THE PEOPLE I COME ACROSS WITH THE LIGHT OF HEART…AND, LIKE A LAMPLIGHTER, TO LIGHT UP THE WORLD!
LPP ∇ Awesome, well I am sure you are inspiring a lot of people, I for one am inspired by your work! Keep going I can’t wait to see what is next and please keep us informed of your 3D live light painting work!!
CB ∇ THANK YOU.

Talk about taking light painting to new levels… this one literally does in terms of height and progression. Spaxels Light Painting is a swarm of remote controlled drones that can create 3D light painting is the sky. Did you hear what I say?!? They can create 3D LIGHT PAINTINGS in the FREAKING SKY! check out the video and for more Click HERE.

The most common question that I get besides “Is That Photoshop” is “What kind of light tools do you use?”
Like most light painters I have used everything you can think of to modify light. Over my years of Light Painting many of my light modifiers have been empty plastic bottles. The problem I had, and I think many of us have, was that to connect my flashlights to the bottles or to other light modifiers for that matter, I had to use tape. This meant my lights were fixed to one color or texture of light. I had to carry a bunch of lights and light modifiers all the time, if I wanted a brighter flashlight attached to a different light modifier I had to rip the tape off and start over, I ruined my good flashlights with the sticky residue from the tape, using the tape method was very limiting and it just sucked. I wanted a way to be able to universally connect any light I wanted to any light modifier and I wanted to be able to change them quickly and easily.
3 years ago I set out to solve this problem and to create a system of tools that I call “Light Painting Brushes”. I wanted to make something that would be Universal and work with most flashlights on the market! I wanted the System to be simple to use and most importantly it had to be affordable. After many ridiculously complex prototypes, that didn’t work and would have been way too expensive, the simple and remarkable Universal Connector was finally created.
The Universal Connector is the key that unlocks the “Light Painting Brushes” System. It is a durable rubber fitting that allows you to universally connect literally millions of light emitting devices to a limitless array of custom light modifiers and light painting tools. The Light Painting Brushes allows tools and/or lights to be changed quickly and easily allowing many different “light painting brushes” and lights to be interchanged during a single exposure. Using the Light Painting Brushes Universal Connector you can attach any light emitting device, flashlight, or torch that is relatively round and has a diameter of .975″ to 1.5″ to a variety of custom light painting brushes.
Something that was tremendously important to me when designing this system is the innovation in our light painting community. My favorite feature of the Light Painting Brush System is that the Universal Connector was designed to not only fit the custom line of Light Painting Brushes but it also fits any standard plastic water or soda bottle. If you are on a tight budget or one of the many innovators in our community you can create your own light painting tools out of empty plastic bottles.
The Light Painting Brushes and Universal Connector is a system that you can build on for your entire light painting career. When you get it in your hands and the endless possibilities CLICK, your mind will be blown! I will be working hard to produce new and exciting tools and light modifiers as we move forward, but I know the community will make modifiers that I would never dream of and I CANNOT WAIT TO SEE WHAT YOU CREATE!
Thank you all for your inspiration and support over the years, I hope you love this as much as I do! Check out the short product intro below and for a lot MORE check out LightPaintingBrushes.com

Unless you have been living under a rock or in a comma for the last year you have probably heard of the light painting tool called The PixelStick. The Pixelstick is that light painting tool that looks a lot like Michael Ross’s Digital Light Wand created around 2010, huh hummmm… The Pixelstick received mass exposure and raised nearly 6 times its Kickstarter funding goal, a total of $628,417.00 to go into production! That was in December of 2013, well just about a month ago veteran Light Painter Ian Hobson got a hold of one of the first production models. Ian was kind enough to put The Pixelstick through its paces and write an in depth, honest and impartial review to let us all know if its worth the $325.00, check it out below.
Images and words by (Ian Hobson)
I have no axe to grind, nor am I an evangelist for fancy tools, but I am passionate about light painting. I want to share my thoughts with others who take the artform seriously, and are not simply looking for a ‘magic bullet’ style device to turn them into spectacularly competent light painters overnight. So by writing this, I’m doing nothing more than calling it how I see it. I’m not sure how well kickstarter projects usually do, but Bitbanger Labs must have been pretty pleased with how their second one turned out. It seemed that almost as soon as they’d set up the kickstarter for the Pixelstick, it had exceeded it’s required target and was set to become a real product. Now it is a real product, and is one of very few commercially available dedicated light painting tools.

Is It Worth The Money
For those of you who are unfamiliar with it, the Pixelstick is an array of 200 addressable RGB LEDs. This means each LED can produce almost any colour, and each one can be instructed to flash on and off at a particular speed and colour sequence. With the right set of instructions, the LEDs can be used to mimic the pixels of a bitmapped image, so as the Pixelstick is moved through space, the LEDs effectively ‘draw’ the bitmap in midair and can be captured during a long exposure photograph.
As a concept, this is not new. The first such light painting tool appeared a few years ago and in January 2010, pioneering work by Mike Ross (TxPilot on Flickr) used the open source Arduino platform to send the instructions to the LEDs. ( Mike’s first example of this is here: https://www.flickr.com/photos/txross/4268235686)
At the time, this required some tricky manipulation to generate the code to ‘paint’ a bitmap, and the hardware had to be self-assembled. The amount of technical effort made doing this quite a headache, and despite Mike’s excellent online tutorial describing how to build what he dubbed the ‘Digital Light Wand’ many people who were keen to try it, were put off by the headache inducing complications of self-build.
Subsequently, other versions of the concept were tried, such as the LightScythe by ‘Mechatronics Guy’ in Australia, and more recently electronics component suppliers Adafruit have published online tutorials on using the latest versions of addressable LED strips with Arduino and Raspberry Pi platforms. But this still requires the user to self-build, and this puts a lot of people off.
Bitbanger Labs filled the gap in the market in October 2013 when they launched their kickstarter project to produce an ‘off the shelf’ version of this concept. Happily for them, they reached their target with 5 weeks to spare, and the Pixelstick went into production in early 2014, and started shipping in the late summer. Bitbanger are marketing it as a game changer, claiming it will ‘Change the way you take photographs forever’.
So does it live up to the hype?

The Parts Unboxed
The main thing that stands out is the Pixelstick is pretty much plug-and-play. There’s no mucking about with soldering irons, no banging your head at a screen trying to program arduino code. There’s minimal assembly, slap a bitmap onto an SD card and away you go. For those who aren’t sure how to manipulate a bitmap, Bitbanger provide a few pre-loaded test patterns that don’t even require an SD card, and they also have a few pre-prepared bitmaps for download from their site.
Another major consideration that formed a large part of the pre-release update emails for the Kickstarter is the build quality. Bitbanger seemed quite determined that they would produce a robust piece of kit. They have used extruded aluminum for the backbone and decent quality plastic to form the control box housing the circuitry. The cables are well sheathed and have durable connections to the LED strips and the control box. Nothing rattles about, the LCD screen displaying the user interface is just about the right size to combine ease of use without being so big it gets in the way. The LED strips are good and bright, being able to shine through ambient light well enough to allow it to be used under moderate streetlighting. The LED strip is in two sections, and they fit together snugly, with an adjustable bracket holding the two sections of supporting aluminium securely together. The control box and the battery holder are both attached to the back of the aluminium backbone by adjustable screw fittings, so they can be positioned anywhere along the length of the device. The central bracket also has a fitting to insert a small length of metal rod which serves as a handle, and a surrounding section of tube allows the stick to be spun around the handle should the user so desire.
So far so good, when assembled, the pixelstick feels solid, but is not so heavy as to be unwieldy. At 1.8m length, it’s not something you’d wave about easily like a lightsaber, but there is the option of using only half the LEDs to create a more manageable tool, and it works perfectly well in this configuration if you need to fit it into small spaces where the full length would be a hindrance.

It stands up well to being spun about in a circle
The big winner for me though, is the interface. I’ve used a few variations of self-build Arduino Digital Light Wands, and whilst the current state of the art versions using the adafruit SW2012 Neopixel LEDs have the edge over the pixelstick in terms of image quality, they suffer from less accessible interface. In short, it’s awkward to change from one bitmap to another, or to alter the speed at which the bitmap is displayed by the LEDs. This is where Bitbanger have come up trumps.
The Pixelstick interface is intuitive, being simple to use yet also comprehensive. It allows to user to easily select from the bitmaps loaded onto the SD card, and has a number of other features that indicate the designers did some serious thinking about what light painters would want to do with the device. It allows you to alter the speed, brightness of the bitmap with ease, there’s an option to repeat the bitmap up to 99 times, or even reverse the left-right direction by which the bitmap is displayed. There’s an option for a timer delay, so the LEDs will wait for the prescribed number of seconds before lighting up, all of which increase the creative potential of the device. Another aspect of the interface that shows the designers were thinking of functionality is that the buttons are extruded from the control box enough to allow operation in the dark, i.e. with a bit of practise, they are big enough, and well spaced enough that you can feel where they are without needing to see them. The ‘fire’ button which sends the selected bitmap to the LEDs is set apart, and is bright yellow, which is a small thing, but it helps a lot when you’re jumping about in the dark, as does the separate power switch, which is placed on the top edge of the box, where it’s easily accessible, but out of the way so you don’t hit it by accident when operating the device.

A well designed interface
Another function I have not yet had time to explore fully is the ‘Increment’ feature of the interface. This allows sequentially numbered bitmaps to be executed one after another by hitting the ‘fire’ button. Making it very useful for those who seek to create light painted animations of the bitmaps stored on their SD card. Add to this the nice carry bag (handily sporting a bright yellow interior to make it more visible in dark situations, so you don’t find yourself scrambling about looking for it when shooting), the option for inserting different grades of diffuser in front of the LEDs and the ability to trigger the LEDs via a standard wireless remote control, then there are a good number of positive points to be made about this device.
But it can’t be all perfect can it? No. There are a few issues I have with the pixelstick, because I’m a picky so-and-so.
First off, the handle is wrong. It’s a short pole sticking out at right angles from the main section, and it is fixed centrally, so there’s no option to place it where you as an individual feel comfortable with it. A handle more like a pistol grip would have been a better option, as though this wouldn’t allow spinning, it would make it a lot easier to pull the stick through the air, and the way the device is designed, the two types of handle could easily be interchanged.
In terms of the quality of the images it produces, I have no complaints. The firmware interprets 24 bit .bmp files very well indeed. The colours are accurate, and if they seem a bit washed out, then just drop the brightness, or increase your F Stop, and all will be well. The resolution is very good, with 100 LEDs per metre being substantially less than the 144 LED/m available from Adafruits Neopixels, the diffuser compensates to a large extent, and the images do look sufficiently photorealistic. It’s worth putting some dither on tight edged lines in bitmaps though, as I found that the smooth lines from rasterized vector graphics do look a little jaggedy around the edges without a bit of dithering.

Smooth lines need dithering to avoid jagged edges
I’m also critical of the SD card slot, it’s tight and holds the card well, but the card sticks out slightly. There’s nothing to stop grit/moisture from getting in around the edges to infiltrate the control box, which could become a problem eventually. A flexible cover like those found on cameras covering the usb slots would have been much preferable. But it shouldn’t be too much trouble to make one from Sugru or even just a bit of tape will be better than nothing. A raised plastic ridge around the slot would have been a good thing too, as I’ve noticed a tendency for the card to release when the device is laid down on that side. As the card hits the ground first, it springs out as if you were pushing it with your finger to get it out. A ridge would prevent this.

Out and about at the beach, sand or water could get into the control box
One last niggle. The firmware seems to ignore trailing or leading black pixels in a bitmap. So if you have a 200px wide black bitmap with a small white dot in the middle, when you hit ‘fire’ the white dot will appear at the edge of the image displayed by the LEDs. I assume there’s a workaround out there, presumably by using a line of pixels that are 99.9% black, but not entirely, so that the firmware doesn’t ignore them, but they’re not bright enough to show up on camera.
In conclusion, the Pixelstick is a decent bit of kit. It’s not a game changer in the way that had been suggested before it’s release, as it’s not offering anything substantially different from the functionality already on offer from it’s precursors, to whom it undeniably owes an unacknowledged debt, and which can be created for a fraction of the price. But if you’re not keen on making your own tools and you’re prepared to shell out the cash, it will offer hours of fun and increase the creative opportunities for light painters.
Other reviewers, perhaps less immersed in the world of light painting have declared it to take long exposure photography to the next level and that it’s the best light painting tool they’ve seen well, that’s a matter of opinion.
For light painting snobs such as myself, the lack of skill required to employ it in it’s most basic form means that the novelty could wear off pretty quickly. But it also means that the creative challenge to use it in ways that go beyond simply dragging a bitmap through the air is worth taking into consideration.
One thing I can confidently state is that it lives up to my expectations, I didn’t expect it to revolutionise my light painting, but I did expect it to be worth the financial outlay in terms of it’s quality of construction and operation, and it is. Above all, I hope it’s success as a business project will inspire other manufacturers to realise that there is a vast untapped market for quality light painting tools out there.
Bottom Line: It’s a good piece of kit and does the job well, but you could make one yourself for less cash.

Fruity Oaty Pixels
(LPP Admin NOTE)
One other subject that should be noted are the incredible opportunities Pixelstick offers in the field of stop motion animation using its ‘Increment’ feature as seen in the video below, create by Bitbanger Labs. Check it out and to get your own head on over HERE.


Joerg says “It´s hard to do a 100% perfect round circle in a real performance, so you can see the sequences are hopping a little bit. You have to move exactly to end on 360° where you started at 1°, is very tricky. That´s light painting as I know it, it need´s a well prepared and correctly accomplished movement in the dark – if the light painter has moved all fine, the result is awesome. I can tell you, I work hard on perfect movements and the results are getting better and better!”
The film making process was not without a few fails. Joerg says “sometimes my steps were not good enough, sometimes the lamp crashed to a tree or a wall so I would have to redo the production”. In one of the more notable re-takes one of Joerg’s horses walked over in the field to see what all the lights were about… Check out the animated gif of the horse incident and the full Light Lasso film below!


What do you get when you combine Hugo Baptista, Cisco LightPainting, Darren Pearson, Will Wildmot, a light painting workshop, 3 hours of shooting, 12 Nikon cameras, 9 Canon camera, 1400 photos, and 30 hours of post-production? One really cool piece of Light Painting Bullet-Time Stop-Motion Animation. This piece was created at the 1st International LightArt and Light Painting Convention held in Oviedo, Spain. The event was organized by the LPWA (click here)to read a detailed closing report of the event.. For more about on the background of the bullet time lapse project check out the interview below…


LPP ∇ Hugo I just saw your Bullet Time Lapse you create at the LightArt Congress in Oviedo Spain this year awesome work what inspired the idea and how did the project come together?
HB ∇ As you probably know the term bullet-time comes from that scene in The Matrix where Neo dodges bullets. When I first saw it in 99 I thought I want to do that one day. And that’s how I can now dodge bullets…lol
Seriously, Eric Pare and Patrick Rochon have made great bullet-time videos with light painting and of course they were also a big part of the inspiration. Unfortunately the budget required for such a feat with a large number of the same cameras, lenses and an advanced triggering system with live viewing often exceeds what many clients are ready to spend. When I was in talks with the Oviedo LightArt congress organizers about how to go about this project we decided it would be feasible to crowd-source this with workshop attendees. Not only was it feasible but it was more inclusive too in a workshop setting. To make it work we needed to have the attendees bring along camera/lens combinations with approximately the same field of view. That is why we required a complete list of camera(s) and lense(s) on the sign up form so I could request the most common. We ended up with 12 Nikons and 9 Canons and diverse lenses that I tried to keep at approx. 18mm.
LPP ∇ Oh wow this created as part of a Light Painting workshop?
HB ∇ Yes. A 3 hour workshop designed to be all about doing and not so much about talking given the little time available. Here is a more detailed explanation of the process: http://www.oddballgraphics.com/?works=crowdsourcing-a-bullet-time-stop-motion-video
LPP ∇ Who were the other light painters that were involved?
HB ∇ I was very happy to have Cisco Light Painting (left) and Darren Pearson (right) agree to LP behind two dancers from ZigZag dance group while Will Wildmot helped with the setup as well as being responsible for a side light.
LPP ∇ How did you set it up, it must have been very difficult working with so many different people and camera?
HB ∇ Yes, Particularly the language barrier was an issue since not everyone understood English and my Portuguese masked with a Spanish accent wasn’t clear to everyone. That lead to a misunderstanding with two members of the Canon row who set their cameras to 80mm instead of 18mm. That’s why I didn’t use that row in the bullet-time. I should have printed the settings for everyone to read like I originally planned but I naively thought it could be done verbally. The first hour was spent aligning the cameras in a semi-circle, pointing the cameras at a ping pong ball on a tripod and making sure they were at the same height and same distance from each other.
LPP ∇ What kind of light painting tools did you use?
HB ∇ I made a custom tool consisting of a transparent hose, two handles and a double DLW from Michael Ross. Cisco and Darren were using their own tools.
LPP ∇ Do you plan on doing more of these workshops?
HB ∇ I sure do. But not necessarily using this format. I want to do it with many more cameras in a wide open space next time.
LPP ∇ How were the images put together in post?
HB ∇ The first stage is importing all the raws in Lightroom and organize them by camera number. Then I’ll approximate the settings so that the different cameras/lenses match. I then created a 1400 photo quick collection making sure to not select accidental shots and to not include sequences that were missing shots as was the case with some. I found pretty soon that some cameras had moved slightly between exposures which meant copying crop settings wouldn’t work as it did with all other settings. I knew a considerable amount of editing would be needed so I decided to go all the way and crop all the photos one by one based on where the action was taking place which meant this bullet-time would have a variable center of rotation. I liked this effect in early tests so I went with it. I then exported the quick collection to a 4K sequence and further edited it with After Effects and Twixtor.
LPP ∇ Woah thats a tremendous about of work! How long did it take to put everything together to make the final video?
HB ∇ About 30 hours (excluding the many hours of rendering)
LPP ∇ What was the most important thing you learned from this experience?
HB ∇ I met many people from around the world who are very passionate about light painting but also many who were just starting, all working together for a greater goal. I learned that the Spanish LP community is brewing with incredible talent and was inspired to see how committed everyone was.
LPP ∇ Is there anything you would do differently next time you make a Light Painting Bullet Timelapse?
HB ∇ If I have the budget to do it for a commercial project yes, pretty much everything would be different but next time I use this workshop format I will definitely not forget to write the settings down on unambiguous pieces of paper!
LPP ∇ Its a really great piece of work! Thank for taking the time to answer some questions.
To keep up to date on the NEXT light painting workshop and for more amazing work Check out Hugo’s website OddBallGraphics.com

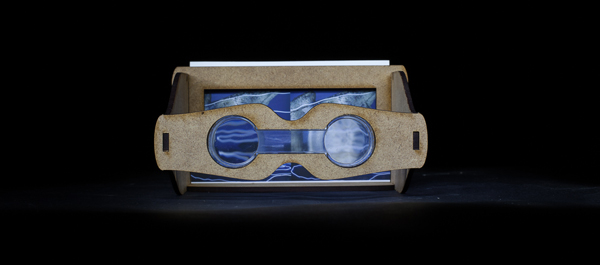
A few years ago I met Jadikan at an art show, we were talking about light painting when he pulled me into a back room to show me a secret project he was working on. Jadikan showed me this ancient looking contraption that was like a wooden version of a Viewmaster toy I had when I was a kid. This old contraption turned out to be a stereoscopic viewer! When I looked inside I saw my first ever analog 3D light painting! Of corse I immediately started running away to try and steal it but he caught me so I had to give it back. A Stereoscopic viewer holds an image known as a stereogram. Basically how it all works is you shoot two images of the exact same scene that are at a slightly different angle from one another, when you put them side by side in the viewer your brain turns the two images into one image with extreme depth.
A 3D light painting was a very exciting thing to see for the first time and I wanted to learn more so I asked a bunch of questions, Jadikan was rightfully quiet about the project and just showed me enough to make my mind race. Now thanks to the SOLID-LIGHT Project I have the answers to all those questions that raced in my mind some 3 years ago. Check out the images, interview, and video below.
LPP ∇ I’m sooooo excited to see this project ready for release, tell me what is behind the Solid-Light Project and who is involved?
JLP ∇ The Solid Light Project’s purpose is: To promote 3D pictures/content with an original stereoviewer.
Behind the “Solid One”‘s step, The Light Painting Photography was created by myself and photographer JF Delamarre, the website was made by another friend and the viewer is from me (using laser cutting machine in a Fab Lab)
LPP ∇ Where the idea come from ?
JLP ∇ I have been interested in stereo photography since I discover it. My first attempt was in 2008, when I had a second digital camera available for the first time. A few months later, I met a guy who was practicing stereo photography with an old film camera on medium format.
LPP ∇ Shooting stereoscopic film has to be pretty difficult? How does that work?
JLP ∇ You have to cut the film and display it correctly between 2 pieces of thin glass to be insert in an old steroviewer.
Not an easy job but when you see inside the viewer, it is just amazing how the depth and the detail jump out at your eyes on the 120 inversible film with magnifying glasses.
LPP ∇ What kind of camera are you shooting with?
JLP ∇ So we started to shoot together with his “Stereflektoskop” from the 30’s. From 2009 to 2014, we have learned a lot about 3D pictures and shot rolls and rolls of film (always invertible) at the same time, I found a few other medium format cameras in specialised shops on the internet.
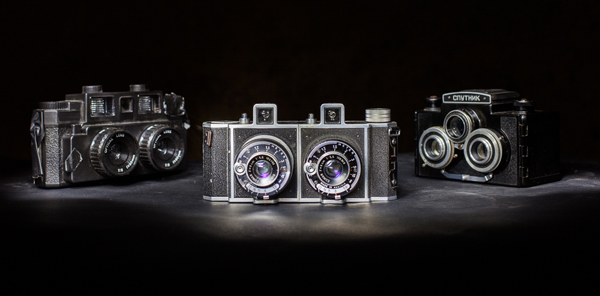
LPP ∇ How did the project progress into what we see now in the Solid-Light Project?
JLP ∇ As I was started to understand the full process of stereophotography, I wanted to find a way to share thoses 3D works at exhibitions.
Using prints or screens instead of the original film will allow to show easily in different places without the original.
I experimented with different viewers on the market, built a few others by hand and I finally discovered a way to reach my goal of a personal reproducible stereo viewer when I found The Fab Lab network!
Fab Labs are a fair sharing place for computer controlled machines. (laser cutting, 3D printing …)
I went to the closest Fab LAB to start designing a Stereoviewer. It took a few months with different versions to finally present Solid One in a kit – for prints or for using with a smartphone (compatible size).
LPP ∇ How does it work if someone wants to make their own viewer?
JLP ∇ I made the plans available for people want to make their own.
People have 2 choices: Download the .dxf file and use a laser cutting machine to do the job (I use a 3mm thick medium wood for the viewer) or download the pdf, print it and cut it from a 3mm foam board for example. The trickiest part is to find the lenses, I did not find reseller for one piece, so send me an email if you need a sample.
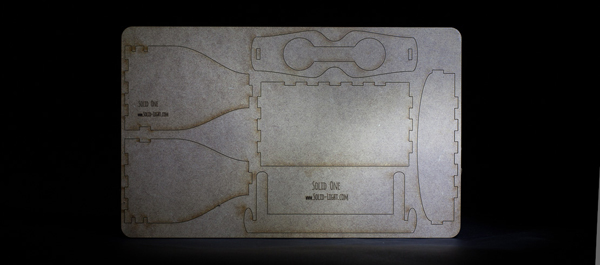
LPP ∇ Whats next for this project?
JLP ∇ The next step of Solid Light is not fully determined, but I have in mind to collaborate with a painter artist to make with “his” 3D boxes. (inside/outside/shape) I also want this tool can be used by other photographers/artists who want to show stereo artworks.
LPP ∇ This is one incredible project and I speak for all of us when I say THANK YOU for all of your hard work and especially for making the stereoscopic viewer freely available for all of us! Anything else you would like to ad?
JLP ∇ I think that this was the right time to make the final touches and launch this project because of the “google cardboard” announcement this summer… (check this out if you don’t know about it)
…Solid One is fully compatible with the Virtual Reality content displayed by google ! 😉
For more info on the Solid Light Project check out the video below and website http://www.solid-light.com/en/ stay up to date with all of Jadikans latest projects on his Facebook page HERE!

When you snap a photo on a GPS enabled device such as a fancy camera or smart phone you (knowingly or unknowingly) add a little piece of information into the metadata, the latitude and longitude coordinates.
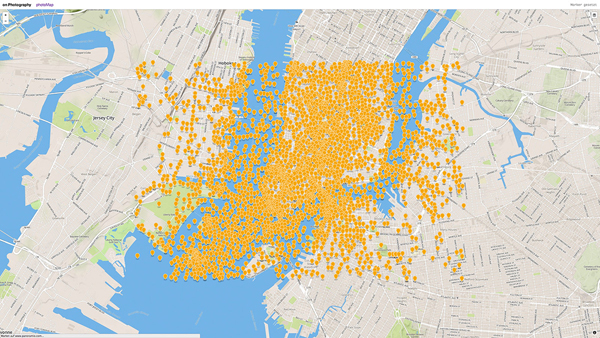
This can be great for things like location scouting or even tracking terrorist… Phillip Schmitt, who is way smarter than most people, figured out a way to create Light Painting using the information contained within these geotags by writing some code, making a phone talk to a flash and doing some other stuff I don’t really understand.
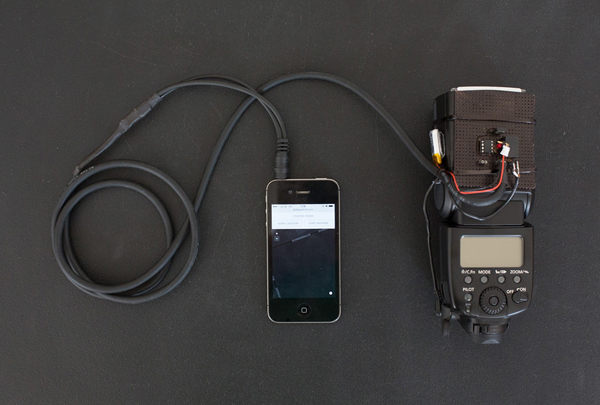
The results of his efforts are nothing short of pure light painting magic! Check out the info, video, and images below. For even more info check out Phillips website HERE!
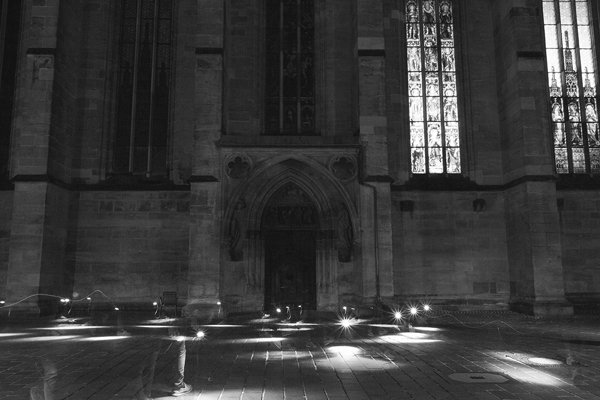
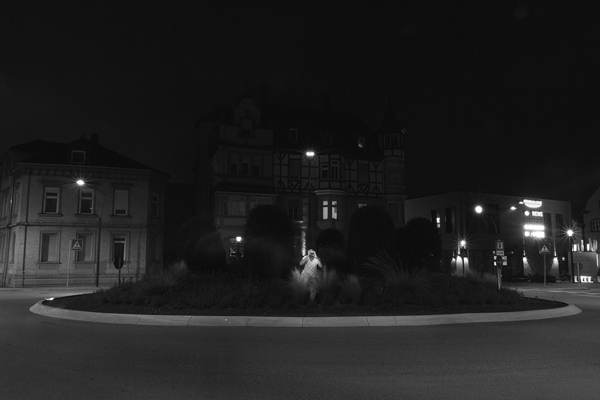
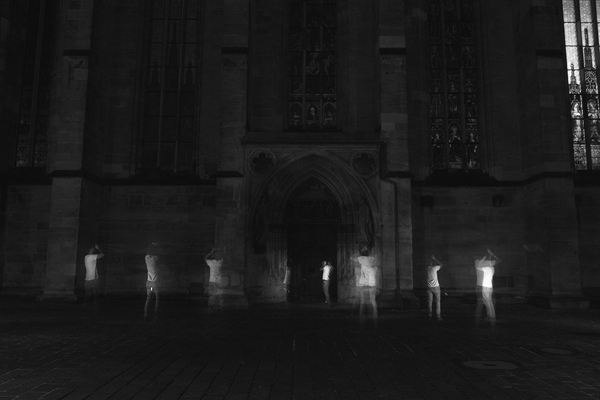
ABOUT THE PROJECT: Phillip says “I built a custom camera, flash + smartphone setup that queries the Flickr and Panoramio API for photos taken at the current geographical position. Whenever there’s a photo available, a flash is triggered. Long-exposure photographs capture multiple flash lights — each representing one geotagged photo — and situates them in the place of their origin. Using this technique, I produced two kinds of images. Those with light dots in it are mere representations of the data. The second kind has “ghost photographers” or “holograms” in it, exploring the question how it would have looked if all the photographers who uploaded their pictures had been there simultaneously.”